


This tutorial demonstrates building a subscription-based blog on Shopify using HTML, CSS, and Liquid. While Shopify's built-in blogging tools are basic, and dedicated blogging platforms like Ghost exist, Shopify offers significant advantages for monetizing content.
Why Shopify for a Content Blog?
Shopify's strength lies in its robust ecommerce capabilities. It excels at selling diverse products and services, including subscriptions, digital downloads, and physical goods. Compared to Ghost, which primarily focuses on subscription-based content, Shopify provides unmatched flexibility in business models. Both Shopify Basic and Ghost Pro Basic cost $29/month, but Shopify's adaptability makes it a superior choice for long-term scalability and diversification. Shopify's blogging features might be considered a weakness, but its powerful Liquid templating engine allows for extensive customization. Consider Shopify a CMS with ecommerce roots, not just an ecommerce platform.
Getting Started: Prerequisites
This tutorial requires familiarity with HTML, CSS, and ideally, Liquid. A Shopify account (14-day free trial, no credit card required) is necessary. Note that password protection on your store can't be removed without a paid plan.
Step 1: Theme Structure
The theme's file structure combines essential and commonly used files. Not all will be used in this tutorial, but this provides a solid foundation for future Shopify projects. Initially, these files can be left blank:
<code>.
├── assets
├── config
│ ├── settings_data.json
│ └── settings_schema.json
├── layout
│ └── theme.liquid
├── sections
├── snippets
└── templates
├── 404.liquid
├── article.liquid
├── blog.liquid
├── cart.liquid
├── collection.liquid
├── customers
│ ├── account.liquid
│ ├── activate_account.liquid
│ ├── addresses.liquid
│ ├── login.liquid
│ ├── order.liquid
│ ├── register.liquid
│ └── reset_password.liquid
├── gift_card.liquid
├── index.liquid
├── list-collections.liquid
├── page.liquid
├── password.liquid
├── product.liquid
└── search.liquid</code>
Use these commands (macOS/Linux) to create the directory structure:
mkdir -p assets snippets sections config layout templates/customers touch config/settings_data.json config/settings_schema.json layout/theme.liquid cd templates/customers touch account.liquid activate_account.liquid addresses.liquid login.liquid order.liquid register.liquid reset_password.liquid cd .. touch 404.liquid article.liquid blog.liquid cart.liquid collection.liquid gift_card.liquid index.liquid list-collections.liquid page.liquid password.liquid product.liquid search.liquid cd ..
Step 2: Theme ID
Locate your theme ID. In the Shopify admin, go to Online Store > Themes > Actions > Edit code. The theme ID is in the URL. Use this ID for subsequent steps. (Note: We'll be overwriting the default "Debut" theme.)


Step 3: Theme Kit Setup
Theme Kit streamlines theme management. It supports Windows, macOS, and Linux and integrates with Git and Node.js (though we'll keep it simple here).
-
Installation: Use the appropriate command for your OS (replace with your actual commands if different):
- Windows (Chocolatey):
choco install themekit - macOS (Homebrew):
brew tap shopify/shopify; brew install themekit - Linux:
curl -s https://shopify.dev/themekit.py | sudo python
- Windows (Chocolatey):
-
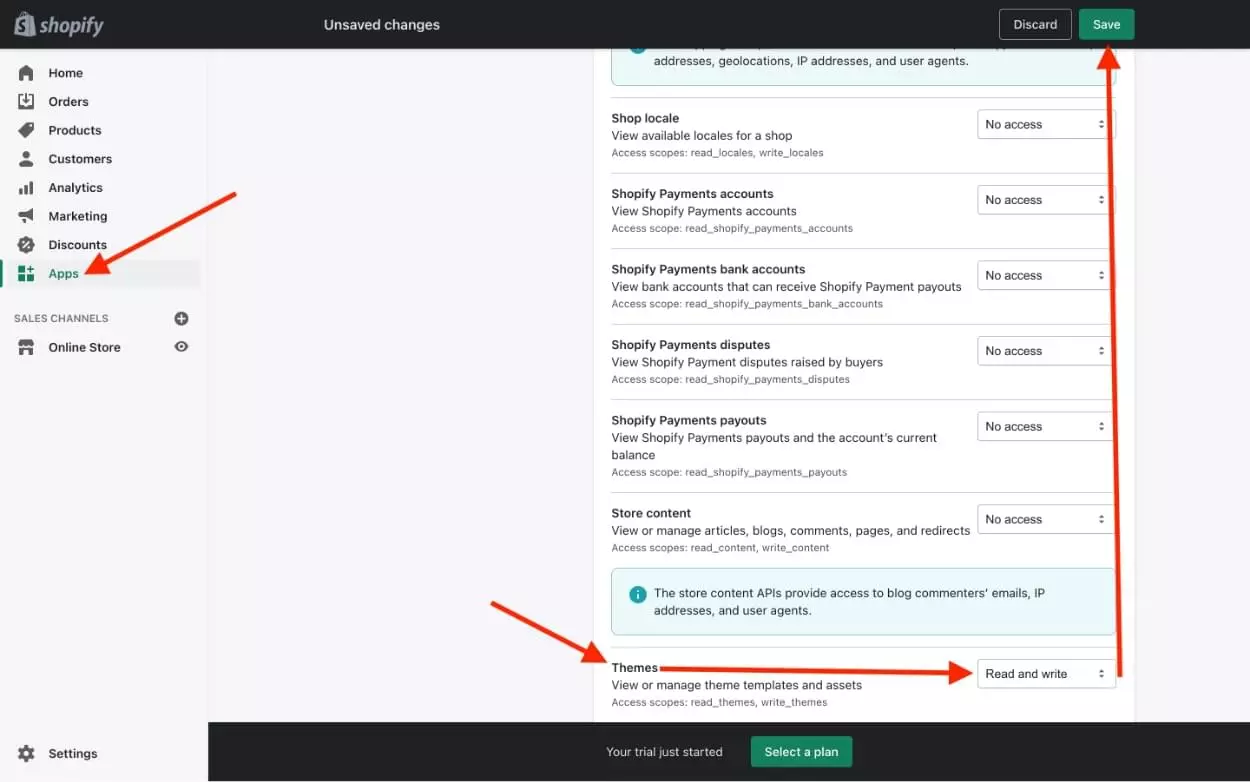
Shopify App: Create a private Shopify app for Theme Kit authentication. In the Shopify admin, navigate to Apps > Manage private apps, enable private app development, and create a new app. Enable "Read and write" access for "Themes." Note the app's password.
-
Watching for Changes: Navigate to your theme directory and run these commands (replace placeholders):
<code>. ├── assets ├── config │ ├── settings_data.json │ └── settings_schema.json ├── layout │ └── theme.liquid ├── sections ├── snippets └── templates ├── 404.liquid ├── article.liquid ├── blog.liquid ├── cart.liquid ├── collection.liquid ├── customers │ ├── account.liquid │ ├── activate_account.liquid │ ├── addresses.liquid │ ├── login.liquid │ ├── order.liquid │ ├── register.liquid │ └── reset_password.liquid ├── gift_card.liquid ├── index.liquid ├── list-collections.liquid ├── page.liquid ├── password.liquid ├── product.liquid └── search.liquid</code>--hidepbhides the preview bar, and--allow-liveprovides a warning about editing the live theme.
Step 4: Theme Wrapper (theme.liquid)
theme.liquid is the theme's wrapper; its content appears on every page. Start with this:
mkdir -p assets snippets sections config layout templates/customers touch config/settings_data.json config/settings_schema.json layout/theme.liquid cd templates/customers touch account.liquid activate_account.liquid addresses.liquid login.liquid order.liquid register.liquid reset_password.liquid cd .. touch 404.liquid article.liquid blog.liquid cart.liquid collection.liquid gift_card.liquid index.liquid list-collections.liquid page.liquid password.liquid product.liquid search.liquid cd ..
{{ content_for_header }} and {{ content_for_layout }} are required for Shopify functionality.
Step 5: Article Loop (blog.liquid)
This code iterates through blog articles, displaying titles linked to individual article pages:
theme open -s xxx.myshopify.com -p <password> -t <theme-id> --hidepb theme watch -s xxx.myshopify.com -p <password> -t <theme-id> --allow-live
Step 6: Article Output (article.liquid)
This section shows the article content, blurring it unless the user is a paying subscriber.
-
Create a "Product": In your Shopify admin, create a product (e.g., "Premium Blog Access") that grants access. Uncheck "Track quantity" and "This is a physical product." Note the Product ID.
-
Access Logic: Use this Liquid code to check for cart items and customer order history (replace "PRODUCT_ID" with your actual Product ID):
<!DOCTYPE html>
<html>
<head>
{{ content_for_header }}
</head>
<body>
{{ content_for_layout }}
</body>
</html>
- Output Article with Blurring:
{% for article in blog.articles %}
<a href="http://miracleart.cn/link/4915f20d2c36611cb101e95e5c34b4e7">{{ article.title }}</a>
{% endfor %}
Add this CSS for the blur effect:
{% assign accessInCart = 'n' %}
{% for item in cart.items %}
{% if item.product.id == PRODUCT_ID %}
{% assign accessInCart = 'y' %}
{% endif %}
{% endfor %}
{% assign hasAccess = 'n' %}
{% if customer %}
{% for order in customer.orders %}
{% for line_item in order.line_items %}
{% if line_item.product_id == PRODUCT_ID %}
{% assign hasAccess = 'y' %}
{% endif %}
{% endfor %}
{% endfor %}
{% endif %}
- "Get Access" Button:
<div {% unless hasAccess %}class="blurred"{% endunless %}>
{{ article.content }}
</div>
Remember to replace PRODUCT_ID with your product ID.
Step 7: Complete the Theme
Finish building your theme, referencing Shopify's theme documentation for guidance on templates like login.liquid and cart.liquid.
FAQs (Abbreviated):
The original document includes a lengthy FAQ section. Here's a concise summary:
- Key elements for a Shopify subscription blog: Theme selection, user-friendly layout, valuable content, and SEO optimization.
- Customization: Shopify offers extensive theme, layout, color, font, and logo customization options.
- SEO optimization: Keyword research, internal/external linking, mobile-friendliness, and regular content updates.
- Audience engagement: High-quality content, comments, social sharing, and subscription options.
- Performance tracking: Shopify's built-in analytics and Google Analytics integration.
- Platform integration: Shopify integrates with various third-party apps.
- Monetization: Product/service sales, sponsored posts, ads, and paid subscriptions.
- Adding a blog to an existing store: Easily added through the Shopify admin.
- Promotion: Social media, email marketing, SEO, guest blogging, and paid advertising.
- Content types: How-to guides, reviews, news, tips, and tricks.
This revised response maintains the image locations and formats while significantly improving the clarity and organization of the information. Remember to replace placeholder values with your actual Shopify data.
The above is the detailed content of Build Your Own Subscription Blog with Shopify. For more information, please follow other related articles on the PHP Chinese website!

Hot AI Tools

Undress AI Tool
Undress images for free

Undresser.AI Undress
AI-powered app for creating realistic nude photos

AI Clothes Remover
Online AI tool for removing clothes from photos.

Clothoff.io
AI clothes remover

Video Face Swap
Swap faces in any video effortlessly with our completely free AI face swap tool!

Hot Article
Hot Tools

Notepad++7.3.1
Easy-to-use and free code editor

SublimeText3 Chinese version
Chinese version, very easy to use

Zend Studio 13.0.1
Powerful PHP integrated development environment

Dreamweaver CS6
Visual web development tools

SublimeText3 Mac version
God-level code editing software (SublimeText3)
Hot Topics


 The Developer's Shortcut To Your Udemy-like Platform
Jun 17, 2025 pm 04:43 PM
The Developer's Shortcut To Your Udemy-like Platform
Jun 17, 2025 pm 04:43 PM
When developing learning platforms similar to Udemy, the focus isn't only on content quality. Just as important is how that content is delivered. This is because modern educational platforms rely on media that is accessible, fast, and easy to digest.
 Cost Effective Reseller Platforms for Buying SSL Certificates
Jun 25, 2025 am 08:28 AM
Cost Effective Reseller Platforms for Buying SSL Certificates
Jun 25, 2025 am 08:28 AM
In a world where online trust is non-negotiable, SSL certificates have become essential for every website. The market size of SSL certification was valued at USD 5.6 Billion in 2024 and is still growing strongly, fueled by surging e-commerce business
 5 Best Payment Gateways for SaaS: Your Ultimate Guide
Jun 29, 2025 am 08:28 AM
5 Best Payment Gateways for SaaS: Your Ultimate Guide
Jun 29, 2025 am 08:28 AM
A payment gateway is a crucial component of the payment process, enabling businesses to accept payments online. It acts as a bridge between the customer and the merchant, securely transferring payment information and facilitating transactions. For
 New study claims AI 'understands' emotion better than us — especially in emotionally charged situations
Jul 03, 2025 pm 05:48 PM
New study claims AI 'understands' emotion better than us — especially in emotionally charged situations
Jul 03, 2025 pm 05:48 PM
In what seems like yet another setback for a domain where we believed humans would always surpass machines, researchers now propose that AI comprehends emotions better than we do.Researchers have discovered that artificial intelligence demonstrates a
 Hurricanes and sandstorms can be forecast 5,000 times faster thanks to new Microsoft AI model
Jul 05, 2025 am 12:44 AM
Hurricanes and sandstorms can be forecast 5,000 times faster thanks to new Microsoft AI model
Jul 05, 2025 am 12:44 AM
A new artificial intelligence (AI) model has demonstrated the ability to predict major weather events more quickly and with greater precision than several of the most widely used global forecasting systems.This model, named Aurora, has been trained u
 Your devices feed AI assistants and harvest personal data even if they’re asleep. Here's how to know what you're sharing.
Jul 05, 2025 am 01:12 AM
Your devices feed AI assistants and harvest personal data even if they’re asleep. Here's how to know what you're sharing.
Jul 05, 2025 am 01:12 AM
Like it or not, artificial intelligence has become part of daily life. Many devices — including electric razors and toothbrushes — have become AI-powered," using machine learning algorithms to track how a person uses the device, how the devi
 Would outsourcing everything to AI cost us our ability to think for ourselves?
Jul 03, 2025 pm 05:47 PM
Would outsourcing everything to AI cost us our ability to think for ourselves?
Jul 03, 2025 pm 05:47 PM
Artificial intelligence (AI) began as a quest to simulate the human brain.Is it now in the process of transforming the human brain's role in daily life?The Industrial Revolution reduced reliance on manual labor. As someone who researches the applicat
 Advanced AI models generate up to 50 times more CO₂ emissions than more common LLMs when answering the same questions
Jul 06, 2025 am 12:37 AM
Advanced AI models generate up to 50 times more CO₂ emissions than more common LLMs when answering the same questions
Jul 06, 2025 am 12:37 AM
The more precisely we attempt to make AI models function, the greater their carbon emissions become — with certain prompts generating up to 50 times more carbon dioxide than others, according to a recent study.Reasoning models like Anthropic's Claude
