


The Laravel framework simplifies difficult web development procedures, but its true value comes from its ability to efficiently handle HTTP requests. The Laravel Request Life Cycle is a systematic procedure for converting an HTTP request into an HTTP response. Understanding this cycle is essential for developing solid, high-performing apps.
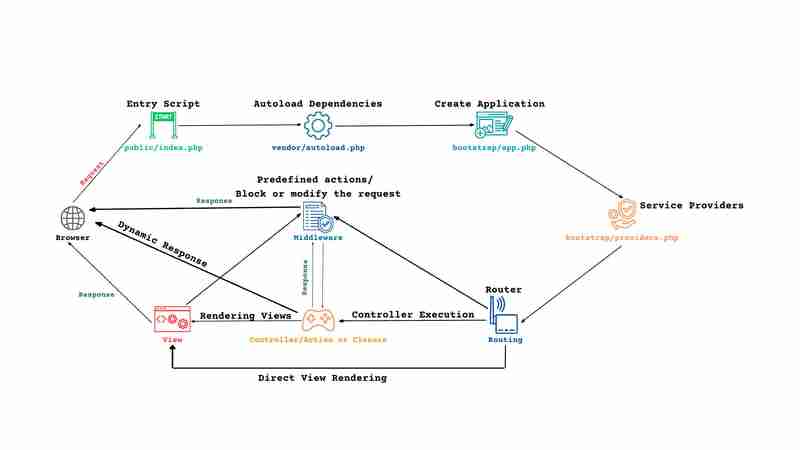
In this blog post, we will look through step-by-step request lifecycle in Laravel, as seen in the diagram below, and explain how each component contributes to the process.
?? The Life Cycle: Breaking Down Each Step
1?? Entry Script (public/index.php)
Every request in a Laravel application begins at the public/index.php file. This is the entry point for all requests, responsible for initializing the application.
2?? Autoloading Dependencies: vendor/autoload.php
The index.php file loads the vendor/autoload.php file, which is created by Composer. This file ensures that all of the application's classes and packages are available.
3??Create Application (bootstrap/app.php)
Next, the application is created in the bootstrap/app.php file. This file loads the necessary configuration settings and prepares the Laravel application to receive incoming requests.
4?? Service Providers (bootstrap/providers.php)
The service providers take over at this stage, ensuring that:
- Core Services (like routing and authentication) are registered.
- Custom Features (like user-defined services or event listeners) are configured. They ensure the application is fully prepared to handle the incoming request efficiently.
5?? Routing
Once the service providers have completed their tasks, the request is passed to the Router. The router evaluates the incoming request and matches it to the suitable route.
- Controller Execution: If a controller is associated with the route, it performs the necessary action.
- Direct View Rendering: In some cases, routes may render a view without using a controller.
6?? Middleware
Middleware can optionally interact in the request's lifetime.
- It performs specific tasks before the request reaches the controller or view.
- Middleware can also block or modify the request if specific criteria are satisfied (for example, authentication checks). After the controller sends a response, middleware can gather it and handle it before it is returned to the browser.
7?? Controller & Response
The controller processes the request and generates a response.
- Dynamic Response: The controller action may include logic that generates dynamic responses or data.
- Rendering Views: In many cases, the controller renders a view and returns an HTTP response.
8?? Returning the Response
Finally, the response is sent back to the user's browser. This could be a view generated by the controller or a direct response from the route. If middleware is present, it will handle the response before it reaches the browser.
? Laravel Request Life Cycle
Conclusion
The Laravel Request Life Cycle is the basis of all Laravel applications. Each step, from application initialization to view rendering, is essential for ensuring that requests are handled smoothly and efficiently. Understanding this lifecycle enables developers to:
- Optimize their applications' performance.
- Debug issues effectively by identifying which stage is generating problems.
- Enhance functionality by using service providers, middleware, and controllers.
Whether you're a Laravel beginner or an experienced developer, understanding this lifecycle helps you to create scalable, maintainable applications.
Let me know your thoughts on this process in the comments below!
Happy coding!?
The above is the detailed content of Understanding the Laravel Request Lifecycle (Laravel. For more information, please follow other related articles on the PHP Chinese website!

Hot AI Tools

Undress AI Tool
Undress images for free

Undresser.AI Undress
AI-powered app for creating realistic nude photos

AI Clothes Remover
Online AI tool for removing clothes from photos.

Clothoff.io
AI clothes remover

Video Face Swap
Swap faces in any video effortlessly with our completely free AI face swap tool!

Hot Article
Hot Tools

Notepad++7.3.1
Easy-to-use and free code editor

SublimeText3 Chinese version
Chinese version, very easy to use

Zend Studio 13.0.1
Powerful PHP integrated development environment

Dreamweaver CS6
Visual web development tools

SublimeText3 Mac version
God-level code editing software (SublimeText3)
Hot Topics


 What are some best practices for versioning a PHP-based API?
Jun 14, 2025 am 12:27 AM
What are some best practices for versioning a PHP-based API?
Jun 14, 2025 am 12:27 AM
ToversionaPHP-basedAPIeffectively,useURL-basedversioningforclarityandeaseofrouting,separateversionedcodetoavoidconflicts,deprecateoldversionswithclearcommunication,andconsidercustomheadersonlywhennecessary.StartbyplacingtheversionintheURL(e.g.,/api/v
 How do I implement authentication and authorization in PHP?
Jun 20, 2025 am 01:03 AM
How do I implement authentication and authorization in PHP?
Jun 20, 2025 am 01:03 AM
TosecurelyhandleauthenticationandauthorizationinPHP,followthesesteps:1.Alwayshashpasswordswithpassword_hash()andverifyusingpassword_verify(),usepreparedstatementstopreventSQLinjection,andstoreuserdatain$_SESSIONafterlogin.2.Implementrole-basedaccessc
 What are weak references (WeakMap) in PHP, and when might they be useful?
Jun 14, 2025 am 12:25 AM
What are weak references (WeakMap) in PHP, and when might they be useful?
Jun 14, 2025 am 12:25 AM
PHPdoesnothaveabuilt-inWeakMapbutoffersWeakReferenceforsimilarfunctionality.1.WeakReferenceallowsholdingreferenceswithoutpreventinggarbagecollection.2.Itisusefulforcaching,eventlisteners,andmetadatawithoutaffectingobjectlifecycles.3.YoucansimulateaWe
 What are the differences between procedural and object-oriented programming paradigms in PHP?
Jun 14, 2025 am 12:25 AM
What are the differences between procedural and object-oriented programming paradigms in PHP?
Jun 14, 2025 am 12:25 AM
Proceduralandobject-orientedprogramming(OOP)inPHPdiffersignificantlyinstructure,reusability,anddatahandling.1.Proceduralprogrammingusesfunctionsorganizedsequentially,suitableforsmallscripts.2.OOPorganizescodeintoclassesandobjects,modelingreal-worlden
 How can you handle file uploads securely in PHP?
Jun 19, 2025 am 01:05 AM
How can you handle file uploads securely in PHP?
Jun 19, 2025 am 01:05 AM
To safely handle file uploads in PHP, the core is to verify file types, rename files, and restrict permissions. 1. Use finfo_file() to check the real MIME type, and only specific types such as image/jpeg are allowed; 2. Use uniqid() to generate random file names and store them in non-Web root directory; 3. Limit file size through php.ini and HTML forms, and set directory permissions to 0755; 4. Use ClamAV to scan malware to enhance security. These steps effectively prevent security vulnerabilities and ensure that the file upload process is safe and reliable.
 How can you interact with NoSQL databases (e.g., MongoDB, Redis) from PHP?
Jun 19, 2025 am 01:07 AM
How can you interact with NoSQL databases (e.g., MongoDB, Redis) from PHP?
Jun 19, 2025 am 01:07 AM
Yes, PHP can interact with NoSQL databases like MongoDB and Redis through specific extensions or libraries. First, use the MongoDBPHP driver (installed through PECL or Composer) to create client instances and operate databases and collections, supporting insertion, query, aggregation and other operations; second, use the Predis library or phpredis extension to connect to Redis, perform key-value settings and acquisitions, and recommend phpredis for high-performance scenarios, while Predis is convenient for rapid deployment; both are suitable for production environments and are well-documented.
 What are the differences between == (loose comparison) and === (strict comparison) in PHP?
Jun 19, 2025 am 01:07 AM
What are the differences between == (loose comparison) and === (strict comparison) in PHP?
Jun 19, 2025 am 01:07 AM
In PHP, the main difference between == and == is the strictness of type checking. ==Type conversion will be performed before comparison, for example, 5=="5" returns true, and ===Request that the value and type are the same before true will be returned, for example, 5==="5" returns false. In usage scenarios, === is more secure and should be used first, and == is only used when type conversion is required.
 How do I stay up-to-date with the latest PHP developments and best practices?
Jun 23, 2025 am 12:56 AM
How do I stay up-to-date with the latest PHP developments and best practices?
Jun 23, 2025 am 12:56 AM
TostaycurrentwithPHPdevelopmentsandbestpractices,followkeynewssourceslikePHP.netandPHPWeekly,engagewithcommunitiesonforumsandconferences,keeptoolingupdatedandgraduallyadoptnewfeatures,andreadorcontributetoopensourceprojects.First,followreliablesource
