


At this time of year, when the forthcoming version of macOS is made available in beta versions, many users want to try it out. If you’re a developer, you need to test your software to make sure it’s compatible with the next version of macOS. Apple gives you plenty of time to do this. The first beta of macOS Sequoia was released in early June, and the official release will not occur until the fall.
Even if you’re not a developer, you may want to try out the public beta and play around with the new features. Apple allows non-developers to run these betas through its public beta program so they can get feedback from more users.
But you don’t want to run beta operating system software on a production machine; your data could be at risk. We’ve previously explained how to run macOS Sequoia in a VM—that is, in a window on your existing macOS installation. In this article, I’ll explain another method for trying out macOS Sequoia: how to add a new APFS volume to your Mac, so you can boot into the beta version of macOS Sequoia and try it out.
What is an APFS volume?
APFS is the Apple File System, which rolled out with macOS Sierra in 2017. It has many advantages for data security and efficiency, one of which is the ability to create new volumes easily. ?Unlike with previous file systems, where you had to partition a disk to make a new volume, the APFS version is non-destructive. You don’t have to erase a disk to partition it (though this was possible, in some cases, previously), and it’s easy to create a new volume with just a few clicks.
This is useful for running beta software because macOS now installs in two volumes on your Mac: a data volume and a system volume. If you open Disk Utility (in /Applications/Utilities), and select your Mac’s drive, you can see this.

There is a system volume, called a “startup snapshot,” which contains the operating system. There is also a Data volume, which contains everything other than macOS itself: all your user files. Because of this, it’s easy to create a new system volume and install another version of macOS, while still accessing your data.
Create a new APFS volume
To create a new APFS volume, select the top-level volume in the sidebar; in the above example, that would be Macintosh HD. (Don’t select the top-level entry, which, here, begins with Apple SSD, or the Container just below it.) Choose Edit > Add APFS Volume, enter a name, then click Add. You’ll see the new volume in the sidebar.

Install the macOS Sequoia beta on your new APFS volume
To install a macOS beta, you need to either have a developer account or sign up for the public beta. In either case, you can go to System Settings > General > Software Update and click the ? (info) button next to Beta Updates to select which beta program you’d like to opt into. (If your Mac is still running macOS Ventura 13.3 or earlier, you’ll need to download Apple’s macOS Beta Access Utility instead, or upgrade to the latest version of macOS Sonoma or Ventura.) Follow the instructions to install macOS Sequoia. When you launch the installer, click Show All Disks, and you should see both your Mac’s internal drive and the new APFS volume. Select that volume, and proceed with the installationimghp
Once this has completed, your Mac starts up in the beta software. You can change this at any time by selecting a new startup disk in System Preferences > Startup Disk. Or, you can choose on the fly by doing one of the following.
If you have an Intel Mac, press and hold the Option key when you turn on your Mac.
If you have an M1 or M2 Mac, press and hold the power key until you see Loading startup options.
In both cases, you’ll be able to choose which disk to start up your Mac from. But the next time you start up your Mac, it will boot using the disk selected in the Startup Disk preference pane.
You can create multiple APFS volumes on your Mac. The advantage of this approach over partitioning the drive is that APFS volumes don’t use any drive space until you put data on them. They all share the total space of the drive, so you don’t have to commit to a specific size, as with a partition.
Delete an APFS volume
When you’ve finished working with an APFS volume, you can delete it with a few clicks. Start your Mac up from a different volume, then, in Disk Utility, select the volume you want to delete and choose Edit > Deleted APFS Volume.
This way of creating APFS volumes makes it much easier to try out beta versions of macOS. You no longer need to make partitions or work off of external drives. If you have enough space to install the new operating system, it’s easy to do and efficient.
The above is the detailed content of Install macOS betas on your Mac in a new APFS volume. For more information, please follow other related articles on the PHP Chinese website!

Hot AI Tools

Undress AI Tool
Undress images for free

Undresser.AI Undress
AI-powered app for creating realistic nude photos

AI Clothes Remover
Online AI tool for removing clothes from photos.

Clothoff.io
AI clothes remover

Video Face Swap
Swap faces in any video effortlessly with our completely free AI face swap tool!

Hot Article
Hot Tools

Notepad++7.3.1
Easy-to-use and free code editor

SublimeText3 Chinese version
Chinese version, very easy to use

Zend Studio 13.0.1
Powerful PHP integrated development environment

Dreamweaver CS6
Visual web development tools

SublimeText3 Mac version
God-level code editing software (SublimeText3)
Hot Topics


 How to Save Battery on MacBook? How to Improve It?
Jun 19, 2025 am 10:15 AM
How to Save Battery on MacBook? How to Improve It?
Jun 19, 2025 am 10:15 AM
You’ve had your Mac for a few years, and you’re starting to feel the effects of your device aging—the battery doesn’t hold up as well as it used to. To avoid getting stuck with a dead Mac, you have no choice but to take your charger e
 How to Delete Focus Modes on iPhone & iPad
Jun 18, 2025 am 10:40 AM
How to Delete Focus Modes on iPhone & iPad
Jun 18, 2025 am 10:40 AM
The Focus Modes functionality comes with several pre-set options such as Work, Driving, Sleep, and users are also free to create custom ones for any scenario imaginable. Should you find yourself not needing a multitude of Focus modes—whether because
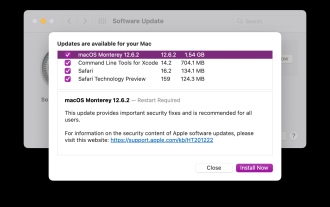 macOS Monterey 12.6.2 & macOS Big Sur 11.7.2 Available with Security Fixes
Jun 14, 2025 am 09:32 AM
macOS Monterey 12.6.2 & macOS Big Sur 11.7.2 Available with Security Fixes
Jun 14, 2025 am 09:32 AM
Apple has made available macOS Monterey 12.6.2 and macOS Big Sur 11.7.2 for users still operating on previous-generation Mac systems. These updates are offered independently of macOS Ventura 13.1.Both macOS Monterey 12.6.2 and macOS Big Sur 11.7.2 co
 How to Automatically Send Messages with Siri from iPhone Without Confirmation
Jun 20, 2025 am 09:40 AM
How to Automatically Send Messages with Siri from iPhone Without Confirmation
Jun 20, 2025 am 09:40 AM
If you trust Siri to accurately transcribe your speech into text and send it as a message, you can activate a setting that lets Siri send messages automatically from your iPhone without asking for confirmation first.With the confirmation feature enab
 Fix File Sharing Not Working in MacOS Ventura
Jun 11, 2025 am 09:49 AM
Fix File Sharing Not Working in MacOS Ventura
Jun 11, 2025 am 09:49 AM
Some users of macOS Ventura have noticed that file sharing between a Mac running macOS Ventura and other devices like iPhones, iPads, Windows PCs, and certain NAS drives such as Synology models is not functioning properly. For many individuals, confi
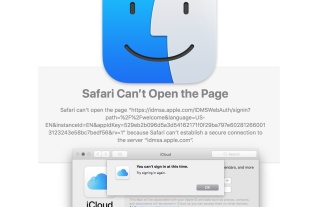 Fix iCloud Errors & “Can’t Establish Secure Connection with idmsa.apple.com” on MacOS Sierra & High Sierra
Jun 22, 2025 am 10:06 AM
Fix iCloud Errors & “Can’t Establish Secure Connection with idmsa.apple.com” on MacOS Sierra & High Sierra
Jun 22, 2025 am 10:06 AM
Some users of Mac computers running MacOS Sierra and MacOS High Sierra have reported issues when trying to log in to an Apple ID or iCloud via System Preferences, as well as problems accessing iCloud.com using Safari. In addition, Safari fails to loa
 How to Create a Bootable macOS Ventura USB Install Drive
Jun 14, 2025 am 09:46 AM
How to Create a Bootable macOS Ventura USB Install Drive
Jun 14, 2025 am 09:46 AM
Creating a bootable macOS Ventura installer can be desirable for many advanced Mac users, whether to perform clean installations, install macOS Ventura 13 onto multiple machines without having to re-download the installer, to serve as a recovery boot
 How to Upgrade from Older MacOS to MacOS Monterey (and Avoid Ventura)
Jun 11, 2025 am 10:34 AM
How to Upgrade from Older MacOS to MacOS Monterey (and Avoid Ventura)
Jun 11, 2025 am 10:34 AM
Are you using a Mac with an older version of macOS and want to upgrade to a newer one, but don’t want to install macOS Ventura? For instance, imagine you're currently running macOS Catalina, Mojave, or Big Sur on your Mac, and you'd prefer to upgrade
