


This topic might seem a bit peculiar. I mean, why should you convert your home directory into a separate partition?
Whenever you are installing Linux, the installer already selects the ‘guided‘ partitioning by default. When you go with this option, the installer places the home directory plus all the other system directories under the root ( / ) partition.
While this setup works quite well, it presents a huge risk. If your system crashes or something corrupts the root partition, all your personal files residing in the home directory are lost.
For this reason, it is important to create a separate home partition during installation. This guarantees the safety of your personal files during reinstallation of an operating system or in case the root partition crashes.
If you accepted the default option while partitioning your hard drive such that all our directories fall under the root partition, then this guide is for you.
In this guide, we will transfer the home directory to a separate partition on a newly added disk. For demonstration purposes, we will use a removable USB drive to serve the purpose of an additional drive. In the real world, this could be an SSD drive or an additional HDD that you want to be the home partition.
Let’s begin!
Step 1: Identify the Added New Drive
Before plugging in the removable drive, we only have a single hard drive (/dev/sda) with a home folder and all the system partitions mounted on the / or root partition.
Here is a glance of your hard drive configuration using the df command.
$ df -Th

Next, we will plug in the 8GB removable USB drive. This is identified as /dev/sdb and is mounted on the /media/tecmint/USB mountpoint.
To confirm this, we will run the lsblk command.
$ lsblk

The partition and mountpoint might vary according to your setup. For instance, a third drive will be indicated as /dev/sdc, a fourth one /dev/sdd and so on.
Step 2: Create a New Partition in Linux
We have newly added our second drive to our system, but in order to use it as a separate partition for our home directory, we need to create a partition on it. At the moment it doesn’t have one since it is a new drive.
The fdisk command confirms it as shown.
$ sudo fdisk -l

In the highlighted section, you can see that the new drive does not have any partition associated with it unlike the first drive which has /dev/sda1, /dev/sda2, and /dev/sda5.
Now, we will create a partition using the command:
$ sudo fdisk /dev/sdb
When prompted, press 'n' to create a new partition. Then press 'p' to specify the creation of a primary partition, and hit '1' to specify the partition number. For the next two prompts, hit ‘ENTER‘ to accept the defaults in specifying the first and last sectors.
Since my removable drive comes with the NTFS filesystem, I will remove it by pressing 'Y'. To save all the changes made, press 'w', as this writes all the changes made to the partition.

To confirm the changes made, once again, run the command:
$ sudo fdisk /dev/sdb
When prompted, press 'p' for print. This prints out the partition’s information. From the output, you can see that a new partition /dev/sdb1 has been created with Linux as the filesystem type. We need to format it to the ext4 filesystem type which we will do so in the next section.

Step 3: Format a New Partition in Linux
The next step is to format the /dev/sdb1 partition using the ext4 filesystem format. Take note that we are formatting /dev/sdb1 (the partition) and not /dev/sdb which is the removable drive.
$ sudo mkfs.ext4 /dev/sdb1

Step 4: Mount New Partition in Linux
For the drive to be accessible to the system, we need to mount it on the system’s filesystem. But first, we will create a mount point on which we will mount the partition.
$ sudo mkdir -p /srv/home
Next, we will mount the partition on the mountpoint as follows. This, in effect, makes the drive available to the system.
$ sudo mount /dev/sdb1 /srv/home
To confirm this, run the df command as shown:
$ sudo df -Th

Step 5: Copy Home Directory Files to New Partition
We now need to copy the contents of the home directory to the mount point which is now located on the drive. So, we will run the command:
$ sudo cp -aR /home/* /srv/home/
Just to confirm that everything went all we will check the contents of the home directory.
$ ls -l /srv/home/tecmint
From the output, you can clearly see that all the default directories expected to be in the home directory are present.

Step 6: Create a New Home Directory and Mount Drive
We now need to create another home directory on which we will mount our home partition. To avoid confusion, we will rename our current home directory to /home.bak shown.
$ sudo mv /home /home.bak
Next, we will create a new home directory.
$ sudo mkdir /home
We will then unmount the /dev/sdb1 filesystem and mount it to the newly created home directory
$ sudo umount /dev/sdb1
$ sudo mount /dev/sdb1 /home
To confirm that the /home directory contains the default directories, we will navigate into and list its contents:
$ cd /home
$ ls -l tecmint

Additionally, you can verify that our filesystem is mounted on the /home mount point using the df command as follows.
$ sudo df -Th /dev/sdb1

The output confirms that the /dev/sdb1 filesystem on our drive is mounted on the /home partition. However, this will not survive a reboot. To make this persistent, an additional step is required and that is to modify the /etc/fstab file with the filesystem information.
Step 7: Permanent Partition Mount in Linux
To automatically ensure that the filesystem is mounted every time upon system startup, we are going to modify the /etc/fstab file. But first, let us get the UUID of the filesystem as follows.
$ sudo blkid /dev/sdb1

Copy and paste the UUID somewhere on a text editor as this will be used in the next step.
Next, open the /etc/fstab file.
$ sudo vim /etc/fstab
Append this line to the file as shown. Replace the uid in the square brackets with the actual UUID of the /dev/sdb1 filesystem that you copied and pasted earlier on the text editor.
UUID=[ uid ] /home ext4 defaults 0 2

Save the changes and close the file. Then run the following command to mount all the partitions.
$ sudo mount -a
Now, your drive will be mounted every time on system startup on the /home partition.
$ df -h /dev/sdb1

To avoid going through all these steps, it’s always advised to have a separate home partition from the rest of the system partitions during installation in order to separate your personal files from system files. This makes it easy to recover your data should something go wrong.
The above is the detailed content of How to Convert a /Home Directory to Partition in Linux. For more information, please follow other related articles on the PHP Chinese website!

Hot AI Tools

Undress AI Tool
Undress images for free

Undresser.AI Undress
AI-powered app for creating realistic nude photos

AI Clothes Remover
Online AI tool for removing clothes from photos.

Clothoff.io
AI clothes remover

Video Face Swap
Swap faces in any video effortlessly with our completely free AI face swap tool!

Hot Article
Hot Tools

Notepad++7.3.1
Easy-to-use and free code editor

SublimeText3 Chinese version
Chinese version, very easy to use

Zend Studio 13.0.1
Powerful PHP integrated development environment

Dreamweaver CS6
Visual web development tools

SublimeText3 Mac version
God-level code editing software (SublimeText3)
Hot Topics


 10 Best File Comparison and Difference (Diff) Tools in Linux
Jun 11, 2025 am 10:26 AM
10 Best File Comparison and Difference (Diff) Tools in Linux
Jun 11, 2025 am 10:26 AM
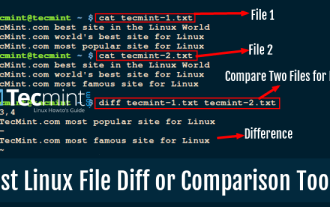
While writing program files or normal text files, programmers and writers sometimes want to know the difference between two files or two versions of the same file. When you compare two computer files on Linux, the difference between their contents is
 How to create a new, empty file from the command line?
Jun 14, 2025 am 12:18 AM
How to create a new, empty file from the command line?
Jun 14, 2025 am 12:18 AM
There are three ways to create empty files in the command line: First, the simplest and safest use of the touch command, which is suitable for debugging scripts or placeholder files; Second, it is quickly created through > redirection but will clear existing content, which is suitable for initializing log files; Third, use echo"> file name to create a file with an empty string, or use echo-n""> file name to avoid line breaks. These three methods have their own applicable scenarios, and choosing the right method can help you complete the task more efficiently.
 5 Best Open Source Mathematical Equation Editors for Linux
Jun 18, 2025 am 09:28 AM
5 Best Open Source Mathematical Equation Editors for Linux
Jun 18, 2025 am 09:28 AM
Are you looking for good software to write mathematical equations? If so, this article provides the top 5 equation editors that you can easily install on your favorite Linux distribution.In addition to being compatible with different types of mathema
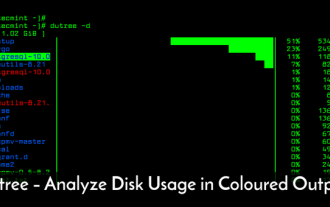 dutree - Analyze File System Disk Usage in Linux
Jun 11, 2025 am 10:33 AM
dutree - Analyze File System Disk Usage in Linux
Jun 11, 2025 am 10:33 AM
dutree is a free, open-source, fast command-line tool for analyzing disk usage, written in the Rust programming language. It was created by combining durep (disk usage reporter) and tree (list directory content in tree-like format) command-line tools
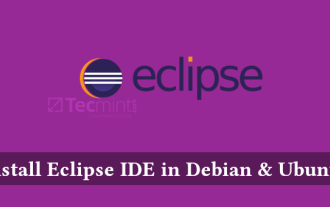 How to Install Eclipse IDE in Debian, Ubuntu, and Linux Mint
Jun 14, 2025 am 10:40 AM
How to Install Eclipse IDE in Debian, Ubuntu, and Linux Mint
Jun 14, 2025 am 10:40 AM
Eclipse is a free integrated development environment (IDE) that programmers around the world use to write software, primarily in Java, but also in other major programming languages using Eclipse plugins.The latest release of Eclipse IDE 2023?06 does
 15 Useful 'ifconfig' Commands to Configure Network in Linux
Jun 11, 2025 am 10:01 AM
15 Useful 'ifconfig' Commands to Configure Network in Linux
Jun 11, 2025 am 10:01 AM
ifconfig in short “interface configuration” utility for system/network administration in Unix/Linux operating systems to configure, manage, and query network interface parameters via command-line interface or in a system configuration scripts
 SCP Linux Command – Securely Transfer Files in Linux
Jun 20, 2025 am 09:16 AM
SCP Linux Command – Securely Transfer Files in Linux
Jun 20, 2025 am 09:16 AM
Linux administrators should be familiar with the command-line environment. Since GUI (Graphical User Interface) mode in Linux servers is not commonly installed.SSH may be the most popular protocol to enable Linux administrators to manage the servers
 24 Hilarious Linux Commands That Will Make You Laugh
Jun 14, 2025 am 10:13 AM
24 Hilarious Linux Commands That Will Make You Laugh
Jun 14, 2025 am 10:13 AM
Linux has a rich collection of commands, and while many of them are powerful and useful for various tasks, there are also some funny and whimsical commands that you can try out for amusement. 1. sl Command (Steam Locomotive) You might be aware of the
