


Virtual Networking Computing (VNC) is a remote sharing system that enables control over any internet-connected computer. Keyboard and mouse inputs can be easily transmitted between systems. This tool allows administrators and technical personnel to manage servers and desktops remotely.
VNC is an open-source application developed in the late 1990s. It is platform-independent, supporting both Windows and Unix/Linux systems. This means a standard Windows user can interact with Linux-based systems seamlessly.
[ You might also like: 11 Best Tools to Access Remote Linux Desktop ]
To use VNC, you need a TCP/IP connection and a VNC viewer client to connect to a computer running the VNC server. The server sends a duplicate of the remote display to the viewer.
This article explains how to install VNC Server using TightVNC, an improved version of the original VNC program, on RHEL-based and Debian-based Linux distributions.
Step 1: Installing the Desktop Environment
If your OS was installed minimally, providing only a command-line interface, then you must install a GUI environment like GNOME or XFCE for VNC access.
<code>$ sudo dnf groupinstall "Server with GUI"   [On <strong>RHEL/CentOS/Fedora</strong> and <strong>Rocky Linux/AlmaLinux</strong>]
OR
$ sudo apt install xfce4 xfce4-goodies      [On <strong>Debian, Ubuntu and Mint</strong>]</code>
Step 2: Installing TightVNC Server
TightVNC allows remote desktop access. Install it using the commands below:
<code>$ sudo yum -y install tigervnc-server xorg-x11-fonts-Type1  [On <strong>RHEL/CentOS/Fedora</strong> and <strong>Rocky Linux/AlmaLinux</strong>]
$ sudo apt install tightvncserver      [On <strong>Debian, Ubuntu and Mint</strong>]</code>
Step 3: Create a Normal VNC User
Create a regular user for VNC access. For example, we’ll use “tecmint” as the username.
<code>$ sudo useradd tecmint
OR
$ sudo adduser tecmint
$ sudo passwd tecmint</code>
Step 4: Set VNC Password for User
Switch to the new user and set a password specifically for VNC access.
<code>[root@tecmint ~]# su - tecmint
[tecmint@tecmint ~]$ vncpasswd
Password:
Verify:</code>
This creates a hidden .vnc directory containing a password file in the user's home folder.
Check if the file exists:
<code># ls -l /home/tecmint/.vnc
-rw------- 1 tecmint tecmint 8 Jul 14 21:33 <strong>passwd</strong></code>
Repeat this step for additional users.
Step 5: Configure VNC for Gnome
Edit the configuration file to specify session settings.
<code>$ vim ~/.vnc/config</code>
Add these lines:
<code>session=gnome
geometry=1920x1200
localhost
alwaysshared</code>
Exit from the current user back to root:
<code>$ exit</code>
Assign display ports to users in the following file:
<code># vim /etc/tigervnc/vncserver.users </code>
Set display port :1 for user tecmint:
<code># This file assigns users to specific VNC display numbers.
# The syntax is =. E.g.:
#
# :2=andrew
# :3=lisa
<strong>:1=tecmint</strong></code>
For other users, assign ports starting from :2.
Step 6: Starting the Tigervnc Server
By default, VNC uses port 5900 with ID:0 for the root user. Other users get incremented ports.
Example mapping:
<code>User's      Port's      ID's
5900        root        :0
5901        tecmint     :1
5902        ravi        :2
5903        navin       :3
5904        avishek     :4</code>
Start and enable the service for the assigned display port:
<code># systemctl start vncserver@:1 --now
# systemctl enable vncserver@:1 --now</code>
Confirm the status:
<code># systemctl status vncserver@:1</code>
Adjust port numbers accordingly for other users.
Step 7: Open VNC Ports on Firewall
Allow traffic through the firewall for each VNC user.
For user tecmint on port 5901:
<code># iptables -A INPUT -m state --state NEW -m tcp -p tcp --dport 5901 -j ACCEPT
OR
# firewall-cmd --zone=public --add-port=5901/tcp
OR
$ sudo ufw allow 5901/tcp</code>
For multiple users:
<code># iptables -I INPUT 5 -m state --state NEW -m tcp -p tcp -m multiport --dports 5902:5904 -j ACCEPT
OR
# firewall-cmd --zone=public --add-port=5902-5904/tcp
OR
$ sudo ufw allow 5901:5910/tcp</code>
Restart the firewall service:
<code># service iptables save
# service iptables restart
Or
# firewall-cmd --reload
# systemctl restart firewalld</code>
Step 8: Download VNC Client
Download and install a VNC Viewer client on your local machine.
- Download VNC Viewer
Step 9: Connect to Remote Desktop Using Client
Launch the VNC Viewer, enter the IP address of the server and the display ID (e.g., 192.168.1.100:1).

Enter the password set earlier with vncpasswd.

You are now connected to the remote desktop.

[ You might also like: How to Access Remote VNC Desktop from Web Browser Using TightVNC Java Viewer ]
The above is the detailed content of How to Install TightVNC to Access Remote Desktops in Linux. For more information, please follow other related articles on the PHP Chinese website!

Hot AI Tools

Undress AI Tool
Undress images for free

Undresser.AI Undress
AI-powered app for creating realistic nude photos

AI Clothes Remover
Online AI tool for removing clothes from photos.

Clothoff.io
AI clothes remover

Video Face Swap
Swap faces in any video effortlessly with our completely free AI face swap tool!

Hot Article
Hot Tools

Notepad++7.3.1
Easy-to-use and free code editor

SublimeText3 Chinese version
Chinese version, very easy to use

Zend Studio 13.0.1
Powerful PHP integrated development environment

Dreamweaver CS6
Visual web development tools

SublimeText3 Mac version
God-level code editing software (SublimeText3)
Hot Topics


 10 Best File Comparison and Difference (Diff) Tools in Linux
Jun 11, 2025 am 10:26 AM
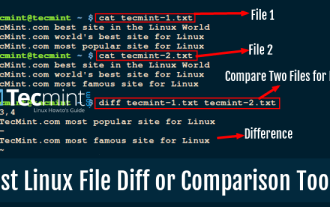
10 Best File Comparison and Difference (Diff) Tools in Linux
Jun 11, 2025 am 10:26 AM
While writing program files or normal text files, programmers and writers sometimes want to know the difference between two files or two versions of the same file. When you compare two computer files on Linux, the difference between their contents is
 How to create a new, empty file from the command line?
Jun 14, 2025 am 12:18 AM
How to create a new, empty file from the command line?
Jun 14, 2025 am 12:18 AM
There are three ways to create empty files in the command line: First, the simplest and safest use of the touch command, which is suitable for debugging scripts or placeholder files; Second, it is quickly created through > redirection but will clear existing content, which is suitable for initializing log files; Third, use echo"> file name to create a file with an empty string, or use echo-n""> file name to avoid line breaks. These three methods have their own applicable scenarios, and choosing the right method can help you complete the task more efficiently.
 5 Best Open Source Mathematical Equation Editors for Linux
Jun 18, 2025 am 09:28 AM
5 Best Open Source Mathematical Equation Editors for Linux
Jun 18, 2025 am 09:28 AM
Are you looking for good software to write mathematical equations? If so, this article provides the top 5 equation editors that you can easily install on your favorite Linux distribution.In addition to being compatible with different types of mathema
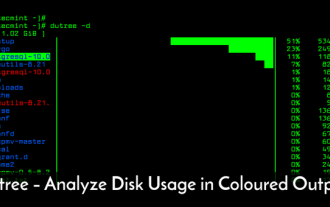 dutree - Analyze File System Disk Usage in Linux
Jun 11, 2025 am 10:33 AM
dutree - Analyze File System Disk Usage in Linux
Jun 11, 2025 am 10:33 AM
dutree is a free, open-source, fast command-line tool for analyzing disk usage, written in the Rust programming language. It was created by combining durep (disk usage reporter) and tree (list directory content in tree-like format) command-line tools
 How to Install Eclipse IDE in Debian, Ubuntu, and Linux Mint
Jun 14, 2025 am 10:40 AM
How to Install Eclipse IDE in Debian, Ubuntu, and Linux Mint
Jun 14, 2025 am 10:40 AM
Eclipse is a free integrated development environment (IDE) that programmers around the world use to write software, primarily in Java, but also in other major programming languages using Eclipse plugins.The latest release of Eclipse IDE 2023?06 does
 15 Useful 'ifconfig' Commands to Configure Network in Linux
Jun 11, 2025 am 10:01 AM
15 Useful 'ifconfig' Commands to Configure Network in Linux
Jun 11, 2025 am 10:01 AM
ifconfig in short “interface configuration” utility for system/network administration in Unix/Linux operating systems to configure, manage, and query network interface parameters via command-line interface or in a system configuration scripts
 SCP Linux Command – Securely Transfer Files in Linux
Jun 20, 2025 am 09:16 AM
SCP Linux Command – Securely Transfer Files in Linux
Jun 20, 2025 am 09:16 AM
Linux administrators should be familiar with the command-line environment. Since GUI (Graphical User Interface) mode in Linux servers is not commonly installed.SSH may be the most popular protocol to enable Linux administrators to manage the servers
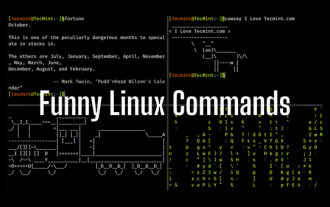 24 Hilarious Linux Commands That Will Make You Laugh
Jun 14, 2025 am 10:13 AM
24 Hilarious Linux Commands That Will Make You Laugh
Jun 14, 2025 am 10:13 AM
Linux has a rich collection of commands, and while many of them are powerful and useful for various tasks, there are also some funny and whimsical commands that you can try out for amusement. 1. sl Command (Steam Locomotive) You might be aware of the
