

Fixed the failure to upload files in Windows Google Chrome
Jul 08, 2025 pm 02:33 PM
Have problems uploading files in Google Chrome? This may be annoying, right? Whether you are attaching documents to emails, sharing images on social media, or submitting important files for work or school, a smooth file upload process is crucial. Therefore, it can be frustrating if your file uploads continue to fail in Chrome on your Windows PC.
If you're not ready to give up your favorite browser, here are some tips to fix the problem of not uploading files on Windows Google Chrome
1. Start with a general repair
Before we understand any advanced troubleshooting tips, it is best to try some of the basic solutions mentioned below.
- Troubleshooting Internet Connection Issues: Weak or unstable Internet connections may be the reason why you cannot upload files in Chrome. To test your connection, open a new tab in Chrome and navigate to the reliable Internet speed testing website. If there is a problem with your internet, consider restarting your router or switching to another network connection and try again.
- Restart Chrome: Sometimes the easiest solution is the most effective. File upload problems in Chrome may be caused by temporary browser failure. If this is the case, restarting Chrome should fix the problem.
- Clear caches and cookies: Obsolete or corrupt browsing data can also cause such problems. You can try to clear caches and cookies in Google Chrome to see if it can solve the problem.
2. Use the invisible window
One of the main advantages of using Chrome is its extensive extension support. However, not all third-party extensions are reliable. When you upload a file from a Windows PC, one of your extensions may cause Chrome to be unresponsive or crash.
To rule out this possibility, you can try using Chrome in incognito mode, which loads the browser without installing any third-party extensions. To open an Incognito window in Chrome, click the icon in the upper right corner of the three-dot menu and select New Incognito window .
After completing the above steps, see if the file can be uploaded smoothly.
5. Disable antivirus software
Many third-party antivirus programs have network protection features designed to protect you as you browse the internet. However, these antivirus programs can sometimes be invasive and prevent files from uploading in Chrome.
To check this possibility, you can temporarily disable antivirus programs on Windows. To do this, just right-click the taskbar icon of the antivirus program and select Disable > Disable until the next restart .
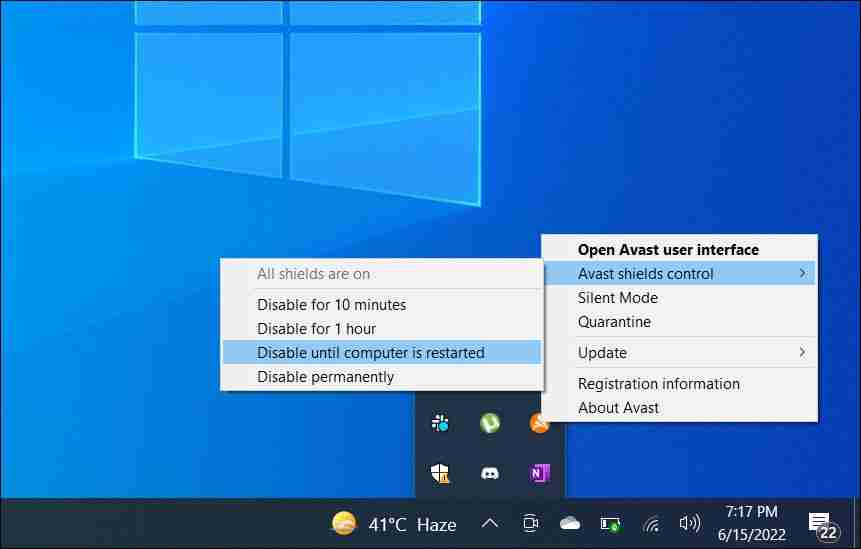
If this solves your problem, you will need to check the network protection settings in the antivirus program and make the necessary changes to avoid any issues.
6. Install any pending Google Chrome updates
Another reason you may not be able to upload files in Google Chrome is that the browser version you are using is outdated or has errors. Although Google Chrome usually updates automatically, this may not happen if you haven't closed your browser for a while.
To check for and install pending Google Chrome updates, use the following steps:
- Open Google Chrome and click the menu icon (three vertical dots) in the upper right corner.
- Select Help > About Chrome .
- Wait for Chrome to download pending updates, and then click the Restart button to install them.

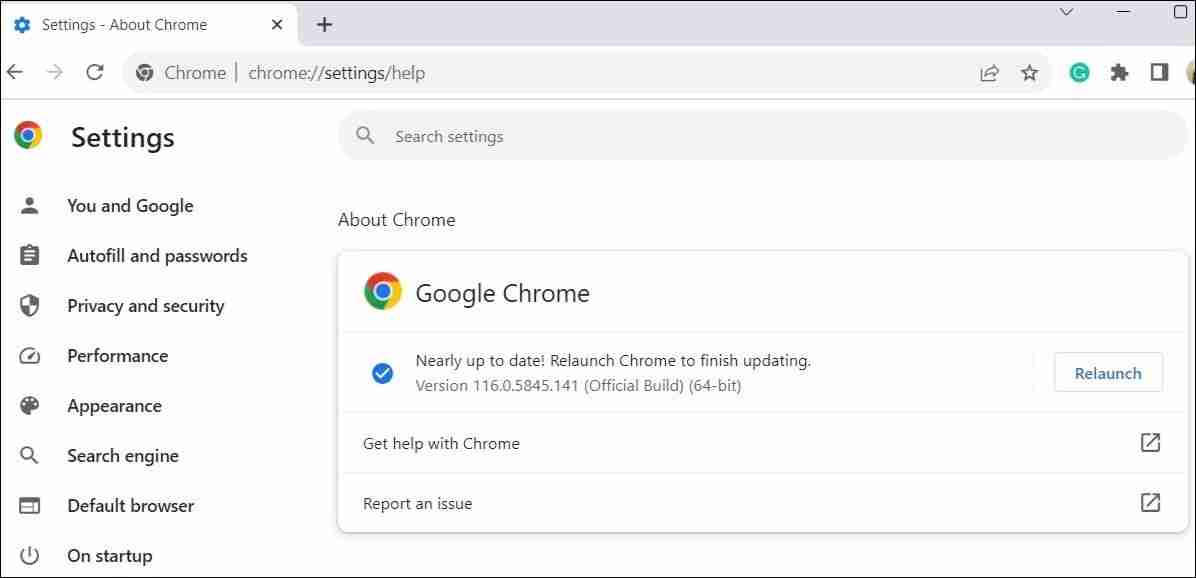
After you update Chrome, your file upload should go as expected.
7. Create a new Chrome configuration file
Issues with Chrome configuration files can also cause browser failure. This can happen if your Chrome configuration file is corrupted. You can try to create a new user profile in Chrome to see if it will solve the problem. Here's how to do this.
- Open Google Chrome and click your profile icon in the upper right corner.
- Select Add from the results menu.
- Select whether you want to log in with your account.
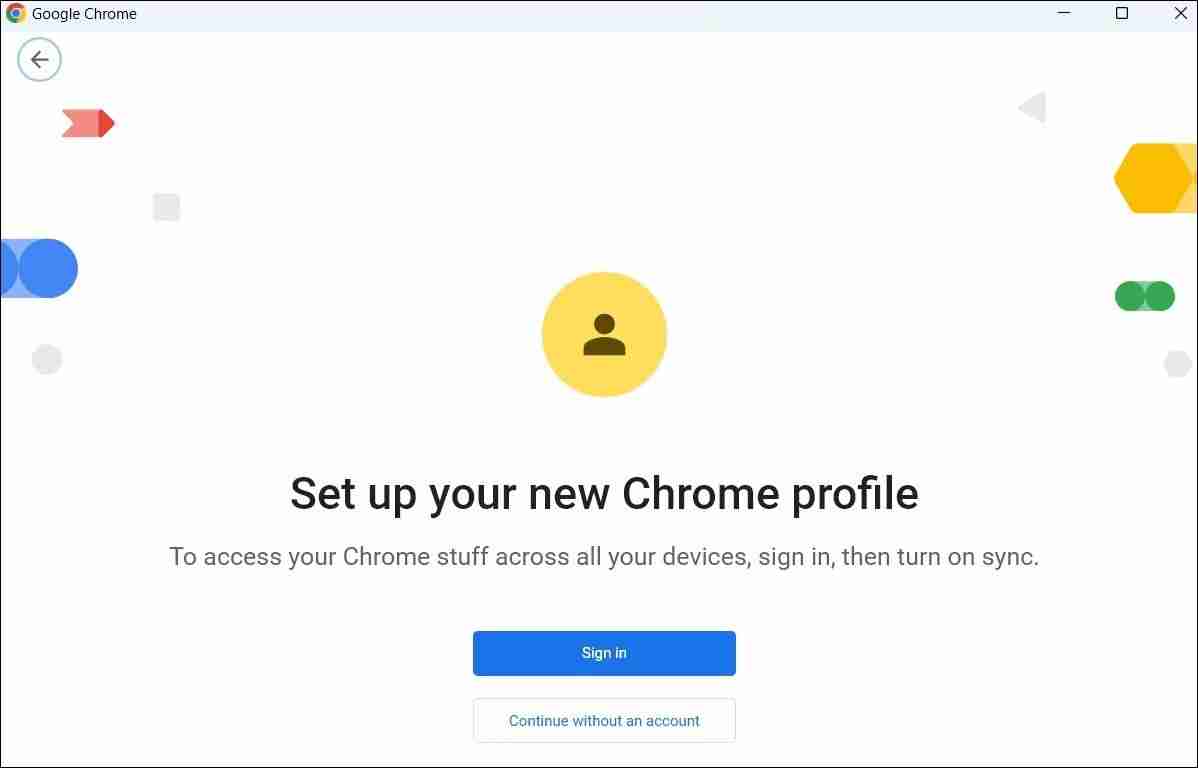
Switch to the newly created configuration file and try uploading the file again. If this solves your problem, you might consider deleting the old Google Chrome profile.
8. Reset Chrome settings
If you still can't upload files in Google Chrome, as a last resort, you can reset your browser. This will delete all your custom settings, disable extensions, and delete other temporary data. However, the bookmarks and passwords you save will not be affected, so you don't need to worry about them.
To reset Google Chrome on Windows:
- Launch Google Chrome and click the three-dot menu in the upper right corner.
- Select Settings From the Results menu.
- Select Reset from the left sidebar.
- Click Restore settings to original defaults Options in the right pane.
- Click Reset to confirm.
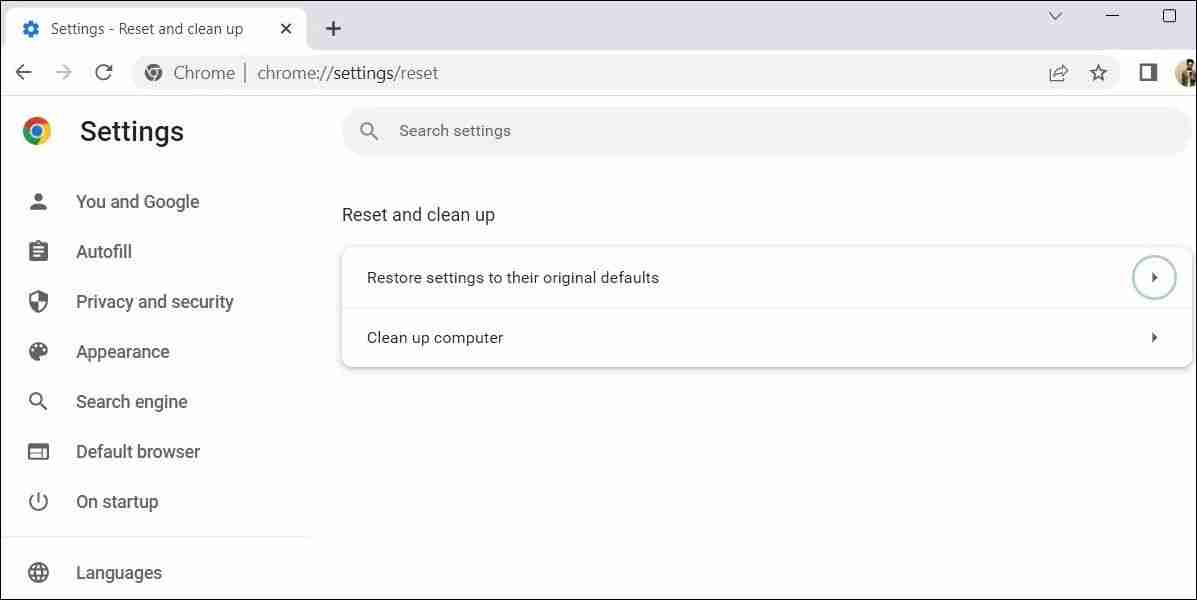
After resetting Chrome, restart it, this issue should bother you.
Experience easy uploads again with Chrome on Windows
Google Chrome may be a popular browser, but it is not without flaws. Sometimes, Chrome may disappoint you because it does not allow you to upload files from your Windows computer. Hopefully this is not the case anymore, and one of the above tips has helped fix the issue of not being able to upload files in Windows Google Chrome.
Recommended: How to Install Nextcloud on Amazon Linux 2023
The above is the detailed content of Fixed the failure to upload files in Windows Google Chrome. For more information, please follow other related articles on the PHP Chinese website!

Hot AI Tools

Undress AI Tool
Undress images for free

Undresser.AI Undress
AI-powered app for creating realistic nude photos

AI Clothes Remover
Online AI tool for removing clothes from photos.

Clothoff.io
AI clothes remover

Video Face Swap
Swap faces in any video effortlessly with our completely free AI face swap tool!

Hot Article
Hot Tools

Notepad++7.3.1
Easy-to-use and free code editor

SublimeText3 Chinese version
Chinese version, very easy to use

Zend Studio 13.0.1
Powerful PHP integrated development environment

Dreamweaver CS6
Visual web development tools

SublimeText3 Mac version
God-level code editing software (SublimeText3)
Hot Topics


 Top 10 latest rankings of regular Bitcoin trading platforms
Jun 26, 2025 pm 05:30 PM
Top 10 latest rankings of regular Bitcoin trading platforms
Jun 26, 2025 pm 05:30 PM
The top ten Bitcoin trading platforms in 2025 are ranked as follows: 1. Binance ranks first with unparalleled liquidity, rich currencies and a powerful security system, and provides diversified ecosystems including spot, derivatives, financial management, etc.; 2. OKX creates a comprehensive Web3 portal, integrating wallet, NFT, DeFi and other functions to meet users' one-stop needs, and its high-performance matching engine and reserve fund proof mechanism enhance trust; 3. Gate.io has become the first choice for investors in small currencies with more than 1,700 cryptocurrencies, and continues to innovate and launch functions such as order trading, Startup first launch; 4. Huobi maintains competitiveness with its deep brand accumulation and stable operation strategies, pays attention to compliance and security, and optimizes user experience; 5. KuC
 How to withdraw coins on the ok exchange? Detailed tutorial on withdrawing coins on ok exchange
Jul 03, 2025 pm 02:03 PM
How to withdraw coins on the ok exchange? Detailed tutorial on withdrawing coins on ok exchange
Jul 03, 2025 pm 02:03 PM
?In today's increasingly popular digital asset trading, it is particularly important to understand how to safely and effectively withdraw your digital assets. As a world-renowned digital asset trading platform, ok exchange provides convenient currency withdrawal services. This tutorial will analyze in detail the steps of withdrawing coins on the ok exchange, things to note, and some common questions and answers to help users complete asset transfer smoothly and ensure asset security. Whether you are using ok exchange for withdrawals for the first time or want to further understand the withdrawal process, this article will provide you with clear and practical guidance.
 Binance vs Huobi htx full-range in-depth comparison of handling fees, security and user experience
Jul 01, 2025 pm 12:27 PM
Binance vs Huobi htx full-range in-depth comparison of handling fees, security and user experience
Jul 01, 2025 pm 12:27 PM
Binance and Huobi HTX are the world's leading cryptocurrency exchanges, each with their own advantages. 1. Binance was established in 2017, with large transaction volume and strong liquidity, providing rich financial derivatives and comprehensive ecosystem services; 2. Huobi HTX was established in 2013, with a long history and a deep user base in the Asian market, especially in the Chinese community; 3. In terms of handling fees, both adopt a stepped rate structure, and ordinary users can enjoy discounts by holding platform coins.
 How do newbies trade cryptocurrencies? The most comprehensive guide to newbies trading in Anbi.com
Jul 03, 2025 pm 01:33 PM
How do newbies trade cryptocurrencies? The most comprehensive guide to newbies trading in Anbi.com
Jul 03, 2025 pm 01:33 PM
The digital asset market has attracted countless newcomers with its volatility and potential. If you are considering stepping into this field and making your first attempt at Anbi.com, it is crucial to understand the necessary basics. This guide will provide you with detailed introduction to the key steps for trading on Anbi.com from scratch, including account establishment, fund inbound, platform interface overview, and how to execute your first trading instructions. Mastering these basic skills is a prerequisite for participating in digital asset transactions safely and effectively.
 The latest official version of Bian Exchange v2.99.4 Bian official version Android portal
Jun 27, 2025 pm 06:27 PM
The latest official version of Bian Exchange v2.99.4 Bian official version Android portal
Jun 27, 2025 pm 06:27 PM
The official Android application of Bian Exchange can be downloaded and installed through the link provided in this article. The core features include: 1. Support a variety of mainstream and emerging cryptocurrencies; 2. Provide multiple trading modes such as spot and contracts; 3. Adopt multiple security measures to ensure asset security; 4. The interface is simple, intuitive and convenient for operation; 5. Equip with a professional customer service team. When downloading, you need to ensure security through official channels. The installation steps are: find the download file, enable installation permissions from unknown sources, start the installation process, complete the installation and run the application. For the first use, you need to register or log in to the account and bind to the secondary verification.
 Ouyi Core Portal Website Ouyi Exchange Official Website that responds to the market quickly
Jul 01, 2025 pm 08:21 PM
Ouyi Core Portal Website Ouyi Exchange Official Website that responds to the market quickly
Jul 01, 2025 pm 08:21 PM
Ouyi OKX is one of the world's well-known digital asset trading platforms, providing users with safe, stable and rich trading products. This platform is committed to ensuring the security of users' assets and transaction experience. This article will provide you with links to the official page of Ouyi OKX. Click the link provided in this article to jump directly to the official homepage, thereby starting your digital asset journey.
 How to add a new disk to Linux
Jun 27, 2025 am 12:15 AM
How to add a new disk to Linux
Jun 27, 2025 am 12:15 AM
The steps to add a new hard disk to the Linux system are as follows: 1. Confirm that the hard disk is recognized and use lsblk or fdisk-l to check; 2. Use fdisk or parted partitions, such as fdisk/dev/sdb and create and save; 3. Format the partition to a file system, such as mkfs.ext4/dev/sdb1; 4. Use the mount command for temporary mounts, such as mount/dev/sdb1/mnt/data; 5. Modify /etc/fstab to achieve automatic mount on the computer, and test the mount first to ensure correctness. Be sure to confirm data security before operation to avoid hardware connection problems.
 Ouyi APP download guide: official installation steps for Android/iOS
Jul 01, 2025 am 11:36 AM
Ouyi APP download guide: official installation steps for Android/iOS
Jul 01, 2025 am 11:36 AM
Ouyi APP is a platform that provides cryptocurrency trading and financial services. It supports various trading functions such as spot, contracts, options, and has leverage, lending, and financial management. Its interface is simple and intuitive, suitable for all kinds of users, and pays attention to technical security. To ensure safety, it is recommended to download the application through the official website. The steps for downloading and installation are as follows: 1. Visit Ouyi official website and find the "APP Download" entrance; 2. Select the corresponding download method according to the device or scan the QR code; 3. Ensure that the file source is reliable and avoid unknown sources of third parties; 4. Download from the app store and click on the installation directly to keep the network stable; 5. If the installation file needs to be manually run and authorized for installation permissions; 6. Click the icon to start the application after the installation is completed; 7. Register or log in to the account and set a strong
