ps method to change the background color of the ID photo: 1. Open the ID photo in Photoshop and copy the layer, select the copied layer; 2. Click [Image-Adjust-Replace] in the menu bar. Color]; 3. Use a straw to absorb the background color of the ID photo; 4. In the replacement area, click [Result], change the color you want, and click OK.

Today I will introduce how to use PS to change the background color of our ID photos. It has a certain reference effect and I hope it will be helpful to everyone[Recommended course: PS Tutorial】
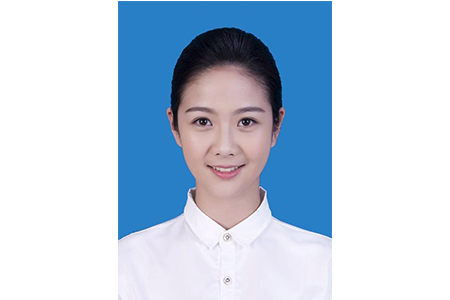
(1) First open the ID photo in Photoshop and copy the layer . Select the copied layer to replace the background color. (The picture comes from the Internet)

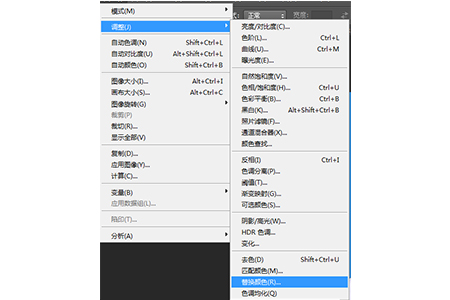
(2) Click the menu bar image--Adjust--Replace color

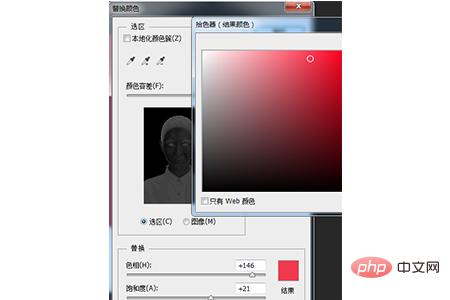
(3) Use a straw to absorb the background color of the ID photo, which is blue in this picture, and a preview selection will appear. Click on the result and change the color you want

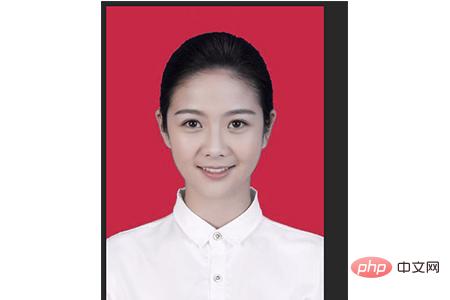
(4) Replace the color. Generally, ID photos are red, blue and white. We will replace it with red today

In this way we will replace the background color of the ID photo
Summary: The above is the entire content of this article, I hope it will be helpful to everyone .
The above is the detailed content of How to change the background color of ID photos in PS. For more information, please follow other related articles on the PHP Chinese website!

Hot AI Tools

Undress AI Tool
Undress images for free

Undresser.AI Undress
AI-powered app for creating realistic nude photos

AI Clothes Remover
Online AI tool for removing clothes from photos.

Clothoff.io
AI clothes remover

Video Face Swap
Swap faces in any video effortlessly with our completely free AI face swap tool!

Hot Article

Hot Tools

Notepad++7.3.1
Easy-to-use and free code editor

SublimeText3 Chinese version
Chinese version, very easy to use

Zend Studio 13.0.1
Powerful PHP integrated development environment

Dreamweaver CS6
Visual web development tools

SublimeText3 Mac version
God-level code editing software (SublimeText3)

Hot Topics
 How do Photoshop's Puppet Warp and Transform tools differ for manipulating image elements?
Jun 11, 2025 am 12:07 AM
Transform is suitable for basic operations such as overall deformation, scaling, and rotation, while PuppetWarp is more suitable for natural bending and stretching of the local image. Transform tools include functions such as free transformation, distortion, perspective deformation, etc., which are suitable for adjusting the overall structure, such as making the billboard fit against the wall, but are not suitable for fine local adjustments; when used, it can be combined with the Shift locking ratio and Alt zoomed from the center. PuppetWarp achieves local deformation by placing pushpins, which is suitable for adjusting the character's posture or expression, such as changing the standing posture into a sitting position; when using it, it is recommended to add more pushpins on the edges and avoid too many pushpins causing lags. It is also recommended to copy the layer to avoid destroying the original image. When selecting tools, you should judge based on needs: T is preferred for overall adjustment
 What are slices, and how were they traditionally used for web design layouts?
Jun 13, 2025 am 12:04 AM
SlicesinAdobePhotoshopwereusedtodivideweblayoutsintosectionsforexportingimagesandgeneratingHTMLtables.Theyalloweddesignerstocreaterectangularareasaroundcomponentslikelogosornavigationbars,exportthemwithcustomsettings,andproducetable-basedlayoutsthatm
 How can color profiles ensure accurate color representation from screen to print?
Jun 12, 2025 am 10:24 AM
Colorprofilesensureaccuratecolortranslationbetweendeviceslikemonitorsandprinterstomaintainconsistentoutput.Everydeviceinterpretscolordifferently,socolorprofilesactastranslators,aligningRGB(monitor)andCMYK(printer)systemsforbettercolormatching.Touseth
 How can custom brushes be created and managed within Photoshop?
Jun 20, 2025 am 12:13 AM
To create and manage custom brushes, first create a black and white image or selection and define it as a brush preset, then design the brush shape by creating a new document or selection, and then save it using "Edit - Define Brush Preset". When organizing brushes, you can open the brush panel to create new groups and organize categories; adjust brush settings such as shape dynamics, scattering, and textures to optimize effects; finally export the selected brush as .abr files through the brush preset panel for backup or sharing.
 What are the implications of image bit depth (8-bit, 16-bit, 32-bit) on quality and file size?
Jun 14, 2025 am 12:01 AM
Higherbitdepthimprovescolordetailandeditingflexibilitybutincreasesfilesize.8-bitimages(16.7millioncolors)suitwebuse,while16-bitofferssmoothergradientsandbetterediting,and32-bitsupportsHDRandcomplexlighting.1.Filesizegrowswithbitdepth:16-bitisdoublean
 What are the advantages of using linked Smart Objects versus embedded Smart Objects?
Jun 18, 2025 am 12:01 AM
The main advantages of using linked smart objects are that file management is more efficient, file size is smaller, and collaboration is more convenient. Specifically: 1. Linking smart objects to achieve cross-project updates by referring to external source files, and can be synchronized to all associated documents in one place; 2. Since the original file is not embedded in PSD, the file size is significantly reduced and the opening and processing speed is improved; 3. Support better version control and team collaboration, which facilitates the handover of resources separately without exposing the complete design. At the same time, attention should be paid to keeping the file path consistent to avoid chain breakage. In contrast, embedded smart objects are suitable for final delivery files without subsequent modifications, while linked smart objects are more suitable for long-term maintenance and multi-file collaborative work.
 How does the 'Select and Mask' workspace improve the process of refining selections?
Jun 19, 2025 am 12:05 AM
Photoshop's Select and Obscure workspace simplifies the processing of complex selections with granular edge adjustments, real-time feedback and multiple output options. First, use the "Refine Edge Brush Tool" to accurately modify hair or soft edges, and support quick adjustment of brush size and sensitivity; second, it provides multiple real-time preview modes such as overlay, black field, and ant line to facilitate timely correction; second, it quickly adjusts edge smoothness, feathering and other parameters through sliders to optimize the selection effect; finally, it supports outputting the results as selections, masks or new documents, seamlessly connecting subsequent processes.
 How do Adjustment Layers provide a non-destructive workflow for image corrections in Photoshop?
Jun 21, 2025 am 12:02 AM
AdjustmentLayersinPhotoshopareessentialfornon-destructiveeditingbecausetheyallowcolor,brightness,andcontrastadjustmentswithoutalteringoriginalpixels.1.Theyfunctionastransparentoverlaysthataffectlayersbeneaththem.2.Eachadjustmentlayerincludesamasktoco


