 WeChat Applet
 Mini Program Development
 A brief analysis of how to introduce Amap into mini programs
A brief analysis of how to introduce Amap into mini programs
Nov 23, 2021 pm 07:04 PMHow to introduce Gaode map into the mini program? This article will introduce to you how to use Amap in the WeChat applet. I hope it will be helpful to you!

Obtain the Amap user key
If you don’t have a key, you need to apply first and enter the Amap development platformlbs.amap.com/, there are detailed steps in Development Guide-> Obtain key, and you can view the key we created in Console-> Application Management-> My Application. [Related learning recommendations: 小program development tutorial]

We can encapsulate the key so that we don’t have to look for it every time. In lib Create a new config.js file in the folder
var config = {
  key: "你的key"
}
module.exports.config = config;
Import the js and key of Amap in js to call the Amap map api
var amapFile = require('../../lib/amap-wx.130.js'); //高德js
var config = require('../../lib/config.js'); //引用我們的配置文件
Get the current location
Create a Gaode map instance and name it myAmapFun
var key = config.config.key;
var myAmapFun = new amapFile.AMapWX({
    key: key
});
Call the getRegeo method
myAmapFun.getRegeo({
    success: (data) => {
        //保存位置的描述信息( longitude經(jīng)度 latitude緯度 和位置信息 )
        let textData = {};
        textData.name = data[0].name;
        textData.desc = data[0].desc
        //將獲取的信息保存
        this.setData({
          textData: textData,
          longitude: data[0].longitude,
          latitude: data[0].latitude,
          // 給該經(jīng)度緯度加上icon做標(biāo)記,并調(diào)節(jié)大小
          markers: [{
            latitude: data[0].latitude,
            longitude: data[0].longitude,
            height: 30,
            width: 35,
            iconPath: '../../imgs/locationIcon/siteA brief analysis of how to introduce Amap into mini programs'
          }]
        })
      },
      fail: function(info){
        console.log("get Location fail");
      }
    });
We can look at the successfully output data, and we can take the information according to our own needs

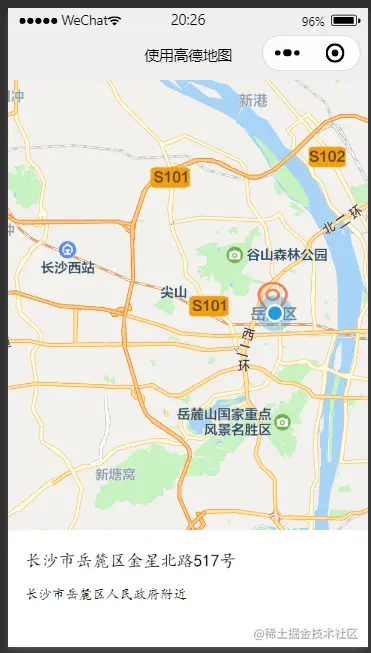
Display the map in the wxml file. The width is 100%, the height is 400px, scale is the zoom ratio of the map
<view class="map_container">
  <map class="map" name="" longitude="{{longitude}}" latitude="{{latitude}}" scale="16"  show-location="true" markers="{{markers}}">
  </map>
</view>
<view class="map_text">
  <text class="h1">{{textData.name}}</text>
  <text>{{textData.desc}}</text>
</view>
Red The marked points are the data of markers; the blue marked points are displayed with show-location="true", but there is no real device preview.

Get nearby points , only take the first ten

data: {
    # 當(dāng)前位置經(jīng)度
    longitude: "",
    # 當(dāng)前位置緯度
    latitude: "",
    # 獲取位置的標(biāo)記信息
    markers: [],
    # 獲取位置的位置信息
    poisdatas : [],
    # 簡單展示信息使用的
    textData: {}
}
Call the getPoiAround interface of Amap to obtain nearby information based on keywords
get_current_PoiAround(){
    var key = config.config.key;
    var myAmapFun = new amapFile.AMapWX({
      key: key
    });
    // getRegeo 獲得當(dāng)前位置信息(上面有用到過這個(gè)方法)
    myAmapFun.getRegeo({
      success: (data) => {
        let textData = {};
        textData.name = data[0].name;
        textData.desc = data[0].desc
        this.setData({
          textData: textData,
          longitude: data[0].longitude,
          latitude: data[0].latitude,
        })
      },
      fail: function(info){
        console.log("get Location fail");
      }
    });
    // 通過關(guān)鍵詞獲取附近的點(diǎn)
    myAmapFun.getPoiAround({
      // 改變icon圖標(biāo)的樣式,點(diǎn)擊前和點(diǎn)擊后的我都暫時(shí)設(shè)成blue.svg, 如果不設(shè)置的話,默認(rèn)就是一個(gè)紅色的小圖標(biāo)
      iconPath: '../../icon/keshan/blue.svg',
      iconPathSelected: '../../icon/keshan/blue.svg',
      // 搜索的關(guān)鍵字(POI分類編碼),在官方文檔https://lbs.amap.com/api/javascript-api/download/ 可以下載查看
      querykeywords: '購物',
      querytypes: '060100',
      success: (data) => {
        const markers = data.markers;
        const poisdatas = data.poisData;
        let markers_new = []
        markers.forEach((item, index) => {
          // 只取10個(gè)點(diǎn),超過就continue了,forEach是不能使用break和continue關(guān)鍵字的
          if( index >= 10 ){
            return;
          }
          // 將我們需要的markers數(shù)據(jù)重新整理一下存入markers_new中
          markers_new.push({
            id: item.id,
            width: item.width,
            height: item.height,
            iconPath: item.iconPath,
            latitude: item.latitude,
            longitude: item.longitude,
            // 自定義標(biāo)記點(diǎn)上方的氣泡窗口
            // display | 'BYCLICK':點(diǎn)擊顯示; 'ALWAYS':常顯 |
            callout: {
              padding: 2,
              fontSize: 15,
              bgColor: "#f78063",
              color: '#ffffff',
              borderRadius: 5,
              display: 'BYCLICK',
              content: poisdatas[index].name
            }
          })
        })
        //  將數(shù)據(jù)保存
        this.setData({
          markers: markers_new,
          poisdatas: poisdatas
        })
      },
      fail: function(info){
        wx.showModal({title:info.errMsg})
      }
    })
  },
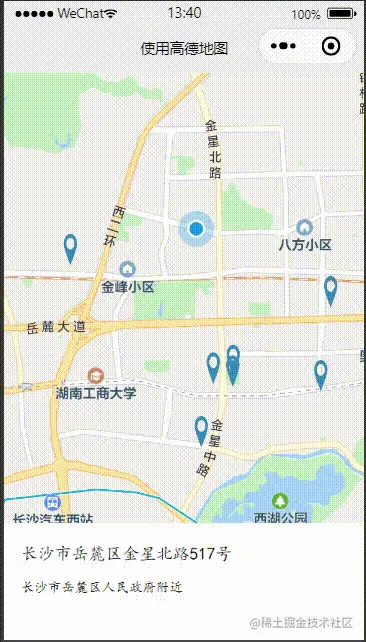
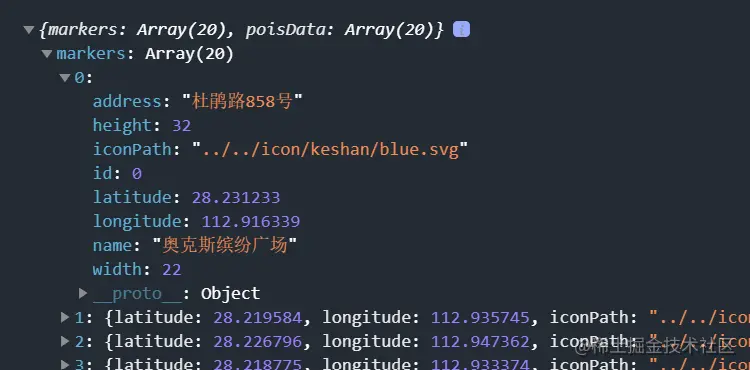
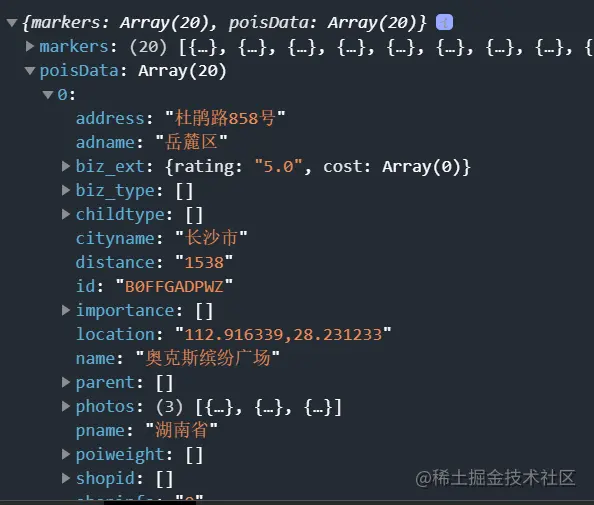
Call the getPoiAround interface to return a successful result


bindmarkertap activates the makertap icon click event and changes the content in map_text
<view class="map_container">
  <map class="map" id="map" name="" longitude="{{longitude}}" latitude="{{latitude}}" scale="16"  show-location="true" markers="{{markers}}" bindmarkertap="makertap">
  </map>

</view>
<view class="map_text">
  <text class="h1">{{textData.name}}</text>
  <text wx:if="{{textData.distance != null}}">{{textData.distance}}m</text>
  <text>{{textData.desc}}</text>
</view>
makertap activates showMarkerInfo to display mark point information, changeMarkerColor Change the color of the marker point
makertap(e) {
    var id = e.detail.markerId;
    this.showMarkerInfo(id);
    this.changeMarkerColor(id);
},
Didn’t we say that poisdatas stores the location information of the point? Once we get the ID, we can take it out and save it in textData to display
 // 展示標(biāo)記點(diǎn)信息
  showMarkerInfo(i) {
    const {poisdatas} = this.data;
    this.setData({
      textData: {
        name: poisdatas[i].name,
        desc: poisdatas[i].address,
        distance: poisdatas[i].distance
      }
    })
  },
If it is the clicked position Just replace iconPath with orange.svg, and the rest are blue.svg, and set the clicked bubble display to display ('ALWAYS'), and then save the modified data again
// 改變標(biāo)記點(diǎn)顏色
changeMarkerColor(index) {
let {markers} = this.data;
for (var i = 0; i < markers.length; i++) {
if (i == index) {
markers[i].iconPath = "../../icon/keshan/orange.svg";
markers[i].callout.display = 'ALWAYS'
} else {
markers[i].iconPath = "../../icon/keshan/blue.svg";
markers[i].callout.display = 'BYCLICK'
}
}
this.setData({
markers: markers
})
},
For more programming-related knowledge, please visit: Introduction to Programming! !
The above is the detailed content of A brief analysis of how to introduce Amap into mini programs. For more information, please follow other related articles on the PHP Chinese website!

Hot AI Tools

Undress AI Tool
Undress images for free

Undresser.AI Undress
AI-powered app for creating realistic nude photos

AI Clothes Remover
Online AI tool for removing clothes from photos.

Clothoff.io
AI clothes remover

Video Face Swap
Swap faces in any video effortlessly with our completely free AI face swap tool!

Hot Article

Hot Tools

Notepad++7.3.1
Easy-to-use and free code editor

SublimeText3 Chinese version
Chinese version, very easy to use

Zend Studio 13.0.1
Powerful PHP integrated development environment

Dreamweaver CS6
Visual web development tools

SublimeText3 Mac version
God-level code editing software (SublimeText3)

Hot Topics
 How to register for Amap
Apr 08, 2024 pm 04:39 PM
1. First install and open the Amap app on your mobile phone, click [My] and select [Login/Register]. 2. Select a mobile phone number, WeChat or Alipay to register as needed, and fill in personal information according to the prompts, including mobile phone number, password, etc. 3. After completing the filling, click [Register] to complete the account registration. 4. Afterwards, use the method selected during registration for login verification. If you register through a mobile phone number, you need to enter your mobile phone number and password to log in.
 Does Amap require mobile phone registration?
May 05, 2024 pm 05:12 PM
Yes, for security, personalized services and account management, Amap requires registration with a mobile phone number. The registration steps include: Open the Amap app, click "My" and "Login/Register", select a mobile phone number to register, enter the mobile phone number to get the verification code, set a password to complete the registration.
 Why is there no sound in the Amap navigation?
Apr 02, 2024 am 05:09 AM
The reasons why there is no sound in Amap navigation include improper speaker connection, lowering the device volume, incorrect Amap settings, background application interference, mobile phone silent or vibration mode, and system permission issues. The solutions are as follows: check the speaker connection; adjust the volume; check the Amap map settings; close background applications; check the phone mode; grant permissions; restart the device; update the Amap map; and contact customer service.
 Xiaomi CarWith joins hands with Amap to open a new era of lane-level navigation
Apr 16, 2024 pm 08:34 PM
According to news on April 16, Xiaomi users have recently welcomed a practical new feature - Xiaomi CarWith has officially launched Amap lane navigation. The launch of this service will undoubtedly bring drivers a more accurate and convenient navigation experience. According to the data, the integration of Amap and CarWith has achieved seamless connection, and users can directly experience the precise guidance of lane-level navigation without the need for additional software updates. This improvement is likely to be made on the server side, saving users the tedious update step. Car lane-level navigation is an innovative feature of Amap. It can restore the real road layout to a high degree on the screen, clearly displaying the number of lanes, ground markings, entrances and exits, special lanes and other information on the current road, providing drivers with a more comprehensive ,
 Where to change the sound on Gaode map?
May 05, 2024 pm 05:30 PM
Sound changes for the Amap map can be made directly within the application: Open the Amap map application. Click on the personal center icon. Go to Settings. Find the "Speech" settings. Choose your preferred voice pack. Tip: Amap provides sound packages in multiple languages ??and genders. After changes, the application needs to be restarted to take effect.
 Operation steps for car invoicing on Amap
Apr 01, 2024 pm 10:10 PM
1. First open the Amap and click [Route]. 2. Click [Call a Car] and click [Personal Center] on the left. 3. Click [Invoice]. 4. Check the itinerary and click [Invoice].
 How to use Amap to open family maps and share maps with family members. Methods and steps for sharing maps with family members.
May 04, 2024 pm 03:34 PM
Amap APP is a professional and easy-to-use free map navigation software. Everyone likes it very much. It has a variety of functions, which can bring great convenience to our lives. What? Inquiries about some locations, planning of routes, viewing some street view maps, or inquiries about longitude and latitude can be solved here. The operation is simple and convenient, beyond your imagination. Many times, everyone likes it. Sharing maps and location information here makes people feel more secure, which is very good. Many times, for some children or elderly people at home, it will make people more worried when they go out. , when encountering various situations, you can avoid the situation where everyone will get lost.
 How to view travel records on Amap
May 05, 2024 pm 05:21 PM
Steps to view travel records on Amap: 1. Log in to Amap; 2. Enter "My" → "My Travel"; 3. View the list of travel records; 4. Click to view details; 5. Export records (optional) .


