
 Software Tutorial
Computer Software
How to recover diskgenius data-diskgenius data recovery tutorial
Software Tutorial
Computer Software
How to recover diskgenius data-diskgenius data recovery tutorial
How to recover diskgenius data-diskgenius data recovery tutorial
Mar 06, 2024 am 09:34 AM
php editor Apple brings you diskgenius data recovery tutorial. Accidentally deleted a file? Disk corruption leading to data loss? don’t worry! diskgenius is a powerful data recovery tool that can help you easily retrieve lost files. This tutorial will introduce the data recovery function of diskgenius in detail, including how to operate it and precautions, so that you can quickly recover important data in an emergency. Let’s learn together!
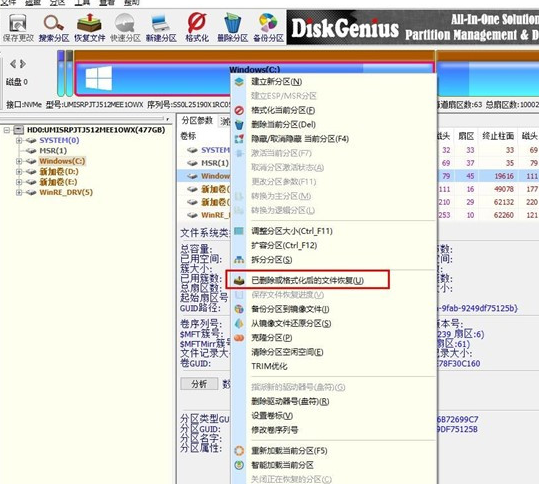
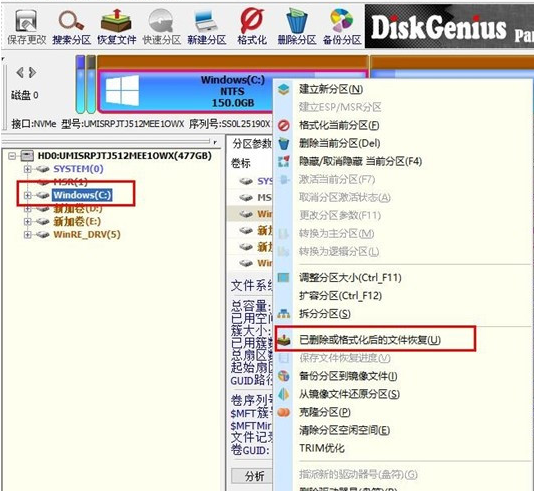
First, in the hard disk partition map above the main interface of DiskGenius, you can directly select the target partition and right-click. Then, in the shortcut menu that pops up, find and click the "Deleted or formatted file recovery" menu item, as shown in the figure.
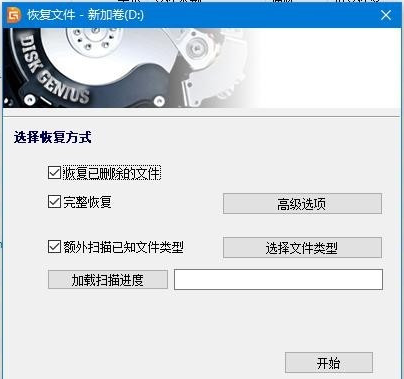
In the second step, the recovery options window pops up. Make sure to check the three options of "Recover Deleted Files", "Complete Recovery" and "Additional Scan for Known File Types".
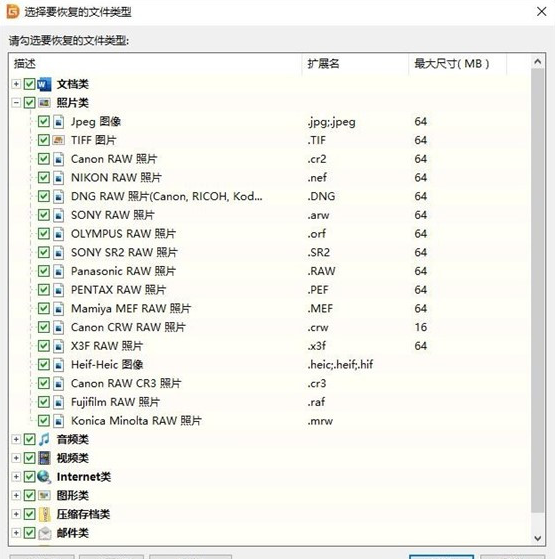
Step 3: Click the "Select File Type" button on the right and specify the file type you need to recover in the pop-up window (as shown in the picture).
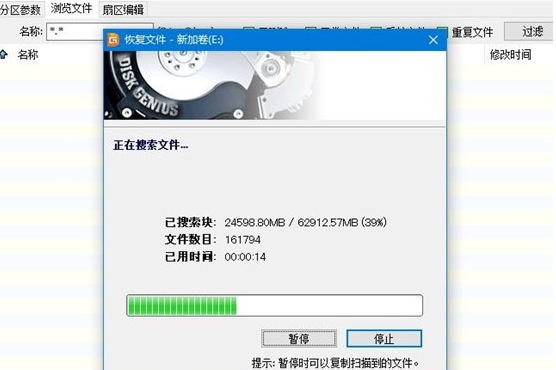
Step 4: After setting the recovery options and clicking the "Start" button, the DiskGenius software will start scanning the data in the hard disk or partition. First, a scanning window will pop up (as shown in the figure).
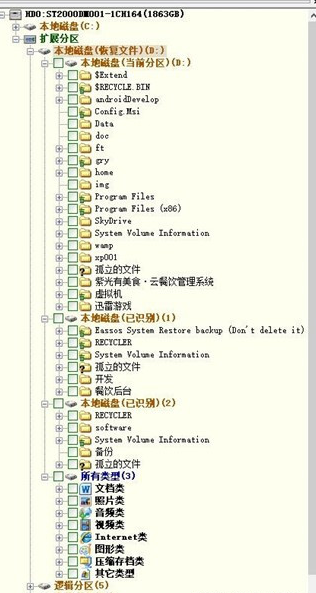
Step 5: After the scan is completed, all scanned directory structures and files in the directories will be displayed on the right (as shown in the figure).
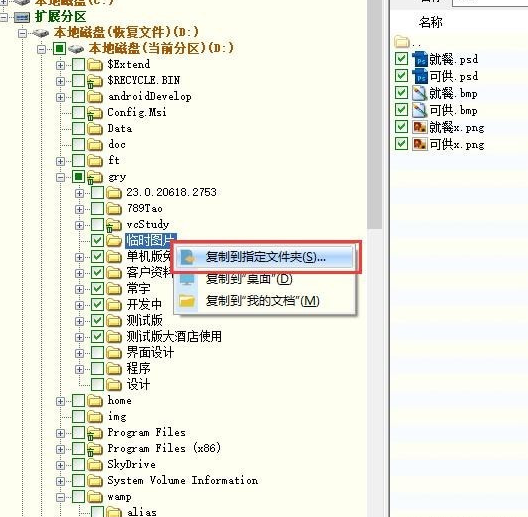
Step 6: At this point, our "data" should have been scanned, we just need to restore it. In the scan results, select the files, directories, etc. to be recovered, then right-click the mouse to copy them to the specified folder (as shown in the figure).
Step 7: Wait for the copy to be completed, and you will see the data reappear on the disk (as shown in the picture).
The above is the entire content of how to recover diskgenius data brought to you by the editor. I hope it can be helpful to everyone.
The above is the detailed content of How to recover diskgenius data-diskgenius data recovery tutorial. For more information, please follow other related articles on the PHP Chinese website!

Hot AI Tools

Undress AI Tool
Undress images for free

Undresser.AI Undress
AI-powered app for creating realistic nude photos

AI Clothes Remover
Online AI tool for removing clothes from photos.

Clothoff.io
AI clothes remover

Video Face Swap
Swap faces in any video effortlessly with our completely free AI face swap tool!

Hot Article
Hot Tools

Notepad++7.3.1
Easy-to-use and free code editor

SublimeText3 Chinese version
Chinese version, very easy to use

Zend Studio 13.0.1
Powerful PHP integrated development environment

Dreamweaver CS6
Visual web development tools

SublimeText3 Mac version
God-level code editing software (SublimeText3)
Hot Topics


 How to uninstall MySQL and clean residual files
Apr 29, 2025 pm 04:03 PM
How to uninstall MySQL and clean residual files
Apr 29, 2025 pm 04:03 PM
To safely and thoroughly uninstall MySQL and clean all residual files, follow the following steps: 1. Stop MySQL service; 2. Uninstall MySQL packages; 3. Clean configuration files and data directories; 4. Verify that the uninstallation is thorough.
 Centos stops maintenance 2024
Apr 14, 2025 pm 08:39 PM
Centos stops maintenance 2024
Apr 14, 2025 pm 08:39 PM
CentOS will be shut down in 2024 because its upstream distribution, RHEL 8, has been shut down. This shutdown will affect the CentOS 8 system, preventing it from continuing to receive updates. Users should plan for migration, and recommended options include CentOS Stream, AlmaLinux, and Rocky Linux to keep the system safe and stable.
 What are the common misunderstandings in CentOS HDFS configuration?
Apr 14, 2025 pm 07:12 PM
What are the common misunderstandings in CentOS HDFS configuration?
Apr 14, 2025 pm 07:12 PM
Common problems and solutions for Hadoop Distributed File System (HDFS) configuration under CentOS When building a HadoopHDFS cluster on CentOS, some common misconfigurations may lead to performance degradation, data loss and even the cluster cannot start. This article summarizes these common problems and their solutions to help you avoid these pitfalls and ensure the stability and efficient operation of your HDFS cluster. Rack-aware configuration error: Problem: Rack-aware information is not configured correctly, resulting in uneven distribution of data block replicas and increasing network load. Solution: Double check the rack-aware configuration in the hdfs-site.xml file and use hdfsdfsadmin-printTopo
 Detailed explanation of the installation steps of MySQL on macOS system
Apr 29, 2025 pm 03:36 PM
Detailed explanation of the installation steps of MySQL on macOS system
Apr 29, 2025 pm 03:36 PM
Installing MySQL on macOS can be achieved through the following steps: 1. Install Homebrew, using the command /bin/bash-c"$(curl-fsSLhttps://raw.githubusercontent.com/Homebrew/install/HEAD/install.sh)". 2. Update Homebrew and use brewupdate. 3. Install MySQL and use brewinstallmysql. 4. Start MySQL service and use brewservicesstartmysql. After installation, you can use mysql-u
 How to build a website for wordpress host
Apr 20, 2025 am 11:12 AM
How to build a website for wordpress host
Apr 20, 2025 am 11:12 AM
To build a website using WordPress hosting, you need to: select a reliable hosting provider. Buy a domain name. Set up a WordPress hosting account. Select a topic. Add pages and articles. Install the plug-in. Customize your website. Publish your website.
 How to update the image of docker
Apr 15, 2025 pm 12:03 PM
How to update the image of docker
Apr 15, 2025 pm 12:03 PM
The steps to update a Docker image are as follows: Pull the latest image tag New image Delete the old image for a specific tag (optional) Restart the container (if needed)
 Steps to add and delete fields to MySQL tables
Apr 29, 2025 pm 04:15 PM
Steps to add and delete fields to MySQL tables
Apr 29, 2025 pm 04:15 PM
In MySQL, add fields using ALTERTABLEtable_nameADDCOLUMNnew_columnVARCHAR(255)AFTERexisting_column, delete fields using ALTERTABLEtable_nameDROPCOLUMNcolumn_to_drop. When adding fields, you need to specify a location to optimize query performance and data structure; before deleting fields, you need to confirm that the operation is irreversible; modifying table structure using online DDL, backup data, test environment, and low-load time periods is performance optimization and best practice.
 CentOS Stream 8 troubleshooting methods
Apr 14, 2025 pm 04:33 PM
CentOS Stream 8 troubleshooting methods
Apr 14, 2025 pm 04:33 PM
CentOSStream8 system troubleshooting guide This article provides systematic steps to help you effectively troubleshoot CentOSStream8 system failures. Please try the following methods in order: 1. Network connection testing: Use the ping command to test network connectivity (for example: pinggoogle.com). Use the curl command to check the HTTP request response (for example: curlgoogle.com). Use the iplink command to view the status of the network interface and confirm whether the network interface is operating normally and is connected. 2. IP address and gateway configuration verification: Use ipaddr or ifconfi
