

VBOX_E_OBJECT_NOT_FOUND(0x80bb0001)VirtualBox error
Mar 24, 2024 am 09:51 AM
When trying to open a disk image in VirtualBox, you may encounter an error indicating that the hard drive cannot be registered. This usually happens when the VM disk image file you are trying to open has the same UUID as another virtual disk image file. In this case, VirtualBox displays error code VBOX_E_OBJECT_NOT_FOUND(0x80bb0001). If you encounter this error, don’t worry, there are some solutions you can try. First, you can try using VirtualBox's command line tools to change the UUID of the disk image file, which will avoid conflicts. You can run the command `VBoxManage internalcommands sethduuid ` to generate a new UUID. Another workaround is to edit the VirtualBox configuration file (.vbox file), find the entry related to the conflicting disk image file, and change the UUID manually. Please make sure to back up the original file before editing the configuration file in case something unexpected happens. If the above method does not solve the problem, you can also try to create a new virtual machine and
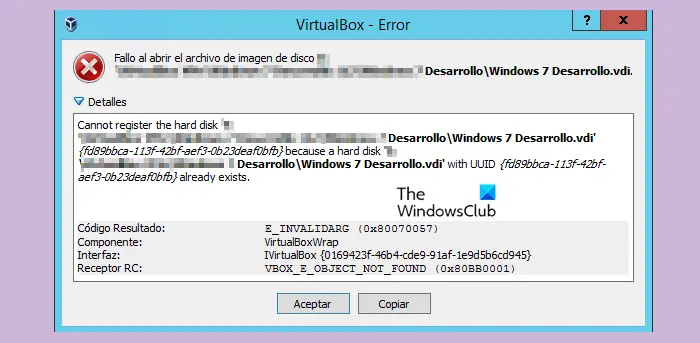
Unable to register the hard disk 'File-LocationName.vdi' {%Virtual-Disk-UUID%} because the hard disk 'File-LocationName.vdi' with UUID {%Virtual-Disk-UUID%} already exists.
Result code: E_INVALIDARG (0x80070057) Component: VirtualBoxWrapInterface: IVirtualBox {fafa4e17—1ee2—4905—a10e—fe7c18bf5554} Caller RC: VBOX_E_OBARY_NOT_FOUND (0x80BB001)"
Fix VBOX_E_OBAUTY_NOT_FOUND (0x80bb0001) VirtualBox error
If you encounter "Vbox_e_Object_Not_Found (0x80bb0001)" error in VirtualBox, please try the following solutions to resolve it:
let us start
1]Remove missing virtual disk from VirtualBox
First, we need to deal with the failed virtual disk in the virtual box. Typically, when this error occurs, Virtual Box may not recognize a specific virtual disk. By removing any missing or misconfigured virtual disks, we can ensure that VirtualBox is managing resources and configuration correctly, potentially resolving the problem. Removing the failed virtual disk from the Virtual Box is the first step in resolving this issue. Next, we can perform the following steps to remove any missing or misconfigured virtual machines: 1. Open the VirtualBox management interface and select the virtual machine that needs to be operated. 2. In the virtual machine options, select Delete or Remove the virtual machine. 3. Confirm the deletion operation and follow the prompts to complete the deletion process. 4. Make sure to back up important data before deleting the virtual machine to avoid data loss. 5. After the deletion is complete, restart VirtualBox and check whether
Hope this helps you.
2]Clone disk image using Virtual Media Manager
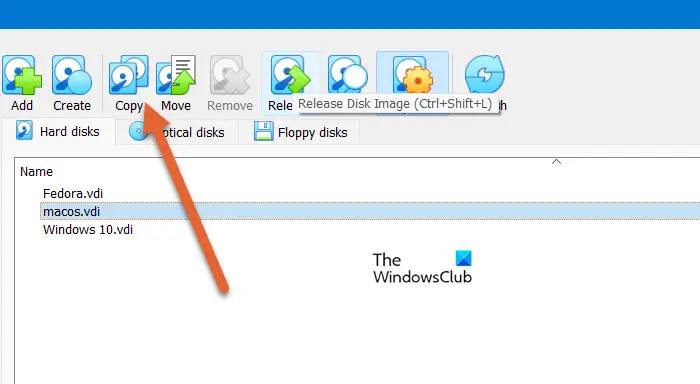
To ensure data integrity, it is recommended to clone the disk image in Virtual Media Manager. This process rebuilds damaged metadata and updates the configuration, helping to identify issues related to the disk image and determine whether the error is related to VirtualBox or the system configuration. To perform a clone operation of a disk image, follow these steps:
Once completed, set up a new virtual machine in VirtualBox using the newly created disk image.
3]Change virtual disk UID
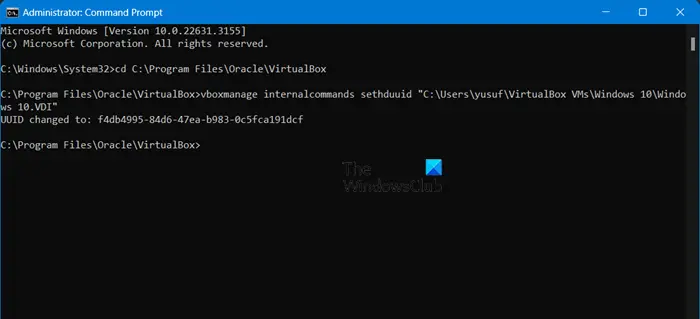
Finally, we will change the UID of the virtual disk as this ensures that VirtualBox can correctly identify and locate the virtual disk object and fix any corruption or misconfiguration issues.
- Close VirtualBox properly and open Command Prompt with administrative rights by typing cmd or command prompt in the search box, right-click on the first result and select the Run as administrator option.
- Now, copy and paste the following command and hit the Enter button: cd C:Program FilesOracleVirtualBox
- After the previous command, copy and paste the command and hit the Enter button and follow it:
vboxmanage internalcommands sethduuid " % Full_VHD_File_Location %"
Note: The path to the VHD file will vary based on the user's actual path. Assuming that the virtual disk image file name "Windows 11.dll" is located at "C:UsersyusufVirtualBox VMWindows 11", the command will be vboxmanage internalcommands sethduuid "C:UsersyusufVirtualBox VMWindows 11Windows 11.dll"
- If the process completes successfully, you will receive confirmation that the GUID has been changed.
Close the command prompt window and connect the virtual hard disk to the new virtual machine.
The above is the detailed content of VBOX_E_OBJECT_NOT_FOUND(0x80bb0001)VirtualBox error. For more information, please follow other related articles on the PHP Chinese website!

Hot AI Tools

Undress AI Tool
Undress images for free

Undresser.AI Undress
AI-powered app for creating realistic nude photos

AI Clothes Remover
Online AI tool for removing clothes from photos.

Clothoff.io
AI clothes remover

Video Face Swap
Swap faces in any video effortlessly with our completely free AI face swap tool!

Hot Article
Hot Tools

Notepad++7.3.1
Easy-to-use and free code editor

SublimeText3 Chinese version
Chinese version, very easy to use

Zend Studio 13.0.1
Powerful PHP integrated development environment

Dreamweaver CS6
Visual web development tools

SublimeText3 Mac version
God-level code editing software (SublimeText3)
Hot Topics


 How to uninstall MySQL and clean residual files
Apr 29, 2025 pm 04:03 PM
How to uninstall MySQL and clean residual files
Apr 29, 2025 pm 04:03 PM
To safely and thoroughly uninstall MySQL and clean all residual files, follow the following steps: 1. Stop MySQL service; 2. Uninstall MySQL packages; 3. Clean configuration files and data directories; 4. Verify that the uninstallation is thorough.
 Centos stops maintenance 2024
Apr 14, 2025 pm 08:39 PM
Centos stops maintenance 2024
Apr 14, 2025 pm 08:39 PM
CentOS will be shut down in 2024 because its upstream distribution, RHEL 8, has been shut down. This shutdown will affect the CentOS 8 system, preventing it from continuing to receive updates. Users should plan for migration, and recommended options include CentOS Stream, AlmaLinux, and Rocky Linux to keep the system safe and stable.
 What are the common misunderstandings in CentOS HDFS configuration?
Apr 14, 2025 pm 07:12 PM
What are the common misunderstandings in CentOS HDFS configuration?
Apr 14, 2025 pm 07:12 PM
Common problems and solutions for Hadoop Distributed File System (HDFS) configuration under CentOS When building a HadoopHDFS cluster on CentOS, some common misconfigurations may lead to performance degradation, data loss and even the cluster cannot start. This article summarizes these common problems and their solutions to help you avoid these pitfalls and ensure the stability and efficient operation of your HDFS cluster. Rack-aware configuration error: Problem: Rack-aware information is not configured correctly, resulting in uneven distribution of data block replicas and increasing network load. Solution: Double check the rack-aware configuration in the hdfs-site.xml file and use hdfsdfsadmin-printTopo
 Detailed explanation of the installation steps of MySQL on macOS system
Apr 29, 2025 pm 03:36 PM
Detailed explanation of the installation steps of MySQL on macOS system
Apr 29, 2025 pm 03:36 PM
Installing MySQL on macOS can be achieved through the following steps: 1. Install Homebrew, using the command /bin/bash-c"$(curl-fsSLhttps://raw.githubusercontent.com/Homebrew/install/HEAD/install.sh)". 2. Update Homebrew and use brewupdate. 3. Install MySQL and use brewinstallmysql. 4. Start MySQL service and use brewservicesstartmysql. After installation, you can use mysql-u
 How to build a website for wordpress host
Apr 20, 2025 am 11:12 AM
How to build a website for wordpress host
Apr 20, 2025 am 11:12 AM
To build a website using WordPress hosting, you need to: select a reliable hosting provider. Buy a domain name. Set up a WordPress hosting account. Select a topic. Add pages and articles. Install the plug-in. Customize your website. Publish your website.
 How to update the image of docker
Apr 15, 2025 pm 12:03 PM
How to update the image of docker
Apr 15, 2025 pm 12:03 PM
The steps to update a Docker image are as follows: Pull the latest image tag New image Delete the old image for a specific tag (optional) Restart the container (if needed)
 CentOS Stream 8 troubleshooting methods
Apr 14, 2025 pm 04:33 PM
CentOS Stream 8 troubleshooting methods
Apr 14, 2025 pm 04:33 PM
CentOSStream8 system troubleshooting guide This article provides systematic steps to help you effectively troubleshoot CentOSStream8 system failures. Please try the following methods in order: 1. Network connection testing: Use the ping command to test network connectivity (for example: pinggoogle.com). Use the curl command to check the HTTP request response (for example: curlgoogle.com). Use the iplink command to view the status of the network interface and confirm whether the network interface is operating normally and is connected. 2. IP address and gateway configuration verification: Use ipaddr or ifconfi
 Steps to add and delete fields to MySQL tables
Apr 29, 2025 pm 04:15 PM
Steps to add and delete fields to MySQL tables
Apr 29, 2025 pm 04:15 PM
In MySQL, add fields using ALTERTABLEtable_nameADDCOLUMNnew_columnVARCHAR(255)AFTERexisting_column, delete fields using ALTERTABLEtable_nameDROPCOLUMNcolumn_to_drop. When adding fields, you need to specify a location to optimize query performance and data structure; before deleting fields, you need to confirm that the operation is irreversible; modifying table structure using online DDL, backup data, test environment, and low-load time periods is performance optimization and best practice.
