


Start a new project with the blog template
npm create astro@latest -- --template blog
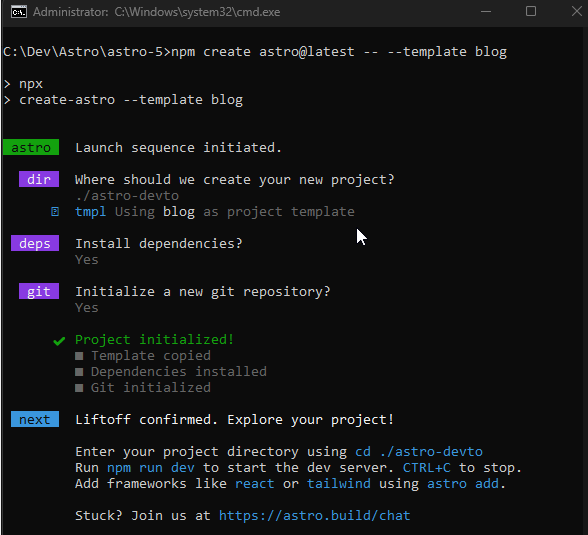
We launch the app
cd [project_name] && npm run dev


Starting with Astro 5, the Content Layer API has been introduced, a tool that allows you to load data from any source during the construction of your site and access it through a simple, securely typed API.
This API offers flexibility to handle content from various sources, such as local Markdown files, remote APIs, or content management systems (CMS). By defining “collections” of content with specific schemas, you can structure and validate your data efficiently. Additionally, the Content Layer API improves performance on content-heavy sites, speeding up build times and reducing memory usage.
https://astro.build/blog/astro-5/
Astro's Content Layer API to integrate dev.to posts into your site
You can use Astro's Content Layer API to integrate dev.to posts into your site. Although there is no specific loader for dev.to, you can create a custom one that consumes its API and stores posts in a content collection in Astro.
To achieve this, follow these steps:
1. Configure access to the dev.to API


Create the .env file in the root of the project
.env
DEV_TO_API_URL=https://dev.to/api/
DEV_API_KEY=tu_clave_de_api
2. Define a collection in Astro
In src/content.config.ts, define a collection for dev.to posts using the Content Layer API:
When creating the project with the Astro template, it automatically generates the collection for the Blog
srccontent.config.ts
import { glob } from 'astro/loaders';
import { defineCollection, z } from 'astro:content';

const blog = defineCollection({
    // Load Markdown and MDX files in the `src/content/blog/` directory.
    loader: glob({ base: './src/content/blog', pattern: '**/*.{md,mdx}' }),
    // Type-check frontmatter using a schema
    schema: z.object({
        title: z.string(),
        description: z.string(),
        // Transform string to Date object
        pubDate: z.coerce.date(),
        updatedDate: z.coerce.date().optional(),
        heroImage: z.string().optional(),
    }),
});

export const collections = { blog };
Now we create the collection for the Dev.to articles
const devTo = defineCollection({
    loader: async () => {
        const headers = new Headers({
            "api-key": DEV_API_KEY,
        });
        const posts = await fetch(`${DEV_TO_API_URL}articles?username=jmr85`, {
            headers: headers
        }).then(res => res.json());

        return posts.map((post: any) => ({
        id: post.slug,
            title: post.title,
            description: post.description,
            pubDate: new Date(post.published_at),
            updatedDate: post.edited_at ? new Date(post.edited_at) : null,
            heroImage: post.cover_image || post.social_image,
        url: post.url,
        }));
    },
    schema: z.object({
        title: z.string(),
        description: z.string(),
        pubDate: z.coerce.date(),
        updatedDate: z.coerce.date().optional(),
        heroImage: z.string().nullable(),
    url: z.string(),
    }),
  });

export const collections = { blog, devTo };
This is the complete code for
srccontent.config.ts
DEV_TO_API_URL=https://dev.to/api/
DEV_API_KEY=tu_clave_de_api
Look at the detail in the definition of the fields in schema, the fields have to match the blog collection of the Astro template and then add those that are particular to the collection of Dev.to posts. They have to have the same name as the data type, this is so that we can "merge" the markdown posts from the Astro template with those from Dev.to in the Blog section.
3. Use posts on your pages:
You can now access dev.to posts in your Astro components or pages using getCollection:
Originally:
srcpagesblogindex.astro
import { glob } from 'astro/loaders';
import { defineCollection, z } from 'astro:content';

const blog = defineCollection({
    // Load Markdown and MDX files in the `src/content/blog/` directory.
    loader: glob({ base: './src/content/blog', pattern: '**/*.{md,mdx}' }),
    // Type-check frontmatter using a schema
    schema: z.object({
        title: z.string(),
        description: z.string(),
        // Transform string to Date object
        pubDate: z.coerce.date(),
        updatedDate: z.coerce.date().optional(),
        heroImage: z.string().optional(),
    }),
});

export const collections = { blog };
Now we will do the iteration of the posts with an inline conditional that, if it is devto, will redirect to the url of the article on the site https://dev.to/{username}/{slug-article}
 {
                        posts.map((post) => (
                            <li>
                                <a href={post.collection === "devTo" ? post.data.url : `/blog/${post.id}/`}>
                                    <img width={720} height={360} src={post.data.heroImage} alt="" />
                                    <h4>


<p><img src="/static/imghw/default1.png" data-src="https://img.php.cn/upload/article/000/000/000/173540174627117.jpg" class="lazy" alt="AstroJS : Integra contenido de Dev.to de manera sencilla"></p>

<p>Repository: https://github.com/jmr85/astro-devto</p>
The above is the detailed content of AstroJS: Integrate Dev.to content easily. For more information, please follow other related articles on the PHP Chinese website!

Hot AI Tools

Undress AI Tool
Undress images for free

Undresser.AI Undress
AI-powered app for creating realistic nude photos

AI Clothes Remover
Online AI tool for removing clothes from photos.

Clothoff.io
AI clothes remover

Video Face Swap
Swap faces in any video effortlessly with our completely free AI face swap tool!

Hot Article
Hot Tools

Notepad++7.3.1
Easy-to-use and free code editor

SublimeText3 Chinese version
Chinese version, very easy to use

Zend Studio 13.0.1
Powerful PHP integrated development environment

Dreamweaver CS6
Visual web development tools

SublimeText3 Mac version
God-level code editing software (SublimeText3)
Hot Topics


 JavaScript vs. Java: Which Language Should You Learn?
Jun 10, 2025 am 12:05 AM
JavaScript vs. Java: Which Language Should You Learn?
Jun 10, 2025 am 12:05 AM
JavaScriptisidealforwebdevelopment,whileJavasuitslarge-scaleapplicationsandAndroiddevelopment.1)JavaScriptexcelsincreatinginteractivewebexperiencesandfull-stackdevelopmentwithNode.js.2)Javaisrobustforenterprisesoftwareandbackendsystems,offeringstrong
 Which Comment Symbols to Use in JavaScript: A Clear Explanation
Jun 12, 2025 am 10:27 AM
Which Comment Symbols to Use in JavaScript: A Clear Explanation
Jun 12, 2025 am 10:27 AM
In JavaScript, choosing a single-line comment (//) or a multi-line comment (//) depends on the purpose and project requirements of the comment: 1. Use single-line comments for quick and inline interpretation; 2. Use multi-line comments for detailed documentation; 3. Maintain the consistency of the comment style; 4. Avoid over-annotation; 5. Ensure that the comments are updated synchronously with the code. Choosing the right annotation style can help improve the readability and maintainability of your code.
 The Ultimate Guide to JavaScript Comments: Enhance Code Clarity
Jun 11, 2025 am 12:04 AM
The Ultimate Guide to JavaScript Comments: Enhance Code Clarity
Jun 11, 2025 am 12:04 AM
Yes,JavaScriptcommentsarenecessaryandshouldbeusedeffectively.1)Theyguidedevelopersthroughcodelogicandintent,2)arevitalincomplexprojects,and3)shouldenhanceclaritywithoutclutteringthecode.
 Java vs. JavaScript: Clearing Up the Confusion
Jun 20, 2025 am 12:27 AM
Java vs. JavaScript: Clearing Up the Confusion
Jun 20, 2025 am 12:27 AM
Java and JavaScript are different programming languages, each suitable for different application scenarios. Java is used for large enterprise and mobile application development, while JavaScript is mainly used for web page development.
 Javascript Comments: short explanation
Jun 19, 2025 am 12:40 AM
Javascript Comments: short explanation
Jun 19, 2025 am 12:40 AM
JavaScriptcommentsareessentialformaintaining,reading,andguidingcodeexecution.1)Single-linecommentsareusedforquickexplanations.2)Multi-linecommentsexplaincomplexlogicorprovidedetaileddocumentation.3)Inlinecommentsclarifyspecificpartsofcode.Bestpractic
 Mastering JavaScript Comments: A Comprehensive Guide
Jun 14, 2025 am 12:11 AM
Mastering JavaScript Comments: A Comprehensive Guide
Jun 14, 2025 am 12:11 AM
CommentsarecrucialinJavaScriptformaintainingclarityandfosteringcollaboration.1)Theyhelpindebugging,onboarding,andunderstandingcodeevolution.2)Usesingle-linecommentsforquickexplanationsandmulti-linecommentsfordetaileddescriptions.3)Bestpracticesinclud
 JavaScript Data Types: A Deep Dive
Jun 13, 2025 am 12:10 AM
JavaScript Data Types: A Deep Dive
Jun 13, 2025 am 12:10 AM
JavaScripthasseveralprimitivedatatypes:Number,String,Boolean,Undefined,Null,Symbol,andBigInt,andnon-primitivetypeslikeObjectandArray.Understandingtheseiscrucialforwritingefficient,bug-freecode:1)Numberusesa64-bitformat,leadingtofloating-pointissuesli
 JavaScript vs. Java: A Comprehensive Comparison for Developers
Jun 20, 2025 am 12:21 AM
JavaScript vs. Java: A Comprehensive Comparison for Developers
Jun 20, 2025 am 12:21 AM
JavaScriptispreferredforwebdevelopment,whileJavaisbetterforlarge-scalebackendsystemsandAndroidapps.1)JavaScriptexcelsincreatinginteractivewebexperienceswithitsdynamicnatureandDOMmanipulation.2)Javaoffersstrongtypingandobject-orientedfeatures,idealfor
