

How to Run Your First Spring Boot Application in Spring Tool Suite?
Feb 07, 2025 pm 12:11 PM
Spring Boot simplifies the creation of robust, scalable, and production-ready Java applications, revolutionizing Java development. Its "convention over configuration" approach, inherent to the Spring ecosystem, minimizes manual setup, allowing developers to focus on business logic instead of boilerplate code. The Spring Tool Suite (STS), a dedicated IDE for Spring development, significantly enhances the Spring Boot experience.
Before starting, ensure you have:
- A Java Development Kit (JDK) installed.
- Spring Tool Suite (STS) installed and configured (download from: http://miracleart.cn/link/5dc624e80d9ab94e3229ec29f675c19d).
- Basic understanding of Java and Spring concepts.
Creating and Configuring a Spring Boot Project in STS:
Step 1: Project Creation
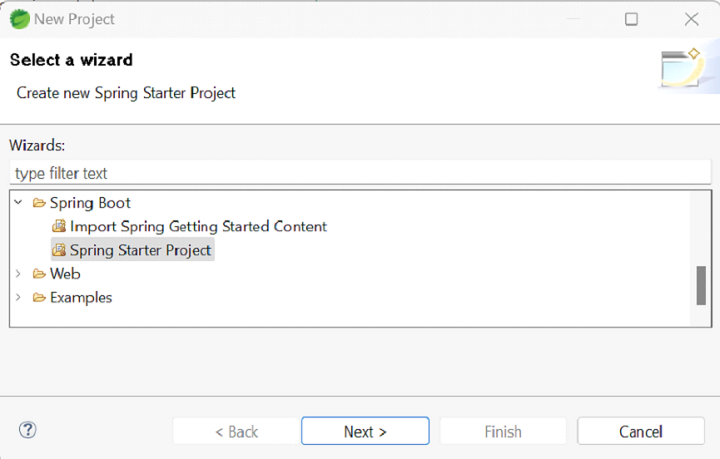
- In STS, select "File" > "New" > "Spring Starter Project".

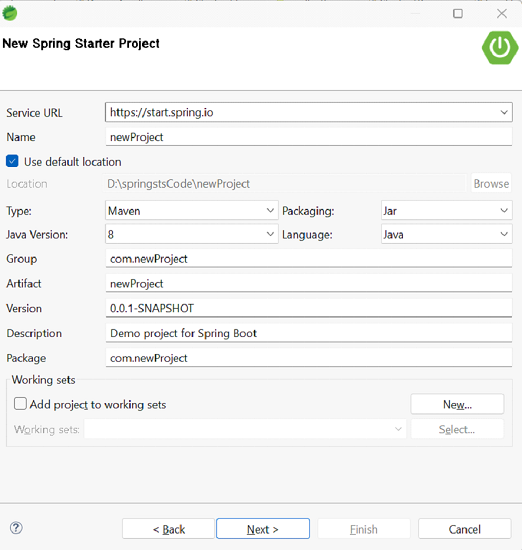
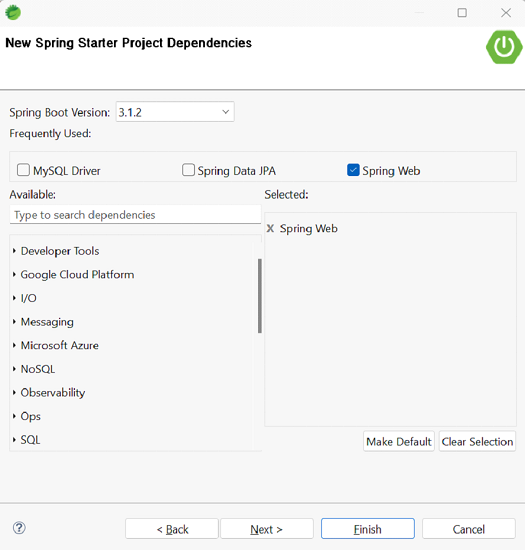
- In the "New Spring Starter Project" dialog, name your project, choose a build tool (Maven or Gradle), select the Spring Boot version, and add necessary dependencies (e.g., "Web" for a web application).
- Click "Finish" to generate the project.
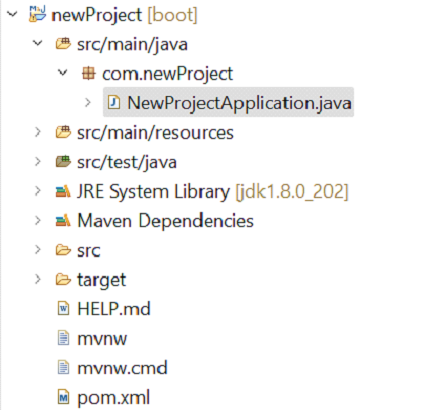
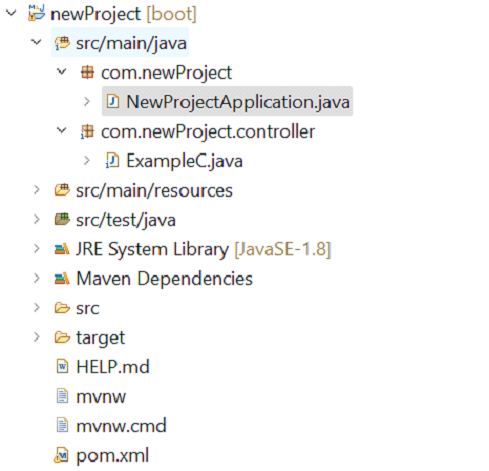
Step 2: Project Structure
Familiarize yourself with the project structure:
-
src/main/java: Contains your Java source code. -
src/main/resources: Holds resource and configuration files. -
src/test/java: Contains your test classes.
Step 3: First Spring Boot Application
The Application.java file (located in src/main/java within your default package) contains the main application bootstrap. It uses SpringApplication.run() to start the application.
The Application.java class typically looks like this:
package com.newProject;

import org.springframework.boot.SpringApplication;
import org.springframework.boot.autoconfigure.SpringBootApplication;

@SpringBootApplication
public class NewProjectApplication {

   public static void main(String[] args) {
      SpringApplication.run(NewProjectApplication.class, args);
   }

}
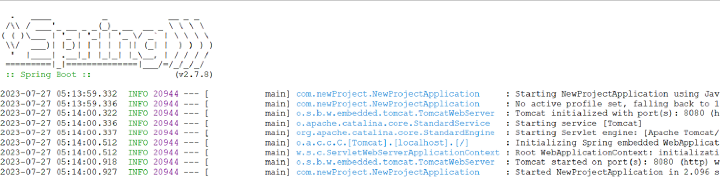
Step 4: Running the Application
- Right-click
Application.javain the Package Explorer. - Select "Run As" > "Spring Boot App".
- Observe the console output showing the application startup process.
- Access the default welcome page in your browser at
http://localhost:8080(or the port specified inapplication.properties).
Step 5: Adding a Controller
- Create a
controllerpackage within yournewProject>src/main/javadirectory. - Create a class (e.g.,
ExampleC) within thecontrollerpackage. Use annotations@Controller,@RequestMapping, and@ResponseBodyas shown below.
package com.newProject.controller;
import org.springframework.web.bind.annotation.RequestMapping;
import org.springframework.stereotype.Controller;
import org.springframework.web.bind.annotation.ResponseBody;
@Controller
public class ExampleC {
@RequestMapping("/firstApp")
@ResponseBody
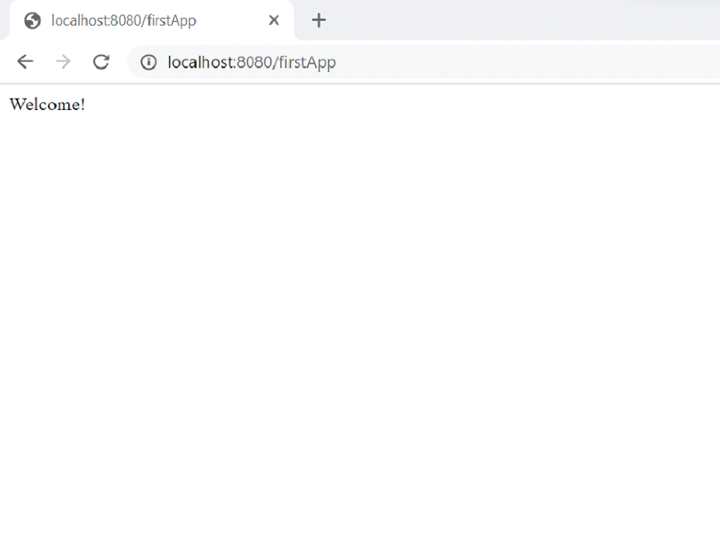
public String firstSpringApp(){
return "Welcome!";
}
}
- Access the result at
http://localhost:8080/firstApp.
Conclusion:
This guide demonstrates creating and running a basic Spring Boot application using STS. By following these steps and understanding the project structure, you can leverage the power and ease of the Spring framework to build more complex applications.
The above is the detailed content of How to Run Your First Spring Boot Application in Spring Tool Suite?. For more information, please follow other related articles on the PHP Chinese website!

Hot AI Tools

Undress AI Tool
Undress images for free

Undresser.AI Undress
AI-powered app for creating realistic nude photos

AI Clothes Remover
Online AI tool for removing clothes from photos.

Clothoff.io
AI clothes remover

Video Face Swap
Swap faces in any video effortlessly with our completely free AI face swap tool!

Hot Article
Hot Tools

Notepad++7.3.1
Easy-to-use and free code editor

SublimeText3 Chinese version
Chinese version, very easy to use

Zend Studio 13.0.1
Powerful PHP integrated development environment

Dreamweaver CS6
Visual web development tools

SublimeText3 Mac version
God-level code editing software (SublimeText3)
Hot Topics


 What is a Singleton design pattern in Java?
Jul 09, 2025 am 01:32 AM
What is a Singleton design pattern in Java?
Jul 09, 2025 am 01:32 AM
Singleton design pattern in Java ensures that a class has only one instance and provides a global access point through private constructors and static methods, which is suitable for controlling access to shared resources. Implementation methods include: 1. Lazy loading, that is, the instance is created only when the first request is requested, which is suitable for situations where resource consumption is high and not necessarily required; 2. Thread-safe processing, ensuring that only one instance is created in a multi-threaded environment through synchronization methods or double check locking, and reducing performance impact; 3. Hungry loading, which directly initializes the instance during class loading, is suitable for lightweight objects or scenarios that can be initialized in advance; 4. Enumeration implementation, using Java enumeration to naturally support serialization, thread safety and prevent reflective attacks, is a recommended concise and reliable method. Different implementation methods can be selected according to specific needs
 How to analyze a Java heap dump?
Jul 09, 2025 am 01:25 AM
How to analyze a Java heap dump?
Jul 09, 2025 am 01:25 AM
Analyzing Java heap dumps is a key means to troubleshoot memory problems, especially for identifying memory leaks and performance bottlenecks. 1. Use EclipseMAT or VisualVM to open the .hprof file. MAT provides Histogram and DominatorTree views to display the object distribution from different angles; 2. sort in Histogram by number of instances or space occupied to find classes with abnormally large or large size, such as byte[], char[] or business classes; 3. View the reference chain through "ListObjects>withincoming/outgoingreferences" to determine whether it is accidentally held; 4. Use "Pathto
 What is a ThreadLocal in Java?
Jul 09, 2025 am 02:25 AM
What is a ThreadLocal in Java?
Jul 09, 2025 am 02:25 AM
ThreadLocal is used in Java to create thread-private variables, each thread has an independent copy to avoid concurrency problems. It stores values ??through ThreadLocalMap inside the thread. Pay attention to timely cleaning when using it to prevent memory leakage. Common uses include user session management, database connections, transaction context, and log tracking. Best practices include: 1. Call remove() to clean up after use; 2. Avoid overuse; 3. InheritableThreadLocal is required for child thread inheritance; 4. Do not store large objects. The initial value can be set through initialValue() or withInitial(), and the initialization is delayed until the first get() call.
 Java Optional example
Jul 12, 2025 am 02:55 AM
Java Optional example
Jul 12, 2025 am 02:55 AM
Optional can clearly express intentions and reduce code noise for null judgments. 1. Optional.ofNullable is a common way to deal with null objects. For example, when taking values ??from maps, orElse can be used to provide default values, so that the logic is clearer and concise; 2. Use chain calls maps to achieve nested values ??to safely avoid NPE, and automatically terminate if any link is null and return the default value; 3. Filter can be used for conditional filtering, and subsequent operations will continue to be performed only if the conditions are met, otherwise it will jump directly to orElse, which is suitable for lightweight business judgment; 4. It is not recommended to overuse Optional, such as basic types or simple logic, which will increase complexity, and some scenarios will directly return to nu.
 How to fix java.io.NotSerializableException?
Jul 12, 2025 am 03:07 AM
How to fix java.io.NotSerializableException?
Jul 12, 2025 am 03:07 AM
The core workaround for encountering java.io.NotSerializableException is to ensure that all classes that need to be serialized implement the Serializable interface and check the serialization support of nested objects. 1. Add implementsSerializable to the main class; 2. Ensure that the corresponding classes of custom fields in the class also implement Serializable; 3. Use transient to mark fields that do not need to be serialized; 4. Check the non-serialized types in collections or nested objects; 5. Check which class does not implement the interface; 6. Consider replacement design for classes that cannot be modified, such as saving key data or using serializable intermediate structures; 7. Consider modifying
 How to iterate over a Map in Java?
Jul 13, 2025 am 02:54 AM
How to iterate over a Map in Java?
Jul 13, 2025 am 02:54 AM
There are three common methods to traverse Map in Java: 1. Use entrySet to obtain keys and values at the same time, which is suitable for most scenarios; 2. Use keySet or values to traverse keys or values respectively; 3. Use Java8's forEach to simplify the code structure. entrySet returns a Set set containing all key-value pairs, and each loop gets the Map.Entry object, suitable for frequent access to keys and values; if only keys or values are required, you can call keySet() or values() respectively, or you can get the value through map.get(key) when traversing the keys; Java 8 can use forEach((key,value)->
 How to implement a caching strategy in Java (e.g., using EhCache or Caffeine)?
Jul 09, 2025 am 01:17 AM
How to implement a caching strategy in Java (e.g., using EhCache or Caffeine)?
Jul 09, 2025 am 01:17 AM
ToimproveperformanceinJavaapplications,choosebetweenEhCacheandCaffeinebasedonyourneeds.1.Forlightweight,modernin-memorycaching,useCaffeine—setitupbyaddingthedependency,configuringacachebeanwithsizeandexpiration,andinjectingitintoservices.2.Foradvance
 Python web scraping dynamic content
Jul 10, 2025 pm 12:18 PM
Python web scraping dynamic content
Jul 10, 2025 pm 12:18 PM
Dynamic web crawling can be achieved through an analysis interface or a simulated browser. 1. Use browser developer tools to view XHR/Fetch requests in the Network, find the interface that returns JSON data, and use requests to get it; 2. If the page is rendered by the front-end framework and has no independent interface, you can start the browser with Selenium and wait for the elements to be loaded and extracted; 3. In the face of the anti-crawling mechanism, headers should be added, frequency control, proxy IP should be used, and verification codes or JS rendering detection should be carried out according to the situation. Mastering these methods can effectively deal with most dynamic web crawling scenarios.
