How to stop Microsoft Edge automatic updates
Microsoft Edge is the default browser that comes with Windows 11. Earlier, the Edge browser received updates as the Windows operating system was updated. However, the Edge browser based on Chromium has changed that. The browser will now automatically update in the background without your knowledge. In this article, we will explain how to stop automatic Microsoft Edge updates in Windows 11 and macOS.
Related: How to disable automatic updates in Google Chrome?
Check for automatic edge updates
Chromium-based Edge is exactly the same as Google Chrome browsers based on Chromium backend code. It will automatically run the update process, download the latest version, and update your browser version. This all happens in the background and you won't even notice that the version has been updated.
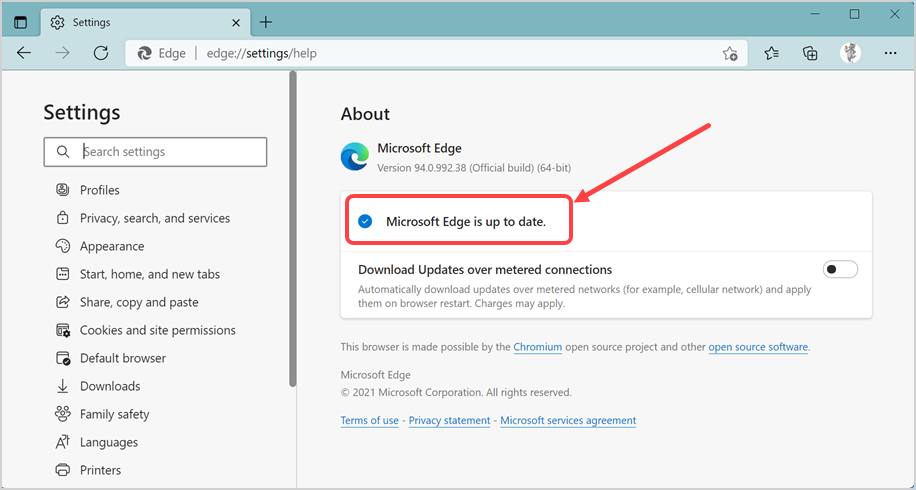
However, you can easily check if the browser automatic update is working properly by navigating to the settings page.
- Press "Alt F" or click the three-dot icon that displays "Settings and More" in the upper right corner of the browser.
- Go to Help and Feedback, and then go to the About Microsoft Edge menu.
- This will open the About settings page and you will see the update run immediately. After a while, you will see results of your browser updating to the latest version.
- Double-click the EdgeUpdate folder to view all relevant files that are automatically updated.
- Select the Microsoft EdgeUpdate application file and press F2 or right-click it and select Show more options, and then select the Rename option. Rename the file to 123MicrosoftEdgeUpdate or whatever name you want.
- You will be prompted to provide administrator access to change the file name. If you are already logged in with administrator access, just click Continue to continue. Otherwise, enter your administrator details to allow changes to the file name.
- Finally, it should look like below, the file name has been changed.
- Now, go back to the Edge browser and use the URL to open about the page edge://Settings/Help . You should see that the automatic update has stopped and an error is displayed. The error is similar to "Error occurred while checking for updates: We cannot create this component (Error code 3: 0x80040154 - System level)". Or you will see a different error code, such as 0x8008005, indicating that the Edge update is not working.
- Sometimes you see the update process runs endlessly, and the rotating wheel shows "Check for updates."
From then on, the automatic Edge update will no longer run and you will get rid of the annoying automatic update. You can change the file name back to its original name and update Edge to its latest version at any time.
Note In addition to changing the Microsoft EdgeUpdate file name, you can also change the name of the EdgeUpdate folder name. It will also stop automatic Edge updates and display the same errors as Edge cannot run the update process. However, you still need administrator permissions to change the folder name.
1.2. Prevent Microsoft Edge from automatically updating endpoint URLs
According to the Edge documentation, Microsoft uses the following two endpoints to connect when updating and installing the Edge browser on your computer.
<code>https://msedge.api.cdp.microsoft.com *.dl.delivery.mp.microsoft.com</code>
Blocking these URLs will prevent Edge from automatically installing updates. You can try to block these URLs by modifying the hosts file in your computer.
- When Notepad is open, press the "Control O" key to open the file from your computer.
- When you are in the Open File dialog box, go to the C:\Windows\System32\Driver\etc folder.
- Make sure to select All Files to view the files or you will not see the files in the folder.
- Open the hosts file and add the following two lines at the end of the file.
<code>127.0.0.1 https://msedge.api.cdp.microsoft.com 127.0.0.1 *.dl.delivery.mp.microsoft.com</code>
- Save the file and check if automatic updates in Edge are stopped.
You can also use browser extensions or Defender Endpoint Security to block these updated URLs.
1.3. Modify the registry keys
Similar to the endpoint, Microsoft uses the EdgeUpdate key in the registry to run automatic updates. You can create this key in the registry with a value of 1 to check whether the update process will be stopped.
- Click Windows Search or Cortana and type regedit to open the Registry Editor from the results.
- Navigate the computer\HKEY_LOCAL_MACHINE\SOFTWARE\Microsoft and right-click the folder.
- Select New > Key to create a new key under the Microsoft folder.
- After you create the key, rename it to EdgeUpdate and right-click the key. Select the "New>DWORD (32-bit) Value" option.
- Rename DWORD to DoNotUpdateToEdgeWithChromium.
- Double-click DWORD and change "Numerical Data" to 1. Press the OK button to change the value and close the pop-up window.
- Now open Edge and check if the automatic update is stopped. You can delete the registry key or change the value data to 0 at any time for automatic updates.
1.4. Try updating the Blocker Toolkit
Microsoft has an update blocking toolkit for Chromium versions. If none of the above methods are suitable for you, then you can try this as a last resort.
- Select the location where the content is extracted.
- Let's save the content in the Downloads folder.
- You can open the Downloads folder to view the extracted content.
- Now, follow the instructions for Notepad above, search and open the command prompt in administrator mode.
- Type cd.. or cd\ and press Enter to move the command prompt to the C: drive.
- Then enter cd C:\Users\
\Downloads to enter the folder where you have the interceptor toolkit file. Make sure to change the directory to the directory where you extract the blocking toolkit using the correct username on your computer. - Run the command EdgeChromium_Blocker.cmd /b to view the Edge update on the local computer that is passed blocked.
You can follow the same process at any time and run the command EdgeChromium_Blocker.cmd /u to unblock the update delivery process.
Related: How to disable automatic updates in Firefox browser?
2. Stop automatic edge updates in Mac
Microsoft also provides an Edge browser for macOS. Unlike other Office apps available in the App Store, you must download and install Edge from the website on your Mac. It works similar to the Windows version and automatically updates to the latest version when you connect to the Internet. However, it has a separate Microsoft AutoUpdate application that runs and seeks your permission before it is updated.
- When the Microsoft AutoUpdate application runs, it displays the current and available Edge versions and file sizes.
- Make sure to disable the Automatically keep Microsoft applications up-to-date check box.
- You can click the Update button and run the update if needed.
While this is perfect, the only problem is that the AutoUpdate application will appear frequently and you need to close it.
The last words
As Google Chrome begins to update automatically, other browsers such as Firefox and Edge follow suit. Although it is acceptable to update for security reasons, it doesn't make sense to run automatic updates all the time and consume network bandwidth. You can stop automatic Microsoft Edge browser updates by following the above method.