

How to recover a Linux system that won't boot (using a live USB)?
Jun 13, 2025 am 12:31 AM
Using Live USB is an effective way to solve problems and recover files when Linux systems fail to boot. First prepare a Live USB containing Linux distributions such as Ubuntu or Fedora, and select USB as the boot device by restarting the computer and entering the boot menu (usually pressing F12, Esc, etc.), so as to enter the Live environment. Next, open the terminal in the Live environment, run "sudo fdisk -l" to identify the root partition (such as /dev/sda1), and use "sudo mount /dev/sda1 /mnt" to mount the partition; if there are separate /boot, /home or /efi partitions, they also need to be mounted separately. Then, you can browse the files in the /mnt directory to repair or copy important data. If you need to repair the GRUB boot program, you can use "sudo chroot /mnt" to enter the system environment after binding the /dev, /dev/pts, /proc, /sys and /run directories, execute "grub-install /dev/sda" and "update-grub", then exit chroot and uninstall all mount points. Finally, take out the USB and restart it. If you only need to recover data, directly access the /mnt/home/username directory, copy the file to an external storage device through file manager or terminal commands (such as "cp -r").

When your Linux system won't boot, it can be frustrating — especially if you need to recover files or fix the issue without reinstalling everything. Fortunately, using a Live USB is one of the most effective ways to access and repair your system. Here's how to do it effectively.
Prepare Your Live USB and Boot Into It
Before anything else, make sure you have a working Live USB with a Linux distribution like Ubuntu or Fedora. If you don't already have one, create it using tools like Rufus (on Windows) or dd (on Linux/macOS).
Once ready:
- Plug in the Live USB.
- Restart your machine.
- Enter the boot menu (usually by pressing F12, Esc, or another function key during startup).
- Select the USB drive as the boot device.
You should now boot into the Live environment. Choose "Try Ubuntu" or equivalent (not install), which will give you full access to your system's files and tools needed for recovery.
Access Your Installed System's Files
Once in the Live environment, you'll want to mount your installed system's partitions so you can access them.
First, open a terminal and run:
sudo fdisk -l
This will show you the list of drives and partitions. Identify your root partition (typically something like /dev/sda1 ).
Then mount it:
sudo mount /dev/sda1 /mnt
If you have a separate /boot , /home , or /efi partition, mount those too:
 sudo mount /dev/sda2 /mnt/boot
sudo mount /dev/sda3 /mnt/home
sudo mount /dev/sda4 /mnt/boot/efi
Replace /dev/sdaX with the actual identifiers from your system.
Now you can browser files under /mnt and perform repairs or copy out important data.
Repair GRUB (Bootloader)
A common reason Linux won't boot is because the bootloader (GRUB) is broken. You can fix this from the Live USB by chrooting into your system.
After mounting your partitions as above, bind some special directories:
 sudo mount --bind /dev /mnt/dev
sudo mount --bind /dev/pts /mnt/dev/pts
sudo mount --bind /proc /mnt/proc
sudo mount --bind /sys /mnt/sys
sudo mount --bind /run /mnt/run
Then chroot into your system:
sudo chroot /mnt
Inside the chrooted environment, reinstall GRUB:
 grub-install /dev/sda
update-grub
Exit the chroot and unmount everything:
 exit
sudo umount /mnt/dev/pts /mnt/dev /mnt/proc /mnt/sys /mnt/run
sudo umount /mnt/boot/efi /mnt/boot /mnt/home /mnt
Reboot your system without the USB, and it should now start normally.
Recover Important Data
If your main goal is just to get files off the system, things are much simpler.
Mount your root partition as shown earlier, then navigate to /mnt/home/yourusername to find user files. From there:
- Use the file manager to drag and drop files onto an external drive.
- Or use the terminal:
cp -r /mnt/home/yourusername/Documents /media/ubuntu/USB_DRIVE/
Make sure to replace
yourusernameandUSB_DRIVEwith the correct names.Also check other partitions if you had separate drives for media or backups.
That's basically all you need to know. Whether you're fixing the boot process or grabbing important documents, a Live USB gives you full control. Just take care not to write changes accidentally to the wrong drive — especially when copying files or running commands in the terminal.
The above is the detailed content of How to recover a Linux system that won't boot (using a live USB)?. For more information, please follow other related articles on the PHP Chinese website!

Hot AI Tools

Undress AI Tool
Undress images for free

Undresser.AI Undress
AI-powered app for creating realistic nude photos

AI Clothes Remover
Online AI tool for removing clothes from photos.

Clothoff.io
AI clothes remover

Video Face Swap
Swap faces in any video effortlessly with our completely free AI face swap tool!

Hot Article
Hot Tools

Notepad++7.3.1
Easy-to-use and free code editor

SublimeText3 Chinese version
Chinese version, very easy to use

Zend Studio 13.0.1
Powerful PHP integrated development environment

Dreamweaver CS6
Visual web development tools

SublimeText3 Mac version
God-level code editing software (SublimeText3)
Hot Topics


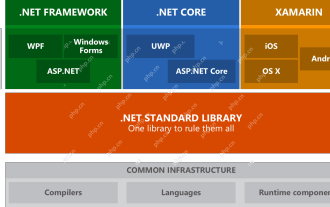 .NET Core Quick Start Tutorial 1. The beginning: Talking about .NET Core
May 07, 2025 pm 04:54 PM
.NET Core Quick Start Tutorial 1. The beginning: Talking about .NET Core
May 07, 2025 pm 04:54 PM
1. The Origin of .NETCore When talking about .NETCore, we must not mention its predecessor .NET. Java was in the limelight at that time, and Microsoft also favored Java. The Java virtual machine on the Windows platform was developed by Microsoft based on JVM standards. It is said to be the best performance Java virtual machine at that time. However, Microsoft has its own little abacus, trying to bundle Java with the Windows platform and add some Windows-specific features. Sun's dissatisfaction with this led to a breakdown of the relationship between the two parties, and Microsoft then launched .NET. .NET has borrowed many features of Java since its inception and gradually surpassed Java in language features and form development. Java in version 1.6
 Postman Integrated Application on CentOS
May 19, 2025 pm 08:00 PM
Postman Integrated Application on CentOS
May 19, 2025 pm 08:00 PM
Integrating Postman applications on CentOS can be achieved through a variety of methods. The following are the detailed steps and suggestions: Install Postman by downloading the installation package to download Postman's Linux version installation package: Visit Postman's official website and select the version suitable for Linux to download. Unzip the installation package: Use the following command to unzip the installation package to the specified directory, for example /opt: sudotar-xzfpostman-linux-x64-xx.xx.xx.tar.gz-C/opt Please note that "postman-linux-x64-xx.xx.xx.tar.gz" is replaced by the file name you actually downloaded. Create symbols
 How to restore the win8 system details steps
May 07, 2025 pm 05:00 PM
How to restore the win8 system details steps
May 07, 2025 pm 05:00 PM
The steps to start system restore in Windows 8 are: 1. Press the Windows key X to open the shortcut menu; 2. Select "Control Panel", enter "System and Security", and click "System"; 3. Select "System Protection", and click "System Restore"; 4. Enter the administrator password and select the restore point. When selecting the appropriate restore point, it is recommended to select the restore point before the problem occurs, or remember a specific date when the system is running well. During the system restore process, if you encounter "The system restore cannot be completed", you can try another restore point or use the "sfc/scannow" command to repair the system files. After restoring, you need to check the system operation status, reinstall or configure the software, and re-back up the data, and create new restore points regularly.
 The difference between programming in Java and other languages ??Analysis of the advantages of cross-platform features of Java
May 20, 2025 pm 08:21 PM
The difference between programming in Java and other languages ??Analysis of the advantages of cross-platform features of Java
May 20, 2025 pm 08:21 PM
The main difference between Java and other programming languages ??is its cross-platform feature of "writing at once, running everywhere". 1. The syntax of Java is close to C, but it removes pointer operations that are prone to errors, making it suitable for large enterprise applications. 2. Compared with Python, Java has more advantages in performance and large-scale data processing. The cross-platform advantage of Java stems from the Java virtual machine (JVM), which can run the same bytecode on different platforms, simplifying development and deployment, but be careful to avoid using platform-specific APIs to maintain cross-platformity.
 Where is the pycharm interpreter?
May 23, 2025 pm 10:09 PM
Where is the pycharm interpreter?
May 23, 2025 pm 10:09 PM
Setting the location of the interpreter in PyCharm can be achieved through the following steps: 1. Open PyCharm, click the "File" menu, and select "Settings" or "Preferences". 2. Find and click "Project:[Your Project Name]" and select "PythonInterpreter". 3. Click "AddInterpreter", select "SystemInterpreter", browse to the Python installation directory, select the Python executable file, and click "OK". When setting up the interpreter, you need to pay attention to path correctness, version compatibility and the use of the virtual environment to ensure the smooth operation of the project.
 How to manually install plugin packages in VSCode
May 15, 2025 pm 09:33 PM
How to manually install plugin packages in VSCode
May 15, 2025 pm 09:33 PM
The steps to manually install the plug-in package in VSCode are: 1. Download the .vsix file of the plug-in; 2. Open VSCode and press Ctrl Shift P (Windows/Linux) or Cmd Shift P (Mac) to call up the command panel; 3. Enter and select Extensions:InstallfromVSIX..., then select .vsix file and install. Manually installing plug-ins provides a flexible way to install, especially when the network is restricted or the plug-in market is unavailable, but attention needs to be paid to file security and possible dependencies.
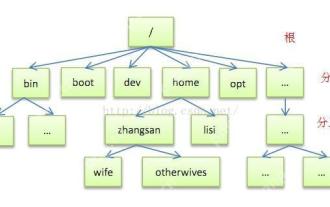 Detailed introduction to each directory of Linux and each directory (reprinted)
May 22, 2025 pm 07:54 PM
Detailed introduction to each directory of Linux and each directory (reprinted)
May 22, 2025 pm 07:54 PM
[Common Directory Description] Directory/bin stores binary executable files (ls, cat, mkdir, etc.), and common commands are generally here. /etc stores system management and configuration files/home stores all user files. The root directory of the user's home directory is the basis of the user's home directory. For example, the home directory of the user user is /home/user. You can use ~user to represent /usr to store system applications. The more important directory /usr/local Local system administrator software installation directory (install system-level applications). This is the largest directory, and almost all the applications and files to be used are in this directory. /usr/x11r6?Directory for storing x?window/usr/bin?Many
 After installing Nginx, the configuration file path and initial settings
May 16, 2025 pm 10:54 PM
After installing Nginx, the configuration file path and initial settings
May 16, 2025 pm 10:54 PM
Understanding Nginx's configuration file path and initial settings is very important because it is the first step in optimizing and managing a web server. 1) The configuration file path is usually /etc/nginx/nginx.conf. The syntax can be found and tested using the nginx-t command. 2) The initial settings include global settings (such as user, worker_processes) and HTTP settings (such as include, log_format). These settings allow customization and extension according to requirements. Incorrect configuration may lead to performance issues and security vulnerabilities.
