

How to deal with the failure to start the SSH service in Linux systems
Mar 19, 2024 pm 12:15 PM
In Linux systems, the SSH (Secure Shell) service is a very important tool for remotely connecting to the server and performing management operations. But sometimes, we may encounter a situation where the SSH service fails to start, which may result in the inability to connect to the server remotely. In this case, we need to take some measures to solve the problem. This article will introduce how to handle the failure to start the SSH service in Linux systems, and provide some specific code examples to help you solve this problem.
1. Confirm whether the SSH service is started
First, we need to confirm whether the SSH service has been started. You can check the status of the SSH service through the following command:
sudo systemctl status ssh
If the SSH service has been started, the system will display the status information that the service is running. If the SSH service does not start, you can try to use the following command to start the SSH service:
sudo systemctl start ssh
If you still cannot start the SSH service, it may be because the configuration file is incorrect or other problems caused. Next, we will investigate the possible causes one by one.
2. Check the SSH configuration file
- Check the SSH configuration file for errors
Normally, the SSH configuration file is located at / etc/ssh/sshd_configpath. You can open the file with a text editor and check whether the configuration items in the file are correct. Make sure there are no missing, misspelled, or grammatical errors in configuration items.
- Restart the SSH service and check the log
If you have modified the SSH configuration file, you need to reload the configuration file and restart the SSH service. This can be achieved using the following command:
sudo service ssh reload
sudo service ssh restart
Then, you can check the system log to understand the error messages that may occur when the SSH service starts:
sudo journalctl -xe
3. Check the SSH port Whether it is occupied
In some cases, it may be that the default SSH port (usually 22) is occupied by other services, causing the SSH service to fail to start. You can use the following command to view the occupied ports on the system:
sudo netstat -tuln
If you find that the port is occupied, you can try to modify the port number in the SSH configuration file, and then Reload the configuration file and restart the SSH service.
4. Check the firewall settings
The firewall may also prevent the SSH service from starting. You can use the following command to view the status of the system firewall:
sudo ufw status
If the firewall is enabled and no ports are opened for the SSH service, you can use the following command to allow the SSH service Pass:
sudo ufw allow ssh
Then, you can reload the firewall rules to ensure the new rules take effect:
sudo ufw reload
5. Rebuild SSH Key
Finally, if none of the above methods solve the problem, you can try to rebuild your SSH key. First, you need to delete the old key file and then regenerate the new key file. The following are the specific steps:
- Delete the old key file
sudo rm /etc/ssh/ssh_host_*
- Regenerate New key file
sudo dpkg-reconfigure openssh-server
After completing the above steps, you can try to restart the SSH service and check whether you can connect normally.
Summarize
When dealing with the failure to start the SSH service in a Linux system, we need to first confirm the status of the SSH service, and then troubleshoot possible causes one by one, including checking configuration files, handling port occupation, checking firewall settings, and rebuilding SSH keys. Through the above methods, I hope you can successfully solve the problem of SSH service startup failure and ensure the security and stable operation of the system.
The above is the detailed content of How to deal with the failure to start the SSH service in Linux systems. For more information, please follow other related articles on the PHP Chinese website!

Hot AI Tools

Undress AI Tool
Undress images for free

Undresser.AI Undress
AI-powered app for creating realistic nude photos

AI Clothes Remover
Online AI tool for removing clothes from photos.

Clothoff.io
AI clothes remover

Video Face Swap
Swap faces in any video effortlessly with our completely free AI face swap tool!

Hot Article
Hot Tools

Notepad++7.3.1
Easy-to-use and free code editor

SublimeText3 Chinese version
Chinese version, very easy to use

Zend Studio 13.0.1
Powerful PHP integrated development environment

Dreamweaver CS6
Visual web development tools

SublimeText3 Mac version
God-level code editing software (SublimeText3)
Hot Topics


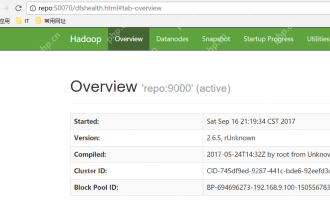 Hadoop pseudo-distributed cluster construction
May 07, 2025 pm 04:45 PM
Hadoop pseudo-distributed cluster construction
May 07, 2025 pm 04:45 PM
Software preparation I am using a virtual machine with CentOS-6.6, with the host name repo. Refer to the steps to install a Linux virtual machine in Windows, I installed JDK in that virtual machine, refer to the guide to installing JDK in Linux. In addition, the virtual machine is configured with a key-free login itself, and the settings for configuring key-free login between each virtual machine are referenced. The download address of Hadoop installation package is: https://mirrors.aliyun.com/apache/hadoop/common/. I am using hadoop 2.6.5 version. Upload the Hadoop installation package to the server and unzip [root@repo~]#tarzxv
 .NET Core Quick Start Tutorial 1. The beginning: Talking about .NET Core
May 07, 2025 pm 04:54 PM
.NET Core Quick Start Tutorial 1. The beginning: Talking about .NET Core
May 07, 2025 pm 04:54 PM
1. The Origin of .NETCore When talking about .NETCore, we must not mention its predecessor .NET. Java was in the limelight at that time, and Microsoft also favored Java. The Java virtual machine on the Windows platform was developed by Microsoft based on JVM standards. It is said to be the best performance Java virtual machine at that time. However, Microsoft has its own little abacus, trying to bundle Java with the Windows platform and add some Windows-specific features. Sun's dissatisfaction with this led to a breakdown of the relationship between the two parties, and Microsoft then launched .NET. .NET has borrowed many features of Java since its inception and gradually surpassed Java in language features and form development. Java in version 1.6
 Postman Integrated Application on CentOS
May 19, 2025 pm 08:00 PM
Postman Integrated Application on CentOS
May 19, 2025 pm 08:00 PM
Integrating Postman applications on CentOS can be achieved through a variety of methods. The following are the detailed steps and suggestions: Install Postman by downloading the installation package to download Postman's Linux version installation package: Visit Postman's official website and select the version suitable for Linux to download. Unzip the installation package: Use the following command to unzip the installation package to the specified directory, for example /opt: sudotar-xzfpostman-linux-x64-xx.xx.xx.tar.gz-C/opt Please note that "postman-linux-x64-xx.xx.xx.tar.gz" is replaced by the file name you actually downloaded. Create symbols
 The difference between programming in Java and other languages ??Analysis of the advantages of cross-platform features of Java
May 20, 2025 pm 08:21 PM
The difference between programming in Java and other languages ??Analysis of the advantages of cross-platform features of Java
May 20, 2025 pm 08:21 PM
The main difference between Java and other programming languages ??is its cross-platform feature of "writing at once, running everywhere". 1. The syntax of Java is close to C, but it removes pointer operations that are prone to errors, making it suitable for large enterprise applications. 2. Compared with Python, Java has more advantages in performance and large-scale data processing. The cross-platform advantage of Java stems from the Java virtual machine (JVM), which can run the same bytecode on different platforms, simplifying development and deployment, but be careful to avoid using platform-specific APIs to maintain cross-platformity.
 Where is the pycharm interpreter?
May 23, 2025 pm 10:09 PM
Where is the pycharm interpreter?
May 23, 2025 pm 10:09 PM
Setting the location of the interpreter in PyCharm can be achieved through the following steps: 1. Open PyCharm, click the "File" menu, and select "Settings" or "Preferences". 2. Find and click "Project:[Your Project Name]" and select "PythonInterpreter". 3. Click "AddInterpreter", select "SystemInterpreter", browse to the Python installation directory, select the Python executable file, and click "OK". When setting up the interpreter, you need to pay attention to path correctness, version compatibility and the use of the virtual environment to ensure the smooth operation of the project.
 How to manually install plugin packages in VSCode
May 15, 2025 pm 09:33 PM
How to manually install plugin packages in VSCode
May 15, 2025 pm 09:33 PM
The steps to manually install the plug-in package in VSCode are: 1. Download the .vsix file of the plug-in; 2. Open VSCode and press Ctrl Shift P (Windows/Linux) or Cmd Shift P (Mac) to call up the command panel; 3. Enter and select Extensions:InstallfromVSIX..., then select .vsix file and install. Manually installing plug-ins provides a flexible way to install, especially when the network is restricted or the plug-in market is unavailable, but attention needs to be paid to file security and possible dependencies.
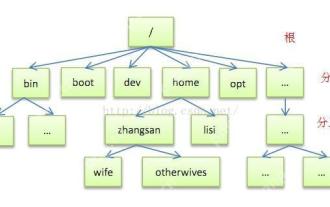 Detailed introduction to each directory of Linux and each directory (reprinted)
May 22, 2025 pm 07:54 PM
Detailed introduction to each directory of Linux and each directory (reprinted)
May 22, 2025 pm 07:54 PM
[Common Directory Description] Directory/bin stores binary executable files (ls, cat, mkdir, etc.), and common commands are generally here. /etc stores system management and configuration files/home stores all user files. The root directory of the user's home directory is the basis of the user's home directory. For example, the home directory of the user user is /home/user. You can use ~user to represent /usr to store system applications. The more important directory /usr/local Local system administrator software installation directory (install system-level applications). This is the largest directory, and almost all the applications and files to be used are in this directory. /usr/x11r6?Directory for storing x?window/usr/bin?Many
 After installing Nginx, the configuration file path and initial settings
May 16, 2025 pm 10:54 PM
After installing Nginx, the configuration file path and initial settings
May 16, 2025 pm 10:54 PM
Understanding Nginx's configuration file path and initial settings is very important because it is the first step in optimizing and managing a web server. 1) The configuration file path is usually /etc/nginx/nginx.conf. The syntax can be found and tested using the nginx-t command. 2) The initial settings include global settings (such as user, worker_processes) and HTTP settings (such as include, log_format). These settings allow customization and extension according to requirements. Incorrect configuration may lead to performance issues and security vulnerabilities.
