


NestJS: Bridging the Gap Between Angular and Backend Development
For Angular developers seeking a seamless transition to backend development, NestJS emerges as a compelling solution. This open-source, progressive Node.js framework, built with TypeScript and sharing core concepts with Angular, provides a familiar and efficient environment for creating robust server-side applications. Its architecture combines the strengths of Object-Oriented, Functional, and Functional Reactive Programming paradigms.
Key Advantages of NestJS:
- Extensibility and Modularity: NestJS's modular design allows for effortless integration with existing libraries, promoting code reusability and maintainability.
- Testability, Scalability, and Maintainability: The framework's architecture inherently supports these crucial aspects of software development.
- Versatile Ecosystem: NestJS offers a comprehensive ecosystem for building diverse server-side applications, from REST APIs to microservices.
- Progressive Approach: It embraces modern JavaScript features and established design patterns.
Quick Start for Angular Developers:
The familiarity of TypeScript and Angular concepts makes NestJS a rapid learning curve for Angular developers. Leveraging existing Node.js libraries like Express.js (for HTTP utilities) and TypeORM (a mature ORM for TypeScript), NestJS provides a solid foundation for building efficient backends.
Setting Up Your NestJS Environment:
-
Prerequisites: Ensure Node.js and npm (or yarn) are installed. TypeScript familiarity is beneficial, given your Angular background.
-
Installing Nest CLI: The Nest CLI streamlines project creation and scaffolding. Install it globally using:
npm install -g @nestjs/cli
-
Creating Your First Project: Generate a new project using:
nest new my-nest-project
-
Development Server: Navigate to your project directory and start the development server:
npm run start:dev
Access your application at
http://localhost:3000.
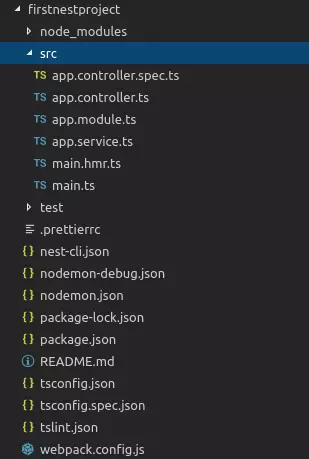
Project Structure and Modules:
NestJS projects follow a well-defined structure optimized for maintainability. The src directory houses your application code, organized into modules. Modules are created using the CLI:
nest generate module users
This command generates a new module, enhancing your application's organization.
Creating Controllers:
Controllers handle incoming HTTP requests. Generate a controller within a module using:
npm install -g @nestjs/cli
This creates a user.controller.ts file within the users module. Decorators like @Get(), @Post(), @Body(), etc., define routes and handle request data.


Conclusion:
NestJS empowers Angular developers to build robust and scalable server-side applications efficiently. Its intuitive structure, TypeScript foundation, and integration with powerful libraries make it an ideal choice for creating comprehensive full-stack applications. Refer to the official NestJS documentation for detailed information and advanced features. Consider exploring NestJS boilerplates for quicker project setup.
Frequently Asked Questions (FAQs):
The FAQs section from the original input has been omitted here to avoid redundancy, as the provided information already comprehensively addresses the points raised in the FAQs.
The above is the detailed content of Introduction to Nest.js for Angular Developers. For more information, please follow other related articles on the PHP Chinese website!

Hot AI Tools

Undress AI Tool
Undress images for free

Undresser.AI Undress
AI-powered app for creating realistic nude photos

AI Clothes Remover
Online AI tool for removing clothes from photos.

Clothoff.io
AI clothes remover

Video Face Swap
Swap faces in any video effortlessly with our completely free AI face swap tool!

Hot Article
Hot Tools

Notepad++7.3.1
Easy-to-use and free code editor

SublimeText3 Chinese version
Chinese version, very easy to use

Zend Studio 13.0.1
Powerful PHP integrated development environment

Dreamweaver CS6
Visual web development tools

SublimeText3 Mac version
God-level code editing software (SublimeText3)
Hot Topics


 Java vs. JavaScript: Clearing Up the Confusion
Jun 20, 2025 am 12:27 AM
Java vs. JavaScript: Clearing Up the Confusion
Jun 20, 2025 am 12:27 AM
Java and JavaScript are different programming languages, each suitable for different application scenarios. Java is used for large enterprise and mobile application development, while JavaScript is mainly used for web page development.
 Javascript Comments: short explanation
Jun 19, 2025 am 12:40 AM
Javascript Comments: short explanation
Jun 19, 2025 am 12:40 AM
JavaScriptcommentsareessentialformaintaining,reading,andguidingcodeexecution.1)Single-linecommentsareusedforquickexplanations.2)Multi-linecommentsexplaincomplexlogicorprovidedetaileddocumentation.3)Inlinecommentsclarifyspecificpartsofcode.Bestpractic
 How to work with dates and times in js?
Jul 01, 2025 am 01:27 AM
How to work with dates and times in js?
Jul 01, 2025 am 01:27 AM
The following points should be noted when processing dates and time in JavaScript: 1. There are many ways to create Date objects. It is recommended to use ISO format strings to ensure compatibility; 2. Get and set time information can be obtained and set methods, and note that the month starts from 0; 3. Manually formatting dates requires strings, and third-party libraries can also be used; 4. It is recommended to use libraries that support time zones, such as Luxon. Mastering these key points can effectively avoid common mistakes.
 JavaScript vs. Java: A Comprehensive Comparison for Developers
Jun 20, 2025 am 12:21 AM
JavaScript vs. Java: A Comprehensive Comparison for Developers
Jun 20, 2025 am 12:21 AM
JavaScriptispreferredforwebdevelopment,whileJavaisbetterforlarge-scalebackendsystemsandAndroidapps.1)JavaScriptexcelsincreatinginteractivewebexperienceswithitsdynamicnatureandDOMmanipulation.2)Javaoffersstrongtypingandobject-orientedfeatures,idealfor
 Why should you place tags at the bottom of the ?
Jul 02, 2025 am 01:22 AM
Why should you place tags at the bottom of the ?
Jul 02, 2025 am 01:22 AM
PlacingtagsatthebottomofablogpostorwebpageservespracticalpurposesforSEO,userexperience,anddesign.1.IthelpswithSEObyallowingsearchenginestoaccesskeyword-relevanttagswithoutclutteringthemaincontent.2.Itimprovesuserexperiencebykeepingthefocusonthearticl
 JavaScript: Exploring Data Types for Efficient Coding
Jun 20, 2025 am 12:46 AM
JavaScript: Exploring Data Types for Efficient Coding
Jun 20, 2025 am 12:46 AM
JavaScripthassevenfundamentaldatatypes:number,string,boolean,undefined,null,object,andsymbol.1)Numbersuseadouble-precisionformat,usefulforwidevaluerangesbutbecautiouswithfloating-pointarithmetic.2)Stringsareimmutable,useefficientconcatenationmethodsf
 What's the Difference Between Java and JavaScript?
Jun 17, 2025 am 09:17 AM
What's the Difference Between Java and JavaScript?
Jun 17, 2025 am 09:17 AM
Java and JavaScript are different programming languages. 1.Java is a statically typed and compiled language, suitable for enterprise applications and large systems. 2. JavaScript is a dynamic type and interpreted language, mainly used for web interaction and front-end development.
 What is event bubbling and capturing in the DOM?
Jul 02, 2025 am 01:19 AM
What is event bubbling and capturing in the DOM?
Jul 02, 2025 am 01:19 AM
Event capture and bubble are two stages of event propagation in DOM. Capture is from the top layer to the target element, and bubble is from the target element to the top layer. 1. Event capture is implemented by setting the useCapture parameter of addEventListener to true; 2. Event bubble is the default behavior, useCapture is set to false or omitted; 3. Event propagation can be used to prevent event propagation; 4. Event bubbling supports event delegation to improve dynamic content processing efficiency; 5. Capture can be used to intercept events in advance, such as logging or error processing. Understanding these two phases helps to accurately control the timing and how JavaScript responds to user operations.
