


We have many well-known chart types: bar, donut, line, pie, you name it. All popular chart libraries support these. Then there are the chart types that do not even have a name. Check out this dreamt-up chart with stacked (nested) squares that can help visualize relative sizes, or how different values compare to one another:
What we’re making
Without any interactivity, creating this design is fairly straightforward. One way to do it is is to stack elements (e.g. SVG
But things get trickier once we introduce some interactivity. Here’s how it should be: When we move our mouse over one of the shapes, we want the others to fade out and move away.
We’ll create these irregular shapes using rectangles and masks — literal
Now, before we begin, you may wonder if a better alternative to SVG to using custom shapes. That’s definitely a possibility! But drawing shapes with a
For example, here’s how we would have to represent the largest blue shape using a
<svg viewbox="0 0 320 320" width="320" height="320">
  <path d="M320 0H0V56H264V320H320V0Z" fill="#264653"></path>
</svg>
If the 0H0V56… does not make any sense to you, check out “The SVG path Syntax: An Illustrated Guide” for a thorough explanation of the syntax.
The basics of the chart
Given a data set like this:
type DataSetEntry = {
  label: string;
  value: number;
};

type DataSet = DataSetEntry[];

const rawDataSet: DataSet = [
  { label: 'Bad', value: 1231 },
  { label: 'Beginning', value: 6321 },
  { label: 'Developing', value: 10028 },
  { label: 'Accomplished', value: 12123 },
  { label: 'Exemplary', value: 2120 }
];
…we want to end up with an SVG like this:
<svg viewbox="0 0 320 320" width="320" height="320">
  <rect width="320" height="320" y="0" fill="..."></rect>
  <rect width="264" height="264" y="56" fill="..."></rect>
  <rect width="167" height="167" y="153" fill="..."></rect>
  <rect width="56" height="56" y="264" fill="..."></rect>
  <rect width="32" height="32" y="288" fill="..."></rect>
</svg>
Determining the highest value
It will become apparent in a moment why we need the highest value. We can use the Math.max() to get it. It accepts any number of arguments and returns the highest value in a set.
const dataSetHighestValue: number = Math.max(
  ...rawDataSet.map((entry: DataSetEntry) => entry.value)
);
Since we have a small dataset, we can just tell that we will get 12123.
Calculating the dimension of the rectangles
If we look at the design, the rectangle representing the highest value (12123) covers the entire area of the chart.
We arbitrarily picked 320 for the SVG dimensions. Since our rectangles are squares, the width and height are equal. How can we make 12123 equal to 320? How about the less “special” values? How big is the 6321 rectangle?
Asked another way, how do we map a number from one range ([0, 12123]) to another one ([0, 320])? Or, in more math-y terms, how do we scale a variable to an interval of [a, b]?
For our purposes, we are going to implement the function like this:
const remapValue = (
  value: number,
  fromMin: number,
  fromMax: number,
  toMin: number,
  toMax: number
): number => {
  return ((value - fromMin) / (fromMax - fromMin)) * (toMax - toMin)   toMin;
};

remapValue(1231, 0, 12123, 0, 320); // 32
remapValue(6321, 0, 12123, 0, 320); // 167
remapValue(12123, 0, 12123, 0, 320); // 320
Since we map values to the same range in our code, instead of passing the minimums and maximums over and over, we can create a wrapper function:
const valueRemapper = (
  fromMin: number,
  fromMax: number,
  toMin: number,
  toMax: number
) => {
  return (value: number): number => {
    return remapValue(value, fromMin, fromMax, toMin, toMax);
  };
};

const remapDataSetValueToSvgDimension = valueRemapper(
  0,
  dataSetHighestValue,
  0,
  svgDimension
);
We can use it like this:
remapDataSetValueToSvgDimension(1231); // 32
remapDataSetValueToSvgDimension(6321); // 167
remapDataSetValueToSvgDimension(12123); // 320
Creating and inserting the DOM elements
What remains has to do with DOM manipulation. We have to create the
Notice that we are using the createElementNS instead of the more common createElement. This is because we are working with an SVG. HTML and SVG elements have different specs, so they fall under a different namespace URI. It just happens that the createElement conveniently uses the HTML namespace! So, to create an SVG, we have to be this verbose:
document.createElementNS('http://www.w3.org/2000/svg', 'svg') as SVGSVGElement;
Surely, we can create another helper function:
const createSvgNSElement = (element: string): SVGElement => {
  return document.createElementNS('http://www.w3.org/2000/svg', element);
};
When we are appending the rectangles to the DOM, we have to pay attention to their order. Otherwise, we would have to specify the z-index explicitly. The first rectangle has to be the largest, and the last rectangle has to be the smallest. Best to sort the data before the loop.
const data = rawDataSet.sort(
  (a: DataSetEntry, b: DataSetEntry) => b.value - a.value
);

data.forEach((d: DataSetEntry, index: number) => {
  const rect: SVGRectElement = createSvgNSElement('rect') as SVGRectElement;
  const rectDimension: number = remapDataSetValueToSvgDimension(d.value);

  rect.setAttribute('width', `${rectDimension}`);
  rect.setAttribute('height', `${rectDimension}`);
  rect.setAttribute('y', `${svgDimension - rectDimension}`);

  svg.appendChild(rect);
});
The coordinate system starts from the top-left; that’s where the [0, 0] is. We are always going to draw the rectangles from the left side. The x attribute, which controls the horizontal position, defaults to 0, so we don’t have to set it. The y attribute controls the vertical position.
To give the visual impression that all of the rectangles originate from the same point that touches their bottom-left corners, we have to push the rectangles down so to speak. By how much? The exact amount that the rectangle does not fill. And that value is the difference between the dimension of the chart and the particular rectangle. If we put all the bits together, we end up with this:
We already added the code for the animation to this demo using CSS.
Cutout rectangles
We have to turn our rectangles into irregular shapes that sort of look like the number seven, or the letter L rotated 180 degrees.
If we focus on the “missing parts” then we can see they cutouts of the same rectangles we’re already working with.
We want to hide those cutouts. That’s how we are going to end up with the L-shapes we want.
Masking 101
A mask is something you define and later apply to an element. Typically, the mask is inlined in the
<svg>
  <mask>
    <!-- ... -->
  </mask>
</svg>
In the
<svg>
  <mask>
    <!-- ... -->
  </mask>
  <rect mask="url(#myCleverlyNamedMask)"></rect>
</svg>
That’s not the only way to define or apply a mask, but it’s the most straightforward way for this demo. Let’s do a bit of experimentation before writing any code to generate the masks.
We said that we want to cover the cutout areas that match the sizes of the existing rectangles. If we take the largest element and we apply the previous rectangle as a mask, we end up with this code:
<svg viewbox="0 0 320 320" width="320" height="320">
  <mask>
    <rect width="264" height="264" y="56" fill=""></rect>
  </mask>
  <rect width="320" height="320" y="0" fill="#264653" mask="url(#theMask)"></rect>
</svg>
The element inside the mask needs a fill value. What should that be? We’ll see entirely different results based on the fill value (color) we choose.
The white fill
If we use a white value for the fill, then we get this:
Now, our large rectangle is the same dimension as the masking rectangle. Not exactly what we wanted.
The black fill
If we use a black value instead, then it looks like this:
We don’t see anything. That’s because what is filled with black is what becomes invisible. We control the visibility of masks using white and black fills. The dashed lines are there as a visual aid to reference the dimensions of the invisible area.
The gray fill
Now let’s use something in-between white and black, say gray:
It’s neither fully opaque or solid; it’s transparent. So, now we know we can control the “degree of visibility” here by using something different than white and black values which is a good trick to keep in our back pockets.
The last bit
Here’s what we’ve covered and learned about masks so far:
- The element inside the
controls the dimension of the masked area. - We can make the contents of the masked area visible, invisible, or transparent.
We have only used one shape for the mask, but as with any general purpose HTML tag, we can nest as many child elements in there as we want. In fact, the trick to achieve what we want is using two SVG
<svg viewbox="0 0 320 320" width="320" height="320">
  <mask>
    <rect width="320" height="320" y="0" fill="???"></rect>
    <rect width="264" height="264" y="56" fill="???"></rect>
  </mask>
  <rect width="320" height="320" y="0" fill="#264653" mask="url(#maskW320)"></rect>
</svg>
One of our masking rectangles is filled with white; the other is filled with black. Even if we know the rules, let’s try out the possibilities.
<mask>
  <rect width="320" height="320" y="0" fill="black"></rect>
  <rect width="264" height="264" y="56" fill="white"></rect>
</mask>
The
Now let’s do flip things where the black rectangle is on top:
<mask>
  <rect width="320" height="320" y="0" fill="white"></rect>
  <rect width="264" height="264" y="56" fill="black"></rect>
</mask>
This is what we want!
Everything under the largest white-filled rectangle is visible, but the smaller black rectangle is on top of it (closer to us on the z-axis), masking that part.
Generating the masks
Now that we know what we have to do, we can create the masks with relative ease. It’s similar to how we generated the colored rectangles in the first place — we create a secondary loop where we create the mask and the two rects.
This time, instead of appending the rects directly to the SVG, we append it to the mask:
data.forEach((d: DataSetEntry, index: number) => {
  const mask: SVGMaskElement = createSvgNSElement('mask') as SVGMaskElement;

  const rectDimension: number = remapDataSetValueToSvgDimension(d.value);
  const rect: SVGRectElement = createSvgNSElement('rect') as SVGRectElement;

  rect.setAttribute('width', `${rectDimension}`);
  // ...setting the rest of the attributes...

  mask.setAttribute('id', `maskW${rectDimension.toFixed()}`);

  mask.appendChild(rect);

  // ...creating and setting the attributes for the smaller rectangle...

  svg.appendChild(mask);
});

data.forEach((d: DataSetEntry, index: number) => {
    // ...our code to generate the colored rectangles...
});
We could use the index as the mask’s ID, but this seems a more readable option, at least to me:
mask.setAttribute('id', `maskW${rectDimension.toFixed()}`); // maskW320, masW240, ...
As for adding the smaller rectangle in the mask, we have easy access the value we need because we previously ordered the rectangle values from highest to lowest. That means the next element in the loop is the smaller rectangle, the one we should reference. And we can do that by its index.
// ...previous part where we created the mask and the rectangle...

const smallerRectIndex = index   1;

// there's no next one when we are on the smallest
if (data[smallerRectIndex] !== undefined) {
  const smallerRectDimension: number = remapDataSetValueToSvgDimension(
    data[smallerRectIndex].value
  );
  const smallerRect: SVGRectElement = createSvgNSElement(
    'rect'
  ) as SVGRectElement;

  // ...setting the rectangle attributes...

  mask.appendChild(smallerRect);
}

svg.appendChild(mask);
What is left is to add the mask attribute to the colored rectangle in our original loop. It should match the format we chose:
rect.setAttribute('mask', `url(#maskW${rectDimension.toFixed()})`); // maskW320, maskW240, ...
The final result
And we are done! We’ve successfully made a chart that’s made out of nested squares. It even comes apart on mouse hover. And all it took was some SVG using the
The above is the detailed content of How to Create an Animated Chart of Nested Squares Using Masks. For more information, please follow other related articles on the PHP Chinese website!

Hot AI Tools

Undress AI Tool
Undress images for free

Undresser.AI Undress
AI-powered app for creating realistic nude photos

AI Clothes Remover
Online AI tool for removing clothes from photos.

Clothoff.io
AI clothes remover

Video Face Swap
Swap faces in any video effortlessly with our completely free AI face swap tool!

Hot Article
Hot Tools

Notepad++7.3.1
Easy-to-use and free code editor

SublimeText3 Chinese version
Chinese version, very easy to use

Zend Studio 13.0.1
Powerful PHP integrated development environment

Dreamweaver CS6
Visual web development tools

SublimeText3 Mac version
God-level code editing software (SublimeText3)
Hot Topics


 What is 'render-blocking CSS'?
Jun 24, 2025 am 12:42 AM
What is 'render-blocking CSS'?
Jun 24, 2025 am 12:42 AM
CSS blocks page rendering because browsers view inline and external CSS as key resources by default, especially with imported stylesheets, header large amounts of inline CSS, and unoptimized media query styles. 1. Extract critical CSS and embed it into HTML; 2. Delay loading non-critical CSS through JavaScript; 3. Use media attributes to optimize loading such as print styles; 4. Compress and merge CSS to reduce requests. It is recommended to use tools to extract key CSS, combine rel="preload" asynchronous loading, and use media delayed loading reasonably to avoid excessive splitting and complex script control.
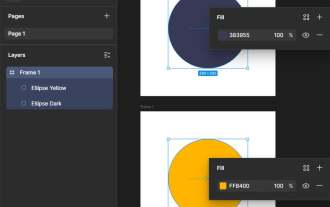 How to use Lotties in Figma
Jun 14, 2025 am 10:17 AM
How to use Lotties in Figma
Jun 14, 2025 am 10:17 AM
In the following tutorial, I will show you how to create Lottie animations in Figma. We'll use two colorful designs to exmplify how you can animate in Figma, and then I'll show you how to go from Figma to Lottie animations. All you need is a free Fig
 External vs. Internal CSS: What's the Best Approach?
Jun 20, 2025 am 12:45 AM
External vs. Internal CSS: What's the Best Approach?
Jun 20, 2025 am 12:45 AM
ThebestapproachforCSSdependsontheproject'sspecificneeds.Forlargerprojects,externalCSSisbetterduetomaintainabilityandreusability;forsmallerprojectsorsingle-pageapplications,internalCSSmightbemoresuitable.It'scrucialtobalanceprojectsize,performanceneed
 Does my CSS must be on lower case?
Jun 19, 2025 am 12:29 AM
Does my CSS must be on lower case?
Jun 19, 2025 am 12:29 AM
No,CSSdoesnothavetobeinlowercase.However,usinglowercaseisrecommendedfor:1)Consistencyandreadability,2)Avoidingerrorsinrelatedtechnologies,3)Potentialperformancebenefits,and4)Improvedcollaborationwithinteams.
 CSS Case Sensitivity: Understanding What Matters
Jun 20, 2025 am 12:09 AM
CSS Case Sensitivity: Understanding What Matters
Jun 20, 2025 am 12:09 AM
CSSismostlycase-insensitive,butURLsandfontfamilynamesarecase-sensitive.1)Propertiesandvalueslikecolor:red;arenotcase-sensitive.2)URLsmustmatchtheserver'scase,e.g.,/images/Logo.png.3)Fontfamilynameslike'OpenSans'mustbeexact.
 What is Autoprefixer and how does it work?
Jul 02, 2025 am 01:15 AM
What is Autoprefixer and how does it work?
Jul 02, 2025 am 01:15 AM
Autoprefixer is a tool that automatically adds vendor prefixes to CSS attributes based on the target browser scope. 1. It solves the problem of manually maintaining prefixes with errors; 2. Work through the PostCSS plug-in form, parse CSS, analyze attributes that need to be prefixed, and generate code according to configuration; 3. The usage steps include installing plug-ins, setting browserslist, and enabling them in the build process; 4. Notes include not manually adding prefixes, keeping configuration updates, prefixes not all attributes, and it is recommended to use them with the preprocessor.
 What are CSS counters?
Jun 19, 2025 am 12:34 AM
What are CSS counters?
Jun 19, 2025 am 12:34 AM
CSScounterscanautomaticallynumbersectionsandlists.1)Usecounter-resettoinitialize,counter-incrementtoincrease,andcounter()orcounters()todisplayvalues.2)CombinewithJavaScriptfordynamiccontenttoensureaccurateupdates.
 CSS: When Does Case Matter (and When Doesn't)?
Jun 19, 2025 am 12:27 AM
CSS: When Does Case Matter (and When Doesn't)?
Jun 19, 2025 am 12:27 AM
In CSS, selector and attribute names are case-sensitive, while values, named colors, URLs, and custom attributes are case-sensitive. 1. The selector and attribute names are case-insensitive, such as background-color and background-Color are the same. 2. The hexadecimal color in the value is case-sensitive, but the named color is case-sensitive, such as red and Red is invalid. 3. URLs are case sensitive and may cause file loading problems. 4. Custom properties (variables) are case sensitive, and you need to pay attention to the consistency of case when using them.
