


This article details a streamlined approach to building a personal website using Eleventy, Tailwind CSS, and Alpine.js, emphasizing simplicity and minimal design. Instead of using existing, potentially complex starters, this guide walks you through a straightforward setup.
Prerequisites: Familiarity with Tailwind CSS, HTML, JavaScript, Nunjucks templating engine, the command line, and npm is assumed.
Step 1: Project Setup
Create a new project directory, navigate to it in your terminal, and initialize a package.json file:
npm init -y
Install Eleventy and Tailwind CSS:
npm install -D @11ty/eleventy tailwindcss@latest
Step 2: Creating a Test Page
Create index.njk (the homepage) and _includes/default.njk (the base template). index.njk will extend default.njk:
<!-- index.njk -->
{% extends "_includes/default.njk" %}

{% block title %}It Works{% endblock %}

{% block content %}
  <div>
    <div>
      Good design<br><br>
      is<br><br>
      as little design<br><br>
      as possible
    </div>
  </div>
{% endblock %}
<!-- _includes/default.njk -->


  <title>{% block title %}Does it work?{% endblock %}</title>
  <meta charset="UTF-8">
  {% if description %}
    <meta content="{{description}}" name="description">
  {% endif %}
  <meta content="ie=edge" http-equiv="x-ua-compatible">
  <meta content="width=device-width, initial-scale=1, shrink-to-fit=no, viewport-fit=cover" name="viewport">
  <link href="/style.css?v=%7B%%20version%20%%7D" rel="stylesheet">
  {% block head %}{% endblock %}


  {% block content %}
    {{ content | safe }}
  {% endblock %}
Step 3: Tailwind CSS Configuration
Create styles/tailwind.config.js and styles/tailwind.css:
// styles/tailwind.config.js
module.exports = {
  content: ['_site/**/*.html'],
  safelist: [],
  theme: {
    extend: {
      colors: {
        change: 'transparent',
      },
    },
  },
  plugins: [],
}
// styles/tailwind.css
@tailwind base;
@tailwind components;
@tailwind utilities;

@layer utilities {
  .change {
    color: transparent;
  }
}
Step 4: Project Configuration and Build
Create .gitignore to exclude unnecessary files:
<code>_site/
.DS_Store
node_modules/</code>
Create .eleventy.js to configure Eleventy:
const htmlmin = require('html-minifier');
const now = String(Date.now());

module.exports = function(eleventyConfig) {
  eleventyConfig.addWatchTarget('./styles/tailwind.config.js');
  eleventyConfig.addWatchTarget('./styles/tailwind.css');
  eleventyConfig.addPassthroughCopy({ './_tmp/style.css': './style.css' });
  eleventyConfig.addShortcode('version', function() { return now; });

  eleventyConfig.addTransform('htmlmin', function(content, outputPath) {
    if (process.env.ELEVENTY_PRODUCTION && outputPath && outputPath.endsWith('.html')) {
      return htmlmin.minify(content, { useShortDoctype: true, removeComments: true, collapseWhitespace: true });
    }
    return content;
  });
};
Update package.json with build scripts:
{
  "scripts": {
    "start": "eleventy --serve & npx tailwindcss -i styles/tailwind.css -c styles/tailwind.config.js -o _site/style.css --watch",
    "build": "ELEVENTY_PRODUCTION=true eleventy && NODE_ENV=production npx tailwindcss -i styles/tailwind.css -c styles/tailwind.config.js -o _site/style.css --minify"
  },
  "devDependencies": {
    "@11ty/eleventy": "^1.0.0",
    "tailwindcss": "^3.0.0",
    "html-minifier": "^4.0.0"
  }
}
Run npm install and then npm start to start the development server. Test Tailwind's reactivity by modifying tailwind.config.js and tailwind.css. Run npm run build for a production build.
Step 5: Integrating Alpine.js
Install Alpine.js:
npm install -D alpinejs
Update .eleventy.js to copy Alpine.js:
// ... (previous .eleventy.js content) ...
eleventyConfig.addPassthroughCopy({ './node_modules/alpinejs/dist/cdn.js': './js/alpine.js' });
// ... (rest of .eleventy.js content) ...
Add Alpine.js to _includes/default.njk before the closing
The above is the detailed content of An Eleventy Starter with Tailwind CSS and Alpine.js. For more information, please follow other related articles on the PHP Chinese website!

Hot AI Tools

Undress AI Tool
Undress images for free

Undresser.AI Undress
AI-powered app for creating realistic nude photos

AI Clothes Remover
Online AI tool for removing clothes from photos.

Clothoff.io
AI clothes remover

Video Face Swap
Swap faces in any video effortlessly with our completely free AI face swap tool!

Hot Article
Hot Tools

Notepad++7.3.1
Easy-to-use and free code editor

SublimeText3 Chinese version
Chinese version, very easy to use

Zend Studio 13.0.1
Powerful PHP integrated development environment

Dreamweaver CS6
Visual web development tools

SublimeText3 Mac version
God-level code editing software (SublimeText3)
Hot Topics


 What is 'render-blocking CSS'?
Jun 24, 2025 am 12:42 AM
What is 'render-blocking CSS'?
Jun 24, 2025 am 12:42 AM
CSS blocks page rendering because browsers view inline and external CSS as key resources by default, especially with imported stylesheets, header large amounts of inline CSS, and unoptimized media query styles. 1. Extract critical CSS and embed it into HTML; 2. Delay loading non-critical CSS through JavaScript; 3. Use media attributes to optimize loading such as print styles; 4. Compress and merge CSS to reduce requests. It is recommended to use tools to extract key CSS, combine rel="preload" asynchronous loading, and use media delayed loading reasonably to avoid excessive splitting and complex script control.
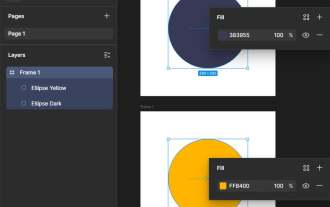 How to use Lotties in Figma
Jun 14, 2025 am 10:17 AM
How to use Lotties in Figma
Jun 14, 2025 am 10:17 AM
In the following tutorial, I will show you how to create Lottie animations in Figma. We'll use two colorful designs to exmplify how you can animate in Figma, and then I'll show you how to go from Figma to Lottie animations. All you need is a free Fig
 External vs. Internal CSS: What's the Best Approach?
Jun 20, 2025 am 12:45 AM
External vs. Internal CSS: What's the Best Approach?
Jun 20, 2025 am 12:45 AM
ThebestapproachforCSSdependsontheproject'sspecificneeds.Forlargerprojects,externalCSSisbetterduetomaintainabilityandreusability;forsmallerprojectsorsingle-pageapplications,internalCSSmightbemoresuitable.It'scrucialtobalanceprojectsize,performanceneed
 Does my CSS must be on lower case?
Jun 19, 2025 am 12:29 AM
Does my CSS must be on lower case?
Jun 19, 2025 am 12:29 AM
No,CSSdoesnothavetobeinlowercase.However,usinglowercaseisrecommendedfor:1)Consistencyandreadability,2)Avoidingerrorsinrelatedtechnologies,3)Potentialperformancebenefits,and4)Improvedcollaborationwithinteams.
 CSS Case Sensitivity: Understanding What Matters
Jun 20, 2025 am 12:09 AM
CSS Case Sensitivity: Understanding What Matters
Jun 20, 2025 am 12:09 AM
CSSismostlycase-insensitive,butURLsandfontfamilynamesarecase-sensitive.1)Propertiesandvalueslikecolor:red;arenotcase-sensitive.2)URLsmustmatchtheserver'scase,e.g.,/images/Logo.png.3)Fontfamilynameslike'OpenSans'mustbeexact.
 What is Autoprefixer and how does it work?
Jul 02, 2025 am 01:15 AM
What is Autoprefixer and how does it work?
Jul 02, 2025 am 01:15 AM
Autoprefixer is a tool that automatically adds vendor prefixes to CSS attributes based on the target browser scope. 1. It solves the problem of manually maintaining prefixes with errors; 2. Work through the PostCSS plug-in form, parse CSS, analyze attributes that need to be prefixed, and generate code according to configuration; 3. The usage steps include installing plug-ins, setting browserslist, and enabling them in the build process; 4. Notes include not manually adding prefixes, keeping configuration updates, prefixes not all attributes, and it is recommended to use them with the preprocessor.
 What are CSS counters?
Jun 19, 2025 am 12:34 AM
What are CSS counters?
Jun 19, 2025 am 12:34 AM
CSScounterscanautomaticallynumbersectionsandlists.1)Usecounter-resettoinitialize,counter-incrementtoincrease,andcounter()orcounters()todisplayvalues.2)CombinewithJavaScriptfordynamiccontenttoensureaccurateupdates.
 CSS: When Does Case Matter (and When Doesn't)?
Jun 19, 2025 am 12:27 AM
CSS: When Does Case Matter (and When Doesn't)?
Jun 19, 2025 am 12:27 AM
In CSS, selector and attribute names are case-sensitive, while values, named colors, URLs, and custom attributes are case-sensitive. 1. The selector and attribute names are case-insensitive, such as background-color and background-Color are the same. 2. The hexadecimal color in the value is case-sensitive, but the named color is case-sensitive, such as red and Red is invalid. 3. URLs are case sensitive and may cause file loading problems. 4. Custom properties (variables) are case sensitive, and you need to pay attention to the consistency of case when using them.
