
 Mobile Game Tutorial
Mobile Game Guide
Zelda Tears of the Kingdom Camera Work in The Depths walkthrough
Mobile Game Tutorial
Mobile Game Guide
Zelda Tears of the Kingdom Camera Work in The Depths walkthrough

Camera Work in The Depths in Zelda: Tears of the Kingdom is a primary quest you’ll begin after obtaining the Paraglider.
This mission will likely mark your first venture into The Depths - the shadowy underworld of Zelda: Tears of the Kingdom - so it’s wise to prepare thoroughly for the journey. It's a crucial task to finish, as it enables you to unlock the Camera for the Purah Pad and, by extension, begin working on the Hyrule Compendium.
Below you'll find out how to complete the Camera Work in The Depths quest in Zelda: Tears of the Kingdom.
Hey! Listen! While we’ve done our best to avoid revealing the storyline, this guide does contain spoilers.
On this page:
- How to start Camera Work in The Depths
- Hyrule Field Chasm location
- How to unlock the Camera
How to start Camera Work in The Depths in Zelda Tears of the Kingdom
Before beginning the Camera Work in The Depths quest in Zelda: Tears of the Kingdom, you must have reached the point in Crisis At Hyrule Castle where both the Paraglider and Regional Phenomena quests are unlocked.
At this stage, Josha will run off to the area below where Purah is standing, which is also where Robbie can be found. Follow Josha to this spot and speak with her to initiate the Camera Work in The Depths quest.


Once you've finished speaking with Josha and Robbie, you’ll receive 10 Brightbloom Seeds and five Arrows. Brightbloom Seeds are extremely useful when exploring the chasms, because once fused to an arrow, you can shoot them onto a wall to light up some of the surrounding area.
Hyrule Field Chasm location in Zelda Tears of the Kingdom
To complete the Camera Work in The Depths quest in Zelda: Tears of the Kingdom, you need to visit the Hyrule Field Chasm. When you're ready, exit Lookout Landing from its southern exit and continue heading south until you arrive at the Hyrule Field Chasm, located near the Jiosin Shrine.

If this is your first time venturing into one of the chasms, we recommend gathering strong weapons—taking the time to fuse materials to them—and stocking up on arrows. The chasms are hazardous, so a well-equipped arsenal is essential.
It’s important to note that health functions differently in the chasms. While you can still heal by consuming food or elixirs in The Depths, if a heart becomes greyed out and damaged, you won’t be able to restore that portion of health. This occurs when you come into contact with Gloom—not the Pokémon, but red puddles of glop—either by stepping into one or being attacked by a Gloom-infected enemy.
If one of your hearts turns grey, it can be restored by returning to the surface, standing within the center of a Lightroot, or eating a meal made with Sundelions—a plant found on the sky islands—as an ingredient. Once the hearts return to normal, you'll need to eat a meal to recover your missing health.
How to unlock the Camera in Zelda Tears of the Kingdom
To reach the depths of the Hyrule Field Chasm in Zelda: Tears of the Kingdom, you need to descend into the chasm itself. Just make sure to deploy the Paraglider at the right moment or else Link will perish.
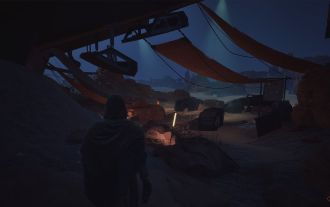
The first thing you need to do in The Depths is talk to Ponnick who is standing near a hot air balloon in a small patch of light. Ponnick will inform you that Robbie has ventured into The Depths, so you must follow him.


However, The Depths is a very dark place and you’ll need to use Brightbloom Seeds to illuminate your path. The easiest way to accomplish this is by fusing a Brightbloom Seed to an arrow and then shooting it at the floor, though, if you want to conserve arrows, you can always toss the seed directly.
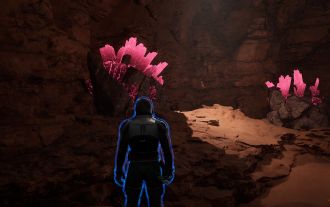
For now, head toward the large glowing object directly west of Ponnick.

Upon arrival, stand beneath the Lightroot and examine the glowing green handprint. This action will cause part of the surrounding area to become illuminated, making your progress easier. It also adds portions of the surrounding terrain to your map of The Depths and allows fast travel back to this Lightroot. The Lightroot will also heal any damage sustained and restore any greyed-out hearts you might have.

Next, you need to head to the fire located west of your current position, but before leaving, read a note from Robbie on the table next to the fire.

Make sure to steer clear of the pools of gloom while traveling to the next fire—if you remain in a gloom pool too long, one of Link’s hearts will turn grey and this segment of your health will be locked. To restore it, you must either return to the surface, stand in the center of a Lightroot, or consume a meal containing Sundelions as an ingredient.

Once you reach the next fire, read the note left by Robbie to learn he has continued westward, and if you look to your left, another Lightroot will be visible in the distance.

Proceed toward this Lightroot using Brightbloom Seeds to light your way and avoid any gloom puddles. You may also encounter enemies along this route; if so, proceed cautiously. Enemies in The Depths often deal more damage than those on the surface, and some are infected with gloom, so exercise caution.
When you reach the Lightroot—the Layusus Lightroot precisely—stand beneath it and select examine to illuminate nearby areas and add more land to your map of The Depths. Afterward, you’ll locate Robbie nearby standing by a fire.

Talking to Robbie will unlock the Camera function, and to test it out, you must take a picture of the nearby statue for Josha. You might need to step back slightly to ensure the statue fits in the frame, but go ahead and snap the photo! You’ll know when you've captured it correctly, and Robbie will automatically respond.

Now it’s time to return to Lookout Landing where you’ll find Robbie and Josha inside the room beneath Purah’s house. Speak with Robbie to initiate a conversation that concludes the quest, and Josha will reward you with five Zonaites.
With that, Camera Work in The Depths comes to a close. If you'd like to explore more about Link’s adventure in Hyrule, check out our Zelda: Tears of the Kingdom walkthrough.
The above is the detailed content of Zelda Tears of the Kingdom Camera Work in The Depths walkthrough. For more information, please follow other related articles on the PHP Chinese website!

Hot AI Tools

Undress AI Tool
Undress images for free

Undresser.AI Undress
AI-powered app for creating realistic nude photos

AI Clothes Remover
Online AI tool for removing clothes from photos.

Clothoff.io
AI clothes remover

Video Face Swap
Swap faces in any video effortlessly with our completely free AI face swap tool!

Hot Article
Hot Tools

Notepad++7.3.1
Easy-to-use and free code editor

SublimeText3 Chinese version
Chinese version, very easy to use

Zend Studio 13.0.1
Powerful PHP integrated development environment

Dreamweaver CS6
Visual web development tools

SublimeText3 Mac version
God-level code editing software (SublimeText3)
Hot Topics


 Dune: Awakening - Where To Get Insulated Fabric
Jun 12, 2025 am 11:19 AM
Dune: Awakening - Where To Get Insulated Fabric
Jun 12, 2025 am 11:19 AM
As you journey through Dune: Awakening, you'll quickly realize that there's a vast array of resources you'll need to locate and gather in large quantities. While some are relatively easy to come by, others are more elusive and found only in specific

 Lies of P Lumacchio Boss Fight Guide (Overture DLC)
Jun 11, 2025 am 10:13 AM
Lies of P Lumacchio Boss Fight Guide (Overture DLC)
Jun 11, 2025 am 10:13 AM
Written by Andrew HammelBrowse all Lies of P Lumacchio is one of the final major bosses in the Overture DLC. He constantly talks about hating violence... only to try and kill you with it. The good news? He's highly vulnerable to fire, backstabs, and
 Date Everything: Dirk And Harper Relationship Guide
Jun 18, 2025 am 01:16 AM
Date Everything: Dirk And Harper Relationship Guide
Jun 18, 2025 am 01:16 AM
You can date everything in Date Everything, just as the game promises. There are some boundaries, yes, but likely fewer than you'd expect. The floor beneath your feet, the food in your fridge, even your own shadow—each is open to love and affection,
 Dune: Awakening - Advanced Planetologist Quest Walkthrough
Jun 18, 2025 pm 06:04 PM
Dune: Awakening - Advanced Planetologist Quest Walkthrough
Jun 18, 2025 pm 06:04 PM
There are five distinct skill classes in Dune: Awakening, but initially, only four are available. The fifth, the Planetologist, requires you to locate a trainer somewhere out in the desert.Completing his initial quest will grant access to basic Plane
 All Mario Kart World Dash Food locations
Jun 12, 2025 am 11:20 AM
All Mario Kart World Dash Food locations
Jun 12, 2025 am 11:20 AM
Mario Kart World has implemented one particular mechanic that I found unexpectedly intriguing – the Dash Food system. These are snacks, thoughtfully prepared and generously handed out by Yoshis throughout the map, which you can eat while racing or ex
 Oguri Cap Build Guide | A Pretty Derby Musume
Jun 30, 2025 am 09:05 AM
Oguri Cap Build Guide | A Pretty Derby Musume
Jun 30, 2025 am 09:05 AM
Written by Priya KapoorBrowse All Uma Musume: Pretty Derby Oguri Cap is a long-distance runner with strong stamina scaling and solid speed growth. She’s dependable in various race formats if you develop her according to her strengths and carefully pl
 PEAK How to Emote
Jun 24, 2025 am 09:33 AM
PEAK How to Emote
Jun 24, 2025 am 09:33 AM
Written by Jason B.Browse All PEAK Guides Emotes in the game PEAK are straightforward and only require a single button input to activate during gameplay.How to EmoteActivate an emote – RSimply press R at any point during a run, and your character wil
