
 Mobile Game Tutorial
Mobile Game Guide
Crisis at Hyrule Castle walkthrough in Zelda Tears of the Kingdom
Mobile Game Tutorial
Mobile Game Guide
Crisis at Hyrule Castle walkthrough in Zelda Tears of the Kingdom
Crisis at Hyrule Castle walkthrough in Zelda Tears of the Kingdom
Jun 17, 2025 am 11:17 AM
Crisis at Hyrule Castle is a main quest you can start early into your journey in Zelda: Tears of the Kingdom, but, to finish it, you’ll first have to complete part of the game’s storyline.
This is because Crisis at Hyrule Castle is divided into two acts - the first occurring within the opening hours of Zelda: Tears of the Kingdom, with the second being unlocked after you’ve completed the Regional Phenomenon main quest.
This Crisis at Hyrule Castle walkthrough in Zelda: Tears of the Kingdom focuses on the second act, where you find the seven Zelda locations with Hyrule Castle, and includes links to where we’ve covered the first part of the quest, so you can complete this part of the game’s storyline.
Hey! Listen! While we’ve done our best to avoid major plot reveals, this guide does contain minor spoilers!
On this page:
- Crisis at Hyrule Castle explained
- How to reach Hyrule Castle
- All Zelda locations during Crisis at Hyrule Castle
If you’d like to learn more about Link’s adventure, visit our Zelda: Tears of the Kingdom walkthrough.
Crisis at Hyrule Castle in Zelda Tears of the Kingdom explained
Crisis at Hyrule Castle is an interesting quest in Zelda: Tears of the Kingdom, because, like the Find Princess Zelda quest, you need to complete other main quests until it can be ticked off your list.
You can start Crisis at Hyrule Castle shortly after leaving the Great Sky Island and completing the To The Kingdom of Hyrule quest. Here you’ll talk to Purah who will task you with finding Captain Hoz and, upon your return, give you the Paraglider. This will then start the Regional Phenomenon, which is finished by completing Wind Temple, Water Temple, Fire Temple and Lightning Temple.
Once you’ve finished these four temples, it’s time to return to Lookout Landing again and talk to Purah. You’ll find her standing by the telescope above her lab and, after talking to her, you’ll be able to continue working through Crisis at Hyrule Castle with your first task being reaching the castle itself.


How to reach Hyrule Castle in Zelda Tears of the Kingdom
Reaching Hyrule Castle can be quite tricky in Zelda: Tears of the Kingdom due to how it's floating above a chasm. Before you depart for it in Crisis at Hyrule Castle, it’s a good idea to ensure you’ve got some high health restoring meals and a selection of strong weapons. Don’t worry about being too precious with the weapons you bring though, because the castle is full of strong equipment you can 'borrow'.
You can reach the castle through multiple ways, such as creating a flying machine using Zonai devices or simply teleporting to the Serutabomac Shrine if you’ve already visited the castle and unlocked this shrine.
The method we took, however, was using the Lookout Landing Skyview Tower to shoot us into the air and then paragliding over to the castle. We managed it with two Stamina upgrades and using the Vow of Tulin, which is earned by completing the Wind Temple.

If you haven’t been upgrading your Stamina, but still want to use the Paraglider to reach Hyrule Castle, then make sure you bring some Energizing Elixirs as these will allow you to restore your Stamina mid-flight or Enduring Elixirs for additional Stamina wheels. You can find the recipes for both in our recipes guide.

All Zelda locations during Crisis at Hyrule Castle in Zelda Tears of the Kingdom
Once you’ve arrived at Hyrule Castle in the Crisis at Hyrule Castle main quest of Zelda: Tears of the Kingdom, you’ll have to travel about the ruined castle to find Zelda in seven different locations.
Zelda will call out to you when you first arrive at Hyrule Castle and her current location will appear on the map. When you visit this location, you will be ambushed by a collection of monsters and, for the next location to reveal itself, you must defeat these monsters.

Below we walk you through the seven Zelda locations in Crisis at Hyrule Castle and how to reach them. It’s important to note that our starting location was outside of the Sanctum and, while you don’t have to start there, Zelda will follow the location order we’ve laid out below.
If you are starting your journey about the castle outside of the Sanctum, then we recommend grabbing the Champion’s Leathers while you’re there. This piece of armor starts with a defence of 5, so, if you haven’t been collecting and upgrading your armor, it may come in handy during the monster battle in this quest.
Zelda location 1 - Second Gatehouse on B1
Zelda can first be found on the B1 level of the Second Gatehouse.

The Second Gatehouse sits south-east of the Sanctum, so just follow the path down from this room, avoiding the Gloom, and glide over when you’re opposite it. Now you just need to drop down to where Zelda’s standing.


Surprise! It’s not actually Zelda but a Black Boss Bokoblin and some Black Bokoblins. You need to defeat them to continue with this quest and, since it's an enclosed area, we recommend using the Sage Vows, especially the Vow of Riju, to defeat them.
Once the monsters are defeated, you can also open a chest to find a Royal Halberd.

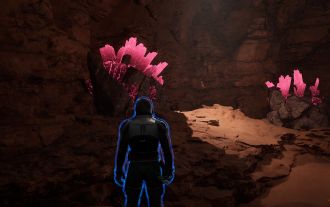
Zelda location 2 - Library on B3
Zelda’s next location is in the Library on the B3 level of Hyrule Castle.

The Library is north of the Second Gatehouse, so head out of the right-hand door and jump across the river. Next you need to climb up the cliff and enter the tower. Inside you’ll find some arrows, a Soldier’s Bow and a chest containing a Royal Shield.


Now you need to climb the ladder inside of the tower and, after jumping down to the other side of the wall, head north. There will be a couple of Blue Lizalfos in this area, which you can either avoid or defeat.

By heading across the road you’ll come to a cliff from which you’ll be able to see the Serutabomac Shrine, which you should unlock if you haven’t done so already, and some Black Moblins. You will also be able to make out a roof in a section of roof alongside the cliff.

What you need to do now is paraglide over to this hole and drop down into it to reach the library.

Head towards Zelda and you’ll find yourself facing a Black Hinox, along with one Fire Chuchu, an Ice Chuchu and an Electric Chuchu. We recommend taking out the Chuchu first to make running around the Hinox easier. You can also use Ascend to reach the balcony to avoid some of the Hinox, but it will throw explosive barrels at you when you’re there.
After the monsters are defeated, it’s time to find Zelda again. Yet, before you leave, it’s worth using Ultrahand to move the fake bookcase beneath the northern stars and visit the King’s Study. Inside you’ll find a Royal Shield, Royal Broadsword and a chest containing the Royal Guard Boots.

Zelda location 3 - Staircase north of Library on B3
The next Zelda location isn’t far from the library and, to reach it, you just need to go up the stairs at the northern end of the room before following the corridor along.

This time the forces you face will be four Gibdo and one Gibdo Moth. Since you’ll be fighting them in a small space, we recommend using the Vow of Riju, earned by completing the Lightning Temple, to make it easier to kill these monsters. Also keep in mind that some of the Gibdos will be hiding up the stairs, so don’t get sneak attacked!
Zelda location 4 - Princess Zelda’s Bedroom on B1
You now need to visit Princess Zelda’s Bedroom, which is on the western side at the B1 level of Hyrule Castle.

To reach it, continue up the stairs and follow the path it brings you. This path will take you around the castle, but it does involve going through a tunnel filled with Horriblins of various colours.
If you want to avoid this tunnel, then you can use the Paraglider to fly around the tunnel and land on a section of land on the other side. Taking this route will, however, mean that you will have to climb back up to the path. There is also a Like Like hanging from an archway in this area!

No matter which route you take, after the tunnel you’ll come to a section of castle where you’ll see an Ice Like hanging from an archway, with a Blue Lizalfos and Black Moblin standing on the wall above. You can ignore the Ice Like for now, but will have to defeat the two monsters on the wall before you need to get past them to reach Zelda.

Once the monsters have been defeated, head up the staircase close to where the Blue Lizalfos once stood and then, possibly defeating another Lizalfos on the way, climb up the next staircase.


When you reach the top, use Ascend before dropping through the hole in the floor to where Zelda is. This will lead you to facing three Fire-Breath Lizalfos. Thankfully, they can be easily defeated by using ice-based attacks, such as fusing a White Chuchu Jelly to an arrow.


Zelda location 5 - Western room on B3
Zelda will now be waiting in a room beneath her bedroom on the B3 level of the castle.

The quickest way to reach this room is to go through the hole in the wall of Zelda’s bedroom and, from there, use the Paraglider to fly down to the correct level. It’s worth placing a Travel Medallion if you have one, so, if you make a mistake, you can quickly return to this point in the castle.

The doorway you’re looking for is beneath the tower, which sits almost parallel with Zelda’s bedroom, on the western edge of the Hyrule Castle.

Once you’re inside the room containing Zelda, you’ll need to defeat a Silver Moblin and a couple of Ice Keese.
Zelda location 6 - South-western room on B3
While Zelda is still on the B3 level of Hyrule Castle and south-east of your current location, you can’t go directly to the room she’s now in.

Instead, use Ascend to leave the area you’re currently in to find yourself close to the Ice Like you ignored on your way to Zelda’s fourth location. This time, however, you do need to kill this monster.

After doing so, continue going forwards until you find a set of stairs at the base of a ruined tower on your right-hand side. Now you simply need to go down the stairs and head down the left-hand corridor you find down there.


Zelda will vanish once again and, this time, you’ll need to defeat three Shock Likes.
Zelda location 7 - Sanctum on 1F
Now it’s time to return to the start of our journey around Hyrule Castle - the Sanctum.

To reach it, we recommend going back up the stairs rather than simply using Ascend since this may leave you in a puddle of Gloom. You can, however, use Ascend once you’re at the top of the stairs before climbing one of the non-Gloom covered sections of the cliff to your east. Depending on which monsters you defeated previously and the Blood Moon, there may be a Blue Lizalfos you need to defeat.

At the top of this wall, climb up the next wall to find yourself outside of the Sanctum. Before you head inside, we recommend ensuring you’re at full health, along with gathering some powerful weapons and good meals if you don’t have them already. It’s also a good idea to activate all of your Sage Vows, because they will help draw attention away from you during the upcoming fight as well as allowing you access to their abilities. You may also want to boost your attack and defence.

When you’re ready, head into the Sanctum and you’ll shortly find yourself facing 10 Phantom Ganon in total. If you haven’t faced this monster before, we recommend giving our how to defeat Phantom Ganon guide a quick read.

The first round of five Phantom Ganon’s will all be using swords and, once you defeat them, five more Phantom Ganon’s will appear. This next round of phantoms will cycle through all of their possible weapons, going from swords to clubs to spears.
During this part of the fight, one of the Phantom Ganon’s will occasionally start to spread Gloom across the battlefield. If you don’t stop this, then you can easily find yourself surrounded by dangerous Gloom and cornered by Phantom Ganons.


Thankfully, you can easily stop this by hitting the Gloom-spreading-phantom three times. The easiest way to do this is by using arrows, since you won’t have to step into the Gloom. The Phantom Ganon will also be stunned for a few seconds afterwards, allowing you to get some good hits in.
After defeating all of the Phantom Ganons and watching the cutscene, collect the Heart Container if you so choose before returning to Lookout Landing to talk to Purah.

The Crisis at Hyrule Castle will now technically be complete, but, to have it ticked off your quest list, you will first need to find the fifth sage. This involves completing the Find the Fifth Sage and Secret of the Ring Ruins main quests, along with visiting the Spirit Temple.
If you’ve already found the fifth sage, however, then you’ll be treated to a rather funny cutscene and then be able to battle Ganondorf. Though you may also want to continue exploring Hyrule and, if that’s the case, then check out our Zelda: Tears of the Kingdom walkthrough.
The above is the detailed content of Crisis at Hyrule Castle walkthrough in Zelda Tears of the Kingdom. For more information, please follow other related articles on the PHP Chinese website!

Hot AI Tools

Undress AI Tool
Undress images for free

Undresser.AI Undress
AI-powered app for creating realistic nude photos

AI Clothes Remover
Online AI tool for removing clothes from photos.

Clothoff.io
AI clothes remover

Video Face Swap
Swap faces in any video effortlessly with our completely free AI face swap tool!

Hot Article
Hot Tools

Notepad++7.3.1
Easy-to-use and free code editor

SublimeText3 Chinese version
Chinese version, very easy to use

Zend Studio 13.0.1
Powerful PHP integrated development environment

Dreamweaver CS6
Visual web development tools

SublimeText3 Mac version
God-level code editing software (SublimeText3)
Hot Topics


 Dune: Awakening - Where To Get Insulated Fabric
Jun 12, 2025 am 11:19 AM
Dune: Awakening - Where To Get Insulated Fabric
Jun 12, 2025 am 11:19 AM
As you journey through Dune: Awakening, you'll quickly realize that there's a vast array of resources you'll need to locate and gather in large quantities. While some are relatively easy to come by, others are more elusive and found only in specific

 Lies of P Lumacchio Boss Fight Guide (Overture DLC)
Jun 11, 2025 am 10:13 AM
Lies of P Lumacchio Boss Fight Guide (Overture DLC)
Jun 11, 2025 am 10:13 AM
Written by Andrew HammelBrowse all Lies of P Lumacchio is one of the final major bosses in the Overture DLC. He constantly talks about hating violence... only to try and kill you with it. The good news? He's highly vulnerable to fire, backstabs, and
 Date Everything: Dirk And Harper Relationship Guide
Jun 18, 2025 am 01:16 AM
Date Everything: Dirk And Harper Relationship Guide
Jun 18, 2025 am 01:16 AM
You can date everything in Date Everything, just as the game promises. There are some boundaries, yes, but likely fewer than you'd expect. The floor beneath your feet, the food in your fridge, even your own shadow—each is open to love and affection,
 Dune: Awakening - Advanced Planetologist Quest Walkthrough
Jun 18, 2025 pm 06:04 PM
Dune: Awakening - Advanced Planetologist Quest Walkthrough
Jun 18, 2025 pm 06:04 PM
There are five distinct skill classes in Dune: Awakening, but initially, only four are available. The fifth, the Planetologist, requires you to locate a trainer somewhere out in the desert.Completing his initial quest will grant access to basic Plane
 All Mario Kart World Dash Food locations
Jun 12, 2025 am 11:20 AM
All Mario Kart World Dash Food locations
Jun 12, 2025 am 11:20 AM
Mario Kart World has implemented one particular mechanic that I found unexpectedly intriguing – the Dash Food system. These are snacks, thoughtfully prepared and generously handed out by Yoshis throughout the map, which you can eat while racing or ex
 Oguri Cap Build Guide | A Pretty Derby Musume
Jun 30, 2025 am 09:05 AM
Oguri Cap Build Guide | A Pretty Derby Musume
Jun 30, 2025 am 09:05 AM
Written by Priya KapoorBrowse All Uma Musume: Pretty Derby Oguri Cap is a long-distance runner with strong stamina scaling and solid speed growth. She’s dependable in various race formats if you develop her according to her strengths and carefully pl
 PEAK How to Emote
Jun 24, 2025 am 09:33 AM
PEAK How to Emote
Jun 24, 2025 am 09:33 AM
Written by Jason B.Browse All PEAK Guides Emotes in the game PEAK are straightforward and only require a single button input to activate during gameplay.How to EmoteActivate an emote – RSimply press R at any point during a run, and your character wil
