
 Mobile Game Tutorial
Mobile Game Guide
How to get Frostbite Armor in Zelda Tears of the Kingdom
Mobile Game Tutorial
Mobile Game Guide
How to get Frostbite Armor in Zelda Tears of the Kingdom

The Frostbite Armor in Zelda: Tears of the Kingdom really shines when you wear it in a cold environment. Wearing any piece of this armor will give Link an elemental attack. The more pieces you wear, the stronger the elemental attack will be.
As with finding many other armor items in Zelda: Tears of the Kingdom, you will need to do some exploring to find all three pieces of the Frostbite Armor. We recommend stocking up on warming meals, elixirs, and weapons before heading off to find this set.
Once you're ready, we're here to show you how to get the Frostbite Armor in Zelda: Tears of the Kingdom.
On this page:
- How to get the Frostbite Shirt
- How to get the Frostbite Headdress
- How to get the Frostbite Trousers
- Frostbite Armor explained
If you'd like to learn more about Link's adventure, visit our Zelda: Tears of the Kingdom walkthrough.
How to get the Frostbite Shirt in Zelda Tears of the Kingdom
The Frostbite Shirt in Zelda: Tears of the Kingdom is in a Cave in the northern tip of Hyrule Ridge. The cave itself can be found in the northernmost half of Hyrule Ridge, near the north eastern tip of Tabantha Frontier.
We know that it can be hard to find the cave entrance, so we've marked the rough location you need to get to on the map below. Head here to begin to find the Frostbite Shirt.

To get the Frostbite Shirt, you need to find a specific cave at the northern tip of Hyrule Ridge. We've detailed the location you need to head to on the map above, and you can also head to the coordinates -2767, 1735, 0232.
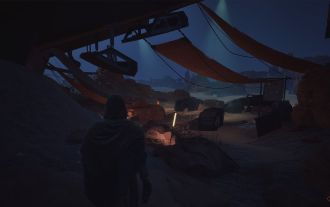
Once you get to this area, look around until you find a large wooden cabin that has Bokoblins outside of it. Defeat the Bokoblins and save the people inside the cabin if you want to. We highly recommend this as they provide information on a fun way to get around. Once you are ready, stand at the front door of the cabin so that you are facing out into the wild.

From here, head towards the main path in front of you and follow it down to your left. Keep following this path until you see a small campsite pop up on your left-hand side.

Behind this campsite, you should find two sisters standing in front of a cave opening. Head into this cave opening and follow the path by climbing down into the lowered section of the cave.

Here, you should find that the pathway continues through a small tunnel. Be ready for a few fights in here, the first enemy you will come across will be a Horriblin.
Take them out however you'd like to. We decided to repeatedly attack them with a melee weapon that had a damage stat of ten combined with a melee weapon that had Topaz attached to it.
Once you've dealt with the Horriblin, continue to follow the path through the small tunnel. You'll soon come across a Like Like attached to the wall on your right. Now, this enemy can eat you up and spit you out - quite literally.

The best way to go about attacking the Like Like is to wait for it to open its mouth to expose the bulbous growth in the middle of it. Attack this repeatedly with a melee weapon to eventually defeat the Like Like.
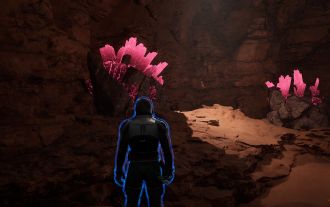
Once the Like Like is dead dead, continue to follow the path in the tunnel until you come to a rather large room in the cave. If you look up, you may even see a glimpse of a Shrine here. However, right now, you will want to go to the right.

Stop walking to the right once you see the flag poles sticking out of the cave walls. When you see them, look to your right again and you should see a chest that is stuck behind some thorns.

To get past these thorns, you can set fire to them. We did this by throwing down some flint and striking it with a weapon that had metal on it. You can also probably scale the cave wall to climb up and over this, but fire is a faster option if you're in a hurry.

Once you get to the chest, open it up to claim your Frostbite Shirt.
If that seems like a lot of effort and you have Rupees to spare, you can always just buy the Frostbite Shirt from Cece's shop in Hateno Village after completing the Mayoral Election quest set.
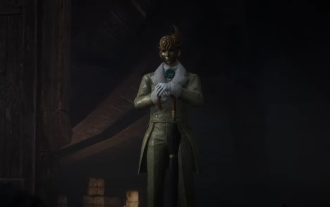
How to get the Frostbite Headdress in Zelda Tears of the Kingdom
The Frostbite Headdress in Zelda: Tears of the Kingdom is in Lake Kilsie Cave. This is west of Hebra Mountain, north west of Rospro Pass Skyview Tower, east of Tauyosipun Shrine and north west of Rito Village.
We've marked its exact location on the map below for you, and the Lake Kilsie Cave coordinates are (-3951, 2844, -0016.)


The entrance to Lake Kilsie Cave is at water level on the northern tip of Lake Kilsie. Once you get here, you'll almost instantly come face to face with a Silver Horriblin in the entrance.
We recommend defeating them before moving forward as they can make a relatively easy task that much harder.

Once you've dealt with the Horriblin, follow the path in the entrance until you reach the edge of it. You should be facing a large room in the cave that has an updraft in the middle of it.
From this point, look to your right and you should see an opening in the wall here covered by icicles. Clear the icicles first by attaching a Bomb Flower to an arrow or using any other material at your disposal to melt the ice away.

Once the icicles have been cleared, jump and glide into the updraft in the middle of the room. This will lift you up, then glide across to the opening you just cleared.

Once inside the opening, you'll see a chest. The Frostbite Headress is in this chest.
How to get the Frostbite Trousers in Zelda Tears of the Kingdom
The Frostbite Trousers in Zelda: Tears of the Kingdom are in Hebra Headspring Cave. This is north east of Rospro Pass Skyview Tower, south east of Talonto Peak, east of Corvash Peak and west of Kopeeki Drifts.
We've marked its exact location on the map below for you, and the Hebra Headspring Cave coordinates are (-2899, 2504, 0329.)


When you get to the entrance of the cave you need to be really careful to not fall into the water. Even if you've boosted Link's cold resistance, being in the water for a few seconds will rapidly take away your hearts.

Carefully make your way into the cave using the stone paths either side of the stream in the middle of the entrance. You will then come across a large room in the cave that looks like this:

Head to your left to where the Brightbloom Plants are and then turn so you are facing the first of the structures in the middle of the water.

We recommend taking a Sticky Elixir here to help you with this next part. There are usually a few Sticky Lizards hanging out on the ceiling above you if you need some ingredients. It is possible to do this without the elixir, but having that extra bit of grip just makes things easier.
Make your way onto the first pillar here. Try to jump and aim for the top part of the pillar in the water as you can grip onto the bit not covered with ice a lot easier.

From this first pillar, hop across to the second taller one in the middle of the water. From here, you should see two Ice Keese and an opening in the cave wall opposite you. If you're finding it hard to locate the opening, make sure you're looking north, north east.

Now, there are two ways you can easily get across to the opening:
Option One
Take out the Ice Keese so they won't bother you, then stand on the edge of the pillar and face the opening. Make sure your Sticky Elixir is still working and then activate Tulin's sage ability.
When ready, jump and open your Paraglider. Quickly use Tulin's ability to boost yourself across and land in the opening. You may only be able to grab the wall a bit below the opening. If this happens, it's fine, you can climb into the opening instead.
Option Two
If you don't have Tulin yet, then this option is for you but we still recommend using a Sticky Elixir if you have one. Defeat the Ice Keese and they will crash into the water below and create small ice platforms that flow to one side of the cave.

Glide down and carefully land on one of these, then use Rewind to send it back to where it began. You may need to ice an Ice Fruit or two here to get to the wall beneath the targeted opening.

Once you get to the wall, climb up it and into the opening.
However you manage to get into the opening, you should see a chest. The Frostbite Trousers are in this chest.
Zelda Tears of the Kingdom Frostbite Armor explained
The Frostbite Armor set in Zelda: Tears of the Kingdom creates frost in any cold area of Hyrule, which essentially means that Link gets Cold Weather Attack for wearing one piece of the set and the attack is boosted each time you wear another piece from the Frostbite collection.
This set does not give you any Cold Resistance, so be warned if you want to wear it and venture into extremely cold environments. If you want to do this, we recommend taking a few cold-resistance meals with you.
The Frostbite Armor, like many other Armor sets you can find across Hyrule, can be upgraded at a Great Fairy Fountain for a price.
Here's a list of each upgrade for the Frostbite Armor and how much it will cost:
| Armor Piece | Upgrade One | Upgrade Two | Upgrade Three | Upgrade Four |
|---|---|---|---|---|
| Frostbite Shirt |
|
|
|
|
| Frostbite Headdress |
|
|
|
|
| Frostbite Trousers |
|
|
|
|

If you want more pieces to add to your collection, we have guides that show you how to get the Yiga Armor to improve your stealth, Zora Armor to help you swim up waterfalls, and Phantom Armor to boost your attack.
The above is the detailed content of How to get Frostbite Armor in Zelda Tears of the Kingdom. For more information, please follow other related articles on the PHP Chinese website!

Hot AI Tools

Undress AI Tool
Undress images for free

Undresser.AI Undress
AI-powered app for creating realistic nude photos

AI Clothes Remover
Online AI tool for removing clothes from photos.

Clothoff.io
AI clothes remover

Video Face Swap
Swap faces in any video effortlessly with our completely free AI face swap tool!

Hot Article
Hot Tools

Notepad++7.3.1
Easy-to-use and free code editor

SublimeText3 Chinese version
Chinese version, very easy to use

Zend Studio 13.0.1
Powerful PHP integrated development environment

Dreamweaver CS6
Visual web development tools

SublimeText3 Mac version
God-level code editing software (SublimeText3)
Hot Topics


 Dune: Awakening - Where To Get Insulated Fabric
Jun 12, 2025 am 11:19 AM
Dune: Awakening - Where To Get Insulated Fabric
Jun 12, 2025 am 11:19 AM
As you journey through Dune: Awakening, you'll quickly realize that there's a vast array of resources you'll need to locate and gather in large quantities. While some are relatively easy to come by, others are more elusive and found only in specific

 Lies of P Lumacchio Boss Fight Guide (Overture DLC)
Jun 11, 2025 am 10:13 AM
Lies of P Lumacchio Boss Fight Guide (Overture DLC)
Jun 11, 2025 am 10:13 AM
Written by Andrew HammelBrowse all Lies of P Lumacchio is one of the final major bosses in the Overture DLC. He constantly talks about hating violence... only to try and kill you with it. The good news? He's highly vulnerable to fire, backstabs, and
 Date Everything: Dirk And Harper Relationship Guide
Jun 18, 2025 am 01:16 AM
Date Everything: Dirk And Harper Relationship Guide
Jun 18, 2025 am 01:16 AM
You can date everything in Date Everything, just as the game promises. There are some boundaries, yes, but likely fewer than you'd expect. The floor beneath your feet, the food in your fridge, even your own shadow—each is open to love and affection,
 Dune: Awakening - Advanced Planetologist Quest Walkthrough
Jun 18, 2025 pm 06:04 PM
Dune: Awakening - Advanced Planetologist Quest Walkthrough
Jun 18, 2025 pm 06:04 PM
There are five distinct skill classes in Dune: Awakening, but initially, only four are available. The fifth, the Planetologist, requires you to locate a trainer somewhere out in the desert.Completing his initial quest will grant access to basic Plane
 All Mario Kart World Dash Food locations
Jun 12, 2025 am 11:20 AM
All Mario Kart World Dash Food locations
Jun 12, 2025 am 11:20 AM
Mario Kart World has implemented one particular mechanic that I found unexpectedly intriguing – the Dash Food system. These are snacks, thoughtfully prepared and generously handed out by Yoshis throughout the map, which you can eat while racing or ex
 Oguri Cap Build Guide | A Pretty Derby Musume
Jun 30, 2025 am 09:05 AM
Oguri Cap Build Guide | A Pretty Derby Musume
Jun 30, 2025 am 09:05 AM
Written by Priya KapoorBrowse All Uma Musume: Pretty Derby Oguri Cap is a long-distance runner with strong stamina scaling and solid speed growth. She’s dependable in various race formats if you develop her according to her strengths and carefully pl
 PEAK How to Emote
Jun 24, 2025 am 09:33 AM
PEAK How to Emote
Jun 24, 2025 am 09:33 AM
Written by Jason B.Browse All PEAK Guides Emotes in the game PEAK are straightforward and only require a single button input to activate during gameplay.How to EmoteActivate an emote – RSimply press R at any point during a run, and your character wil
