


1. Log in to the official website: http://httpd.apache.org/download.cgi
2. As shown below


3. Download the installation package and extract it to the specified directory. You can specify the directory (E:\web\Apache24) according to your own requirements. The web folder can be named according to your own needs.
4. Go to the E:\web\Apache24/conf folder and open the httpd.conf file, as shown below:

Change to the Apache file Unzip the installation path (E:\web\Apache24).
5. Open the command line and enter netstat -a in the command line to check whether port 80 is occupied. If it is occupied, open the httpd.conf file and find the following picture:

Change port 80 to a port that is not occupied (for example: 8088) and save it.
5 Enter the E:/web/Apache24/bin directory through the command line, and then execute the httpd -k install command to install

and then install it on the command line Enter httpd - k start command to start the service

6 Enter loaclhost:8088 in the browser and press Enter. As shown in the figure
7 below, stop the service and enter httpd -k stop in the command line

For more Apache related knowledge, please visitApache usage Tutorial column!
The above is the detailed content of How to download and install apache. For more information, please follow other related articles on the PHP Chinese website!

Hot AI Tools

Undress AI Tool
Undress images for free

Undresser.AI Undress
AI-powered app for creating realistic nude photos

AI Clothes Remover
Online AI tool for removing clothes from photos.

Clothoff.io
AI clothes remover

Video Face Swap
Swap faces in any video effortlessly with our completely free AI face swap tool!

Hot Article
Hot Tools

Notepad++7.3.1
Easy-to-use and free code editor

SublimeText3 Chinese version
Chinese version, very easy to use

Zend Studio 13.0.1
Powerful PHP integrated development environment

Dreamweaver CS6
Visual web development tools

SublimeText3 Mac version
God-level code editing software (SublimeText3)
Hot Topics


 Hadoop pseudo-distributed cluster construction
May 07, 2025 pm 04:45 PM
Hadoop pseudo-distributed cluster construction
May 07, 2025 pm 04:45 PM
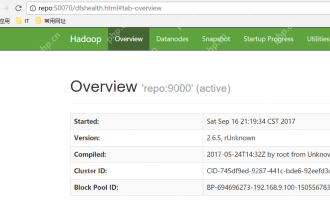
Software preparation I am using a virtual machine with CentOS-6.6, with the host name repo. Refer to the steps to install a Linux virtual machine in Windows, I installed JDK in that virtual machine, refer to the guide to installing JDK in Linux. In addition, the virtual machine is configured with a key-free login itself, and the settings for configuring key-free login between each virtual machine are referenced. The download address of Hadoop installation package is: https://mirrors.aliyun.com/apache/hadoop/common/. I am using hadoop 2.6.5 version. Upload the Hadoop installation package to the server and unzip [root@repo~]#tarzxv
 NGINX vs. Apache: Performance, Scalability, and Efficiency
Apr 19, 2025 am 12:05 AM
NGINX vs. Apache: Performance, Scalability, and Efficiency
Apr 19, 2025 am 12:05 AM
NGINX and Apache are both powerful web servers, each with unique advantages and disadvantages in terms of performance, scalability and efficiency. 1) NGINX performs well when handling static content and reverse proxying, suitable for high concurrency scenarios. 2) Apache performs better when processing dynamic content and is suitable for projects that require rich module support. The selection of a server should be decided based on project requirements and scenarios.
 NGINX vs. Apache: A Comparative Analysis of Web Servers
Apr 21, 2025 am 12:08 AM
NGINX vs. Apache: A Comparative Analysis of Web Servers
Apr 21, 2025 am 12:08 AM
NGINX is more suitable for handling high concurrent connections, while Apache is more suitable for scenarios where complex configurations and module extensions are required. 1.NGINX is known for its high performance and low resource consumption, and is suitable for high concurrency. 2.Apache is known for its stability and rich module extensions, which are suitable for complex configuration needs.
 NGINX and Apache: Understanding the Key Differences
Apr 26, 2025 am 12:01 AM
NGINX and Apache: Understanding the Key Differences
Apr 26, 2025 am 12:01 AM
NGINX and Apache each have their own advantages and disadvantages, and the choice should be based on specific needs. 1.NGINX is suitable for high concurrency scenarios because of its asynchronous non-blocking architecture. 2. Apache is suitable for low-concurrency scenarios that require complex configurations, because of its modular design.
 Detailed steps to deploy a Joomla website on PhpStudy
May 16, 2025 pm 08:00 PM
Detailed steps to deploy a Joomla website on PhpStudy
May 16, 2025 pm 08:00 PM
The steps to deploy a Joomla website on PhpStudy include: 1) Configure PhpStudy, ensure that Apache and MySQL services run and check PHP version compatibility; 2) Download and decompress PhpStudy's website from the official Joomla website, and then complete the installation through the browser according to the installation wizard; 3) Make basic configurations, such as setting the website name and adding content.
 How to execute php code after writing php code? Several common ways to execute php code
May 23, 2025 pm 08:33 PM
How to execute php code after writing php code? Several common ways to execute php code
May 23, 2025 pm 08:33 PM
PHP code can be executed in many ways: 1. Use the command line to directly enter the "php file name" to execute the script; 2. Put the file into the document root directory and access it through the browser through the web server; 3. Run it in the IDE and use the built-in debugging tool; 4. Use the online PHP sandbox or code execution platform for testing.
 How to update Debian Tomcat
May 28, 2025 pm 04:54 PM
How to update Debian Tomcat
May 28, 2025 pm 04:54 PM
Updating the Tomcat version in the Debian system generally includes the following process: Before performing the update operation, be sure to do a complete backup of the existing Tomcat environment. This covers the /opt/tomcat folder and its related configuration documents, such as server.xml, context.xml, and web.xml. The backup task can be completed through the following command: sudocp-r/opt/tomcat/opt/tomcat_backup Get the new version Tomcat Go to ApacheTomcat's official website to download the latest version. According to your Debian system
 Troubleshooting of system performance not recovered after uninstalling Apache service
May 16, 2025 pm 10:09 PM
Troubleshooting of system performance not recovered after uninstalling Apache service
May 16, 2025 pm 10:09 PM
Reasons for system performance not recovered after uninstalling the Apache service may include resource occupancy by other services, error messages in log files, resource consumption by abnormal processes, network connection problems, and file system residues. First, check whether there are other services or processes before uninstalling with Apache; second, pay attention to the operating system's log files and find error messages that may occur during the uninstallation process; second, check the system's memory usage and CPU load, and find out abnormal processes; then, use the netstat or ss command to view the network connection status to ensure that no ports are occupied by other services; finally, clean up the remaining configuration files and log files after uninstallation to avoid occupying disk space.
