


This comprehensive guide explains how to effectively manage your Outlook email storage by archiving emails, tasks, and other items across various Outlook versions (365, 2021, 2019, 2016, 2013, and earlier). Learn to configure automatic archiving, perform manual archiving, and troubleshoot common issues.
Maintaining a streamlined Outlook inbox is crucial for efficiency. Archiving older items reduces mailbox size and improves performance. This tutorial covers both automated and manual archiving methods.
- Automating Email Archiving
- Manual Archiving (Individual or All Folders)
- Locating Archived Files
- Advanced Archiving Techniques
- Relocating Archived Files
- Auto-Deleting from Deleted Items and Junk
- Archiving by Received Date
- Troubleshooting Archiving Problems
What is Outlook Archiving?
Outlook archiving (and AutoArchive) transfers older emails, tasks, and calendar entries to a separate archive folder on your hard drive. This process moves items from your primary .pst file to a dedicated archive.pst file, accessible within Outlook. This frees up space on your C:\ drive (unless you specify a different location).
Archiving offers two key functions:
- Moving items: Transfers items to the archive folder.
- Permanent deletion: Deletes items after a specified time.
Key Facts About Outlook Archiving
To avoid common archiving questions, remember these points:
- Outlook primarily uses .pst files (Outlook Data Files) to store emails, contacts, appointments, tasks, and notes. Only .pst files can be archived. Archived items reside in the Outlook Archive folder and are no longer in their original location.
- Archiving differs from exporting. Exporting creates a copy; archiving moves or deletes the original.
- Archived files are not backups. Create separate backups of your archive.pst file for data security.
- Contacts are not auto-archived. Manual archiving is required for contacts.
- Exchange accounts with online archives disable Outlook's built-in archiving.
Tip: Merge duplicate contacts before archiving.
Automating Email Archiving in Outlook
Outlook's AutoArchive feature automatically moves or deletes old items at set intervals. The steps vary slightly depending on your Outlook version.
Auto-Archiving in Outlook 365 - 2010
AutoArchive isn't enabled by default in Outlook 2010 and later. You might receive prompts to enable it. Click "Yes" to proceed immediately, or "AutoArchive Settings…" to customize options. Alternatively, manually configure it:
- Open Outlook, then navigate to File > Options > Advanced > AutoArchive Settings…
- Check "Run AutoArchive every N days" to activate. Configure other settings and click OK.
The following image shows default settings; detailed explanations for each option are available elsewhere. The archive progress displays in the status bar. The "Archives" folder appears automatically if "Show archive folder in the folder list" is selected. See instructions on displaying the archive folder if needed.

Auto-Archiving in Outlook 2007
Outlook 2007 auto-archives Calendar, Tasks, and Journal items (older than 6 months), along with Sent Items and Deleted Items (older than 2 months) by default. Enable it for other folders:
- Open Outlook and click Tools > Options.
- Go to the Other tab and click AutoArchive….
Configure the settings as described below.
Understanding Outlook AutoArchive Settings
(Outlook 2010 and later: File > Options > Advanced > AutoArchive Settings…)
- Run AutoArchive every N days: Sets the frequency. Frequent archiving of large volumes of data may impact performance.
- Prompt before AutoArchive runs: Provides a confirmation prompt before archiving.
- Delete expired items (e-mail folders only): Deletes messages with individual expiration dates (set in Options > Tracking > Expires after). This is often checked by default, so uncheck if necessary.
- Archive or delete old items: Allows custom AutoArchive settings (unchecked uses defaults).
- Show archive folder in folder list: Displays the "Archives" folder in the Navigation Pane.
- Clean out items older than: Sets the age threshold for archiving.
- Move old items to: Moves items to the archive.pst file. Click Browse to change the location.
- Permanently delete items: Deletes items without archiving.
- Apply these settings to all folders now: Applies settings to all folders.
Default Aging Periods
Default aging periods (changeable per folder):
- Inbox, Drafts, Calendar, Tasks, Notes, Journal: 6 months
- Outbox: 3 months
- Sent Items, Deleted Items: 2 months
- Contacts: Not auto-archived
Excluding Folders or Applying Different Settings
To exclude a folder or customize its settings:
- Right-click the folder and select Properties….
- Choose either "Do not archive items in this folder" or "Archive this folder using these settings" and configure accordingly.
Creating the Archive Folder
If "Show archive folder in folder list" is selected, the "Archives" folder appears automatically. Otherwise:
- Click File > Open & Export > Open Outlook Data File.
- Select the archive.pst file and click OK.
Manual Archiving in Outlook
For more control, manually archive items:
- In Outlook 2016, go to the File tab, and click Tools > Clean up old items. In Outlook 2010 and 2013, click File > Cleanup Tool > Archive…
- Select the folder(s) to archive and set the age threshold. Click Browse to change the archive file location. Check "Include items with 'Do not AutoArchive' checked" to include excluded items.
Location of Outlook Archive Files
The archive.pst file is created automatically during the first auto-archive or manual archive. The location depends on your operating system (unless changed during setup).
Outlook 365 - 2010
-
Vista, Windows 7, 8, 10: C:\Users\
\Documents\Outlook Files\archive.pst -
Windows XP: C:\Documents and Settings\
\Local Settings\Application Data\Microsoft\Outlook\archive.pst
Outlook 2007 and earlier
-
Vista and Windows 7: C:\Users\
\AppData\Local\Microsoft\Outlook\archive.pst -
Windows XP: C:\Documents and Settings\
\Local Settings\Application Data\Microsoft\Outlook\archive.pst
(Note: Application Data and AppData are hidden folders.)
Advanced Archiving Techniques
Changing the Archive File Location
To move an existing archive:
- Close the Archive folder in Outlook.
- Move the archive.pst file to the new location.
- Reconnect the moved file in Outlook (File > Open > Outlook Data File…).
- Update your AutoArchive settings to point to the new location.
Auto-Deleting from Deleted Items and Junk Email
Configure AutoArchive to delete old items from Deleted Items and Junk Email folders by setting the "Permanently delete items" option for these folders.
Archiving by Received Date
To archive based on received date (instead of modified date), modify the registry (use caution!). This requires specific hotfixes for Outlook 2007 and 2010. Create the registry value ArchiveIgnoreLastModifiedTime with a value of 1 under HKEY_CURRENT_USER\Software\Microsoft\Office\<office version>\Outlook\Preferences</office>. Restart Outlook.
Troubleshooting Archiving Problems
Archiving Options Unavailable
This usually indicates an Exchange Server mailbox or organizational mail retention policies. Check with your administrator.
AutoArchive Not Running
Ensure "Run AutoArchive every N days" is checked in AutoArchive settings.
Specific Item Not Archived
Check if the item's modified date is recent or if "Do Not AutoArchive this item" is selected.
Missing Archive Folder
Verify that "Show archive folder in folder list" is selected. Open the Outlook Data File manually if necessary.
Damaged Archive.pst File
Use the Inbox Repair Tool (scanpst.exe) to repair the archive.pst file. If unsuccessful, create a new archive.
Maximum Size Reached
Clean up the archive.pst or main .pst file if it's full. The default limit is 20GB (Outlook 2007) or 50GB (later versions).
This guide provides a thorough understanding of Outlook archiving, empowering you to optimize your email management.
The above is the detailed content of How to archive in Outlook automatically or manually. For more information, please follow other related articles on the PHP Chinese website!

Hot AI Tools

Undress AI Tool
Undress images for free

Undresser.AI Undress
AI-powered app for creating realistic nude photos

AI Clothes Remover
Online AI tool for removing clothes from photos.

Clothoff.io
AI clothes remover

Video Face Swap
Swap faces in any video effortlessly with our completely free AI face swap tool!

Hot Article
Hot Tools

Notepad++7.3.1
Easy-to-use and free code editor

SublimeText3 Chinese version
Chinese version, very easy to use

Zend Studio 13.0.1
Powerful PHP integrated development environment

Dreamweaver CS6
Visual web development tools

SublimeText3 Mac version
God-level code editing software (SublimeText3)
Hot Topics


 How to Use Parentheses, Square Brackets, and Curly Braces in Microsoft Excel
Jun 19, 2025 am 03:03 AM
How to Use Parentheses, Square Brackets, and Curly Braces in Microsoft Excel
Jun 19, 2025 am 03:03 AM
Quick Links Parentheses: Controlling the Order of Opera
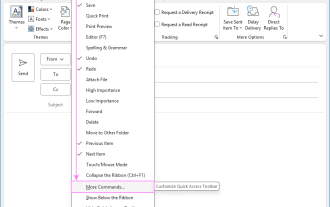 Outlook Quick Access Toolbar: customize, move, hide and show
Jun 18, 2025 am 11:01 AM
Outlook Quick Access Toolbar: customize, move, hide and show
Jun 18, 2025 am 11:01 AM
This guide will walk you through how to customize, move, hide, and show the Quick Access Toolbar, helping you shape your Outlook workspace to fit your daily routine and preferences. The Quick Access Toolbar in Microsoft Outlook is a usefu
 Prove Your Real-World Microsoft Excel Skills With the How-To Geek Test (Intermediate)
Jun 14, 2025 am 03:02 AM
Prove Your Real-World Microsoft Excel Skills With the How-To Geek Test (Intermediate)
Jun 14, 2025 am 03:02 AM
Whether you've secured a data-focused job promotion or recently picked up some new Microsoft Excel techniques, challenge yourself with the How-To Geek Intermediate Excel Test to evaluate your proficiency!This is the second in a three-part series. The
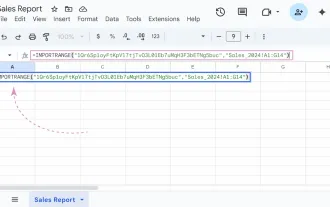 Google Sheets IMPORTRANGE: The Complete Guide
Jun 18, 2025 am 09:54 AM
Google Sheets IMPORTRANGE: The Complete Guide
Jun 18, 2025 am 09:54 AM
Ever played the "just one quick copy-paste" game with Google Sheets... and lost an hour of your life? What starts as a simple data transfer quickly snowballs into a nightmare when working with dynamic information. Those "quick fixes&qu
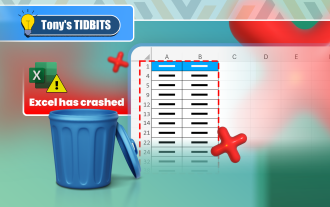 How to Delete Rows from a Filtered Range Without Crashing Excel
Jun 14, 2025 am 12:53 AM
How to Delete Rows from a Filtered Range Without Crashing Excel
Jun 14, 2025 am 12:53 AM
Quick LinksWhy Deleting Filtered Rows Crashes ExcelSort the Data First to Prevent Excel From CrashingRemoving rows from a large filtered range in Microsoft Excel can be time-consuming, cause the program to temporarily become unresponsive, or even lea
 6 Cool Right-Click Tricks in Microsoft Excel
Jun 24, 2025 am 12:55 AM
6 Cool Right-Click Tricks in Microsoft Excel
Jun 24, 2025 am 12:55 AM
Quick Links Copy, Move, and Link Cell Elements
 Don't Ignore the Power of F9 in Microsoft Excel
Jun 21, 2025 am 06:23 AM
Don't Ignore the Power of F9 in Microsoft Excel
Jun 21, 2025 am 06:23 AM
Quick LinksRecalculating Formulas in Manual Calculation ModeDebugging Complex FormulasMinimizing the Excel WindowMicrosoft Excel has so many keyboard shortcuts that it can sometimes be difficult to remember the most useful. One of the most overlooked
 Prove Your Real-World Microsoft Excel Skills With the How-To Geek Test (Advanced)
Jun 17, 2025 pm 02:44 PM
Prove Your Real-World Microsoft Excel Skills With the How-To Geek Test (Advanced)
Jun 17, 2025 pm 02:44 PM
Whether you've recently taken a Microsoft Excel course or you want to verify that your knowledge of the program is current, try out the How-To Geek Advanced Excel Test and find out how well you do!This is the third in a three-part series. The first i
