


This guide will walk you through how to customize, move, hide, and show the Quick Access Toolbar, helping you shape your Outlook workspace to fit your daily routine and preferences.
The Quick Access Toolbar in Microsoft Outlook is a useful feature that keeps your favorite commands right at your fingertips. If you often find yourself digging through menus to reach the same tools, this toolbar can save you time. You control what appears on it, where it's located, and whether it's shown at all, so your most-used tools are always easy to reach.
Outlook Quick Access Toolbar
The Quick Access Toolbar (QAT) in Outlook is a small, customizable set of icons that gives you quick access to your most-used commands such as Send/Receive. It stays visible regardless of the ribbon tab you're in. You can position the QAT above or below the ribbon, or hide it if you prefer a cleaner view.
You can think of the Quick Access Toolbar as your personal shortcut bar in Outlook, which is especially useful for repetitive tasks and options you reach for frequently.
Outlook provided a different QAT for different windows:
- The main Outlook window has its own Quick Access Toolbar.
- Item windows like emails, calendar events, or meeting requests have separate QATs, which can be customized individually. This makes it easy to tailor your commands based on the type of item you're working with.
Note. The Quick Access Toolbar is only available in classic desktop application including Outlook 365, 2024, 2021, 2019, 2016, and lower. It's not available in the new Outlook or web app.
Outlook Quick Access Toolbar location
In the classic desktop version of Outlook 365 through 2010, the Quick Access Toolbar can appear in two places:
Above the ribbon. This is the default position, where the toolbar appears in the upper-left corner of the Outlook window. In this location, only the command icons are shown and no labels.

Below the ribbon. If you prefer your shortcuts closer to the ribbon commands, you can move the QAT just beneath it. In this view, both icons and text labels are displayed, making it easier to identify each command at a glance.

You can switch between these two locations at any time.
Where is Quick Access Toolbar in the new Outlook?
In the new Outlook for Windows, the Quick Access Toolbar is not available, regardless of whether you're using the simplified ribbon or the classic ribbon layout.
This design shift is part of Microsoft's effort to create a more consistent experience across Outlook for web, desktop, and mobile.
Tip. If the Quick Access Toolbar is an important part of your workflow, you can continue using classic Outlook alongside the new version. Learn how to run old and new Outlook apps side by side to explore the new interface without giving up features you depend on.
How to customize Quick Access Toolbar in Outlook
Most customizations are made through the Customize Quick Access Toolbar window, found within the Outlook Options dialog box. You can access it in several ways, but first make sure you're in the right Outlook window, since QAT settings apply separately to different windows.
Before you begin: Choose your target window
- To customize the QAT in the main Outlook window (Mail view), stay in that window.
- To modify the QAT for a message, meeting, appointment, or task window, open a new item of that type (e.g. create a new email or calendar event).
Once you're in the right window, open the QAT settings using one of these methods:
- Go to File > Options > Quick Access Toolbar.
- Right-click anywhere on the QAT and choose Customize Quick Access Toolbar… from the context menu.

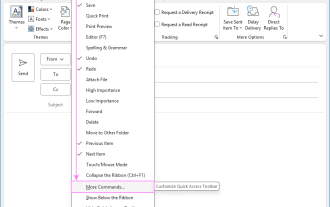
- Click the down arrow at the far right of the QAT and select More Commands from the dropdown list.


No matter which path you take, the Customize Quick Access Toolbar window will open. From there, you can add new commands, remove ones you no longer need, and rearrange their order to suit your workflow.
Next, we'll walk through how to use this window to make each type of customization step-by-step.
How to add button to Outlook Quick Access Toolbar
To keep your favorite Outlook commands just a click away, you can add their buttons to the Quick Access Toolbar. Here's how to do it:
- Depending on where you want to add a QAT button, open the main Outlook window or a specific item window such as email, meeting, or appointment.
- Click the Customize Quick Access Toolbar button – the down arrow on the right side of the Quick Access Toolbar.
- Select a command from the built-in list, for example Quick Print, Forward, Delete, Undo, Redo, etc.
- If the command you want isn't listed, click More Commands. This opens the Outlook Options window for more customization options.
- In the Outlook Options window, do this:
- Use the Choose commands from dropdown to browse options like Popular Commands, Commands Not in the Ribbon, Macros, or All Commands.
- Select the command in the left-hand box and click Add to move it to the QAT.
- The command will now appear in the box on the right.
- If you are adding a macro, select it in the right-hand box and click Modify… to choose a different icon and enter a custom label for the macro button. Please keep in mind that you can only modify the appearance of macros. Built-in Outlook commands have fixed icons and labels – the Modify button will be inactive when one of these is selected.
- Click OK to save the changes.


Done. The new button will appear on the Outlook Quick Access Toolbar.
Note. You can only add commands and macros. Individual list items and styles, which appear on the ribbon, cannot be added to the Quick Access Toolbar.
Tip. To quickly add any ribbon command to the Quick Access Toolbar, just right-click the button on the Outlook ribbon and select Add to Quick Access Toolbar.

How to remove a command from Outlook Quick Access Toolbar
The quickest way to remove a command from the Quick Access Toolbar is this:
- Right-click the command's icon directly on the QAT.
- Choose Remove from Quick Access Toolbar from the pop-up menu.

Alternatively, you can remove commands through the Quick Access Toolbar customization window:
- In the right-hand list, find and select the command you no longer need.
- Click Remove.
- Click OK to save your changes.

Change the order of commands in Quick Access Toolbar
If the current command order doesn't quite match how you work, you can quickly rearrange it to better fit your preferences:
- Open the Quick Access Toolbar customization window.
- In the right-hand list that shows the current commands, select the one you want to move.
- Use the Move Up or Move Down buttons to change its position in the list.
- Click OK to save the new order.

Tip. If your QAT has many commands, consider organizing them into visual groups. You can insert a
Note. The QAT appears as a single row of icons; it can't span multiple lines.
How to move Quick Access Toolbar in Outlook
By default, the Quick Access Toolbar appears at the top of the Outlook window, just above the ribbon. However, you can easily reposition it based on your preference.
To move the QAT below the ribbon
If you prefer your shortcuts closer to the ribbon, you can move the toolbar below it:
- Right-click anywhere on the QAT, or click the down arrow at the far-right end of it.
- From the drop-down menu, select Show Below the Ribbon.

To move QAT above the ribbon
Want to return it to the original position? Do this:
- Right-click anywhere on the QAT or click the down arrow.
- Choose Show Above the Ribbon from the menu.

That's it – your Quick Access Toolbar will instantly move to the new position. Choose the one that feels most comfortable for your workflow.
How to hide and show Quick Access Toolbar in Outlook
If you'd like a cleaner interface or simply don't use the QAT commands, you can hide it in just a couple of clicks.
Hide Quick Access Toolbar in Outlook
To remove the QAT for a certain Outlook window, do this:
- Right-click the Quick Access Toolbar or click the down arrow at the far right of it.
- In the menu that appears, click Hide Quick Access Toolbar.
The toolbar will disappear from your Outlook window.

Show Quick Access Toolbar in Outlook
To restore the Outlook QAT, this is what you need to do:
- Right-click anywhere in the ribbon.
- In the pop-up menu, select Show Quick Access Toolbar.

This lets you tidy up your Outlook workspace without deleting anything – the Quick Access Toolbar will come back with all your custom buttons just as before.
Note. The Quick Access Toolbar in Outlook is window-specific. Hiding or showing it affects only the currently active window type such as main, message, task, contact, etc. It doesn't apply across all Outlook windows at once.
Reset Outlook Quick Access Toolbar to default settings
If you want to remove all your customizations and return the Quick Access Toolbar to its original state, you can reset it by performing these steps:
- Open the Outlook window you want to reset, as each has its own QAT.
- Click the down arrow on the QAT and select More Commands.
- At the bottom of the window, click the Reset button and choose Reset only Quick Access Toolbar from the drop-down menu.
This will remove all added commands and restore the default QAT for the currently selected Outlook window.

Outlook Quick Access Toolbar greyed out
If some or all icons on your Quick Access Toolbar appear grayed out in Outlook, here are the most common reasons and what you can do:

-
The commands aren't currently applicable. Certain buttons will be inactive (grayed out) when they don't apply to the current context. For example:
- Undo may be grayed out if you haven't made any changes yet.
- Save All Attachments might be inactive if the open email has no attachments.
In these cases, you don't need to take any action – those commands will automatically become active when they're relevant.
- There may be an issue with your Outlook installation. If all QAT commands are grayed out across all windows or stay inactive even when they should be available, it could be a sign of a larger issue. Try checking for updates, restarting Outlook, or running a repair for your Microsoft Office installation.
Outlook Quick Access Toolbar missing
If the Quick Access Toolbar isn't showing in Outlook, there are usually two main reasons:
- It was previously hidden. The QAT might have been turned off for a specific Outlook window. You can easily show it again, see how to restore it.
- You're using the new Outlook app. The QAT isn't available in the new Outlook or the web version. It only exists in classic desktop Outlook.
Tip. If you're unsure which version you're using, look for the Try the new Outlook toggle in the upper-right corner – this can help you confirm whether the QAT should be available in your Outlook app.
With just a bit of setup, the Quick Access Toolbar can become your personal control panel in Outlook – ready with the tools you use most, exactly where you want them. It's a simple way to make Outlook feel more intuitive while keeping the commands you rely on within easy reach.
The above is the detailed content of Outlook Quick Access Toolbar: customize, move, hide and show. For more information, please follow other related articles on the PHP Chinese website!

Hot AI Tools

Undress AI Tool
Undress images for free

Undresser.AI Undress
AI-powered app for creating realistic nude photos

AI Clothes Remover
Online AI tool for removing clothes from photos.

Clothoff.io
AI clothes remover

Video Face Swap
Swap faces in any video effortlessly with our completely free AI face swap tool!

Hot Article
Hot Tools

Notepad++7.3.1
Easy-to-use and free code editor

SublimeText3 Chinese version
Chinese version, very easy to use

Zend Studio 13.0.1
Powerful PHP integrated development environment

Dreamweaver CS6
Visual web development tools

SublimeText3 Mac version
God-level code editing software (SublimeText3)
Hot Topics


 How to Use Parentheses, Square Brackets, and Curly Braces in Microsoft Excel
Jun 19, 2025 am 03:03 AM
How to Use Parentheses, Square Brackets, and Curly Braces in Microsoft Excel
Jun 19, 2025 am 03:03 AM
Quick Links Parentheses: Controlling the Order of Opera
 Outlook Quick Access Toolbar: customize, move, hide and show
Jun 18, 2025 am 11:01 AM
Outlook Quick Access Toolbar: customize, move, hide and show
Jun 18, 2025 am 11:01 AM
This guide will walk you through how to customize, move, hide, and show the Quick Access Toolbar, helping you shape your Outlook workspace to fit your daily routine and preferences. The Quick Access Toolbar in Microsoft Outlook is a usefu
 How to insert date picker in Outlook emails and templates
Jun 13, 2025 am 11:02 AM
How to insert date picker in Outlook emails and templates
Jun 13, 2025 am 11:02 AM
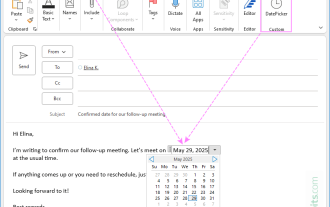
Want to insert dates quickly in Outlook? Whether you're composing a one-off email, meeting invite, or reusable template, this guide shows you how to add a clickable date picker that saves you time. Adding a calendar popup to Outlook email
 Prove Your Real-World Microsoft Excel Skills With the How-To Geek Test (Intermediate)
Jun 14, 2025 am 03:02 AM
Prove Your Real-World Microsoft Excel Skills With the How-To Geek Test (Intermediate)
Jun 14, 2025 am 03:02 AM
Whether you've secured a data-focused job promotion or recently picked up some new Microsoft Excel techniques, challenge yourself with the How-To Geek Intermediate Excel Test to evaluate your proficiency!This is the second in a three-part series. The
 How to Delete Rows from a Filtered Range Without Crashing Excel
Jun 14, 2025 am 12:53 AM
How to Delete Rows from a Filtered Range Without Crashing Excel
Jun 14, 2025 am 12:53 AM
Quick LinksWhy Deleting Filtered Rows Crashes ExcelSort the Data First to Prevent Excel From CrashingRemoving rows from a large filtered range in Microsoft Excel can be time-consuming, cause the program to temporarily become unresponsive, or even lea
 How to Switch to Dark Mode in Microsoft Excel
Jun 13, 2025 am 03:04 AM
How to Switch to Dark Mode in Microsoft Excel
Jun 13, 2025 am 03:04 AM
More and more users are enabling dark mode on their devices, particularly in apps like Excel that feature a lot of white elements. If your eyes are sensitive to bright screens, you spend long hours working in Excel, or you often work after dark, swit
 Microsoft Excel Essential Skills Test
Jun 12, 2025 pm 12:01 PM
Microsoft Excel Essential Skills Test
Jun 12, 2025 pm 12:01 PM
Whether you've landed a job interview for a role that requires basic Microsoft Excel skills or you're looking to solve a real-world problem, take the How-To Geek Beginner Excel Test to verify that you understand the fundamentals of this popular sprea
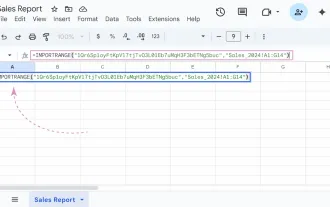 Google Sheets IMPORTRANGE: The Complete Guide
Jun 18, 2025 am 09:54 AM
Google Sheets IMPORTRANGE: The Complete Guide
Jun 18, 2025 am 09:54 AM
Ever played the "just one quick copy-paste" game with Google Sheets... and lost an hour of your life? What starts as a simple data transfer quickly snowballs into a nightmare when working with dynamic information. Those "quick fixes&qu
